Take The Quiz On This Post
Read the post, then take the quiz—test your knowledge and see what you’ve learned!
Introduction
Brick veneer facades are a staple in residential construction, offering home owners a combination of aesthetics, durability, thermal mass and cost-effectiveness. Unlike traditional solid brick construction, brick veneer involves a single layer of bricks that serves as a decorative outer shell, with a separate structural (often timber or steel) frame behind it.
This method not only enhances the visual appeal of a home but also helps with thermal insulation and moisture control, which are important for maintaining comfort and energy efficiency.
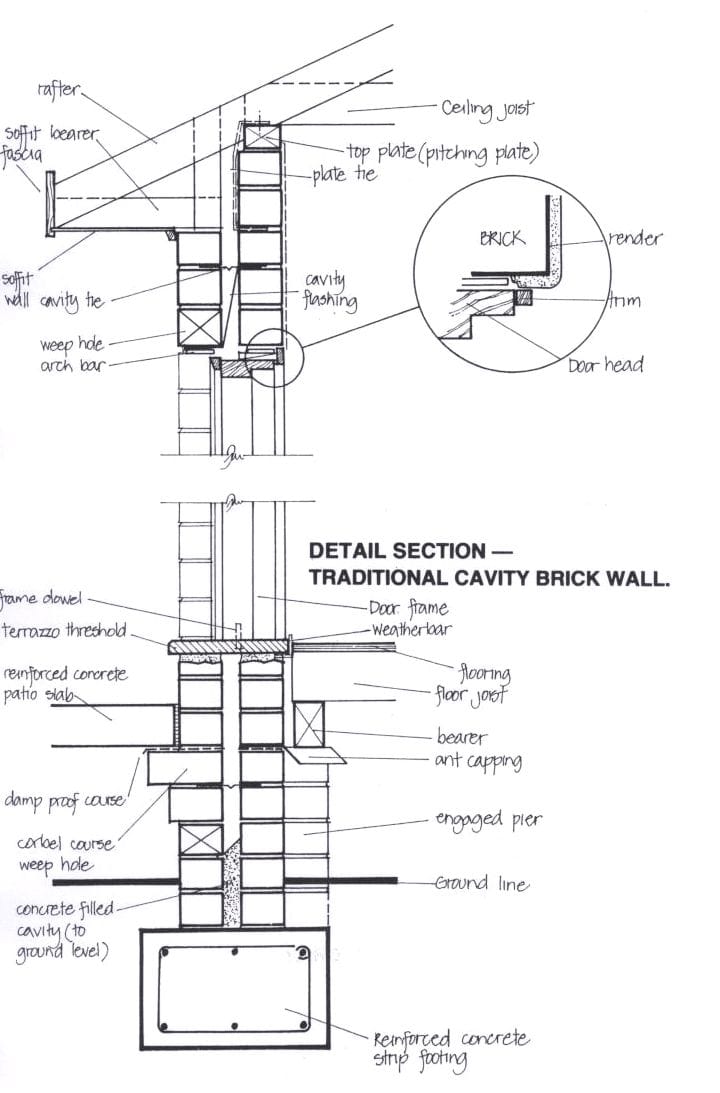
Understanding the components that make up a brick veneer wall façade is helpful. From the damp proof course that protects against moisture to the weepholes that ensure proper drainage (though ventilating the cavity), each element plays an important role in the overall performance and longevity of the wall system.
In this post, we will explore the key elements of brick veneer wall construction, discuss their benefits, and provide insights into best practices for installation and maintenance.

What is Brick Veneer Construction?
Brick veneer construction is a method commonly used in Australian residential house construction, where a single layer of bricks forms the exterior façade of a house. Unlike solid brick construction, where the bricks serve both as the structure and the exterior finish, brick veneer is purely decorative. The structural support is provided by an internal framework, usually made of timber or steel, which is separate from the outer brick layer.

Benefits of Brick Veneer
Thermal Insulation:
- One of the major advantages of brick veneer is its ability to improve the thermal performance of a house. The air gap between the brick veneer and the structural frame acts as a buffer, reducing heat transfer and helping to maintain a comfortable indoor temperature throughout the year.
Cost-Effectiveness:
- Brick veneer is generally more cost-effective than solid brick construction. It requires fewer materials and less labour, making it a more affordable option for home owners. Additionally, the construction process is faster, reducing overall building time and costs.
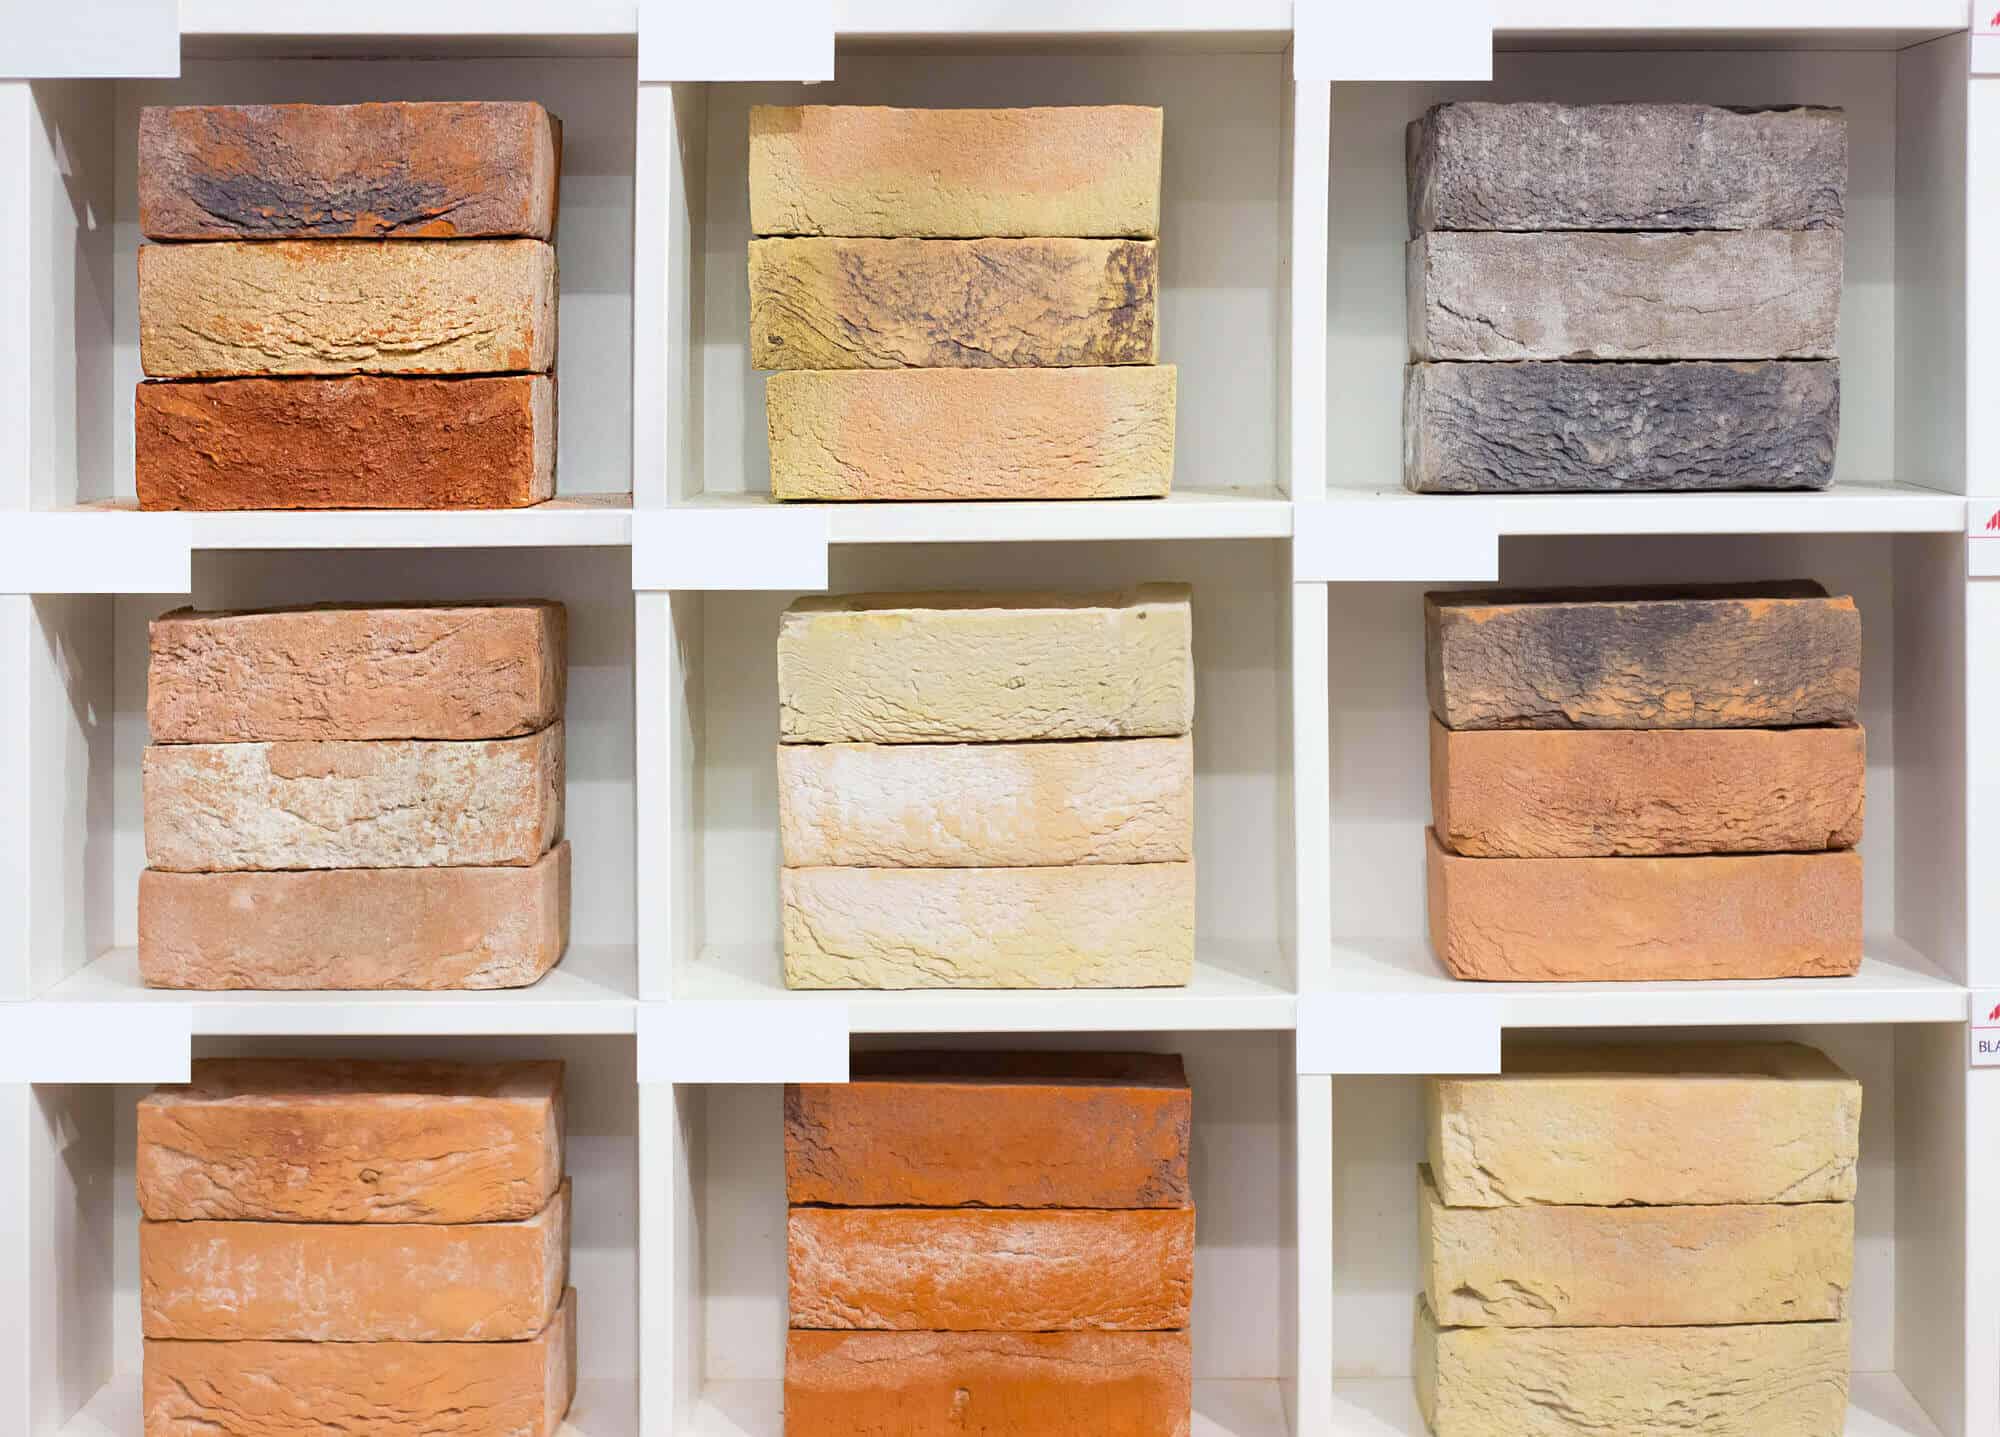
Aesthetic Appeal:
- Brick veneer allows for a wide range of design possibilities. Home owners can choose from various brick colours, textures, and finishes to achieve their desired look. This versatility makes brick veneer a popular choice for those looking to enhance the visual appeal of their homes. Read our article below on different types of masonry construction.
Moisture Control:
- The cavity between the brick veneer and the structural frame is designed to manage moisture effectively. This gap prevents water from penetrating the interior of the house, protecting the structural frame from potential damage due to rot or mould.
Common Applications in Australian Homes:
Brick veneer is widely used in residential construction due to its adaptability and performance. It is commonly found in both single and multi-story homes, providing a durable exterior that works well with various architectural styles.
Elements of Brick Veneer Wall Construction
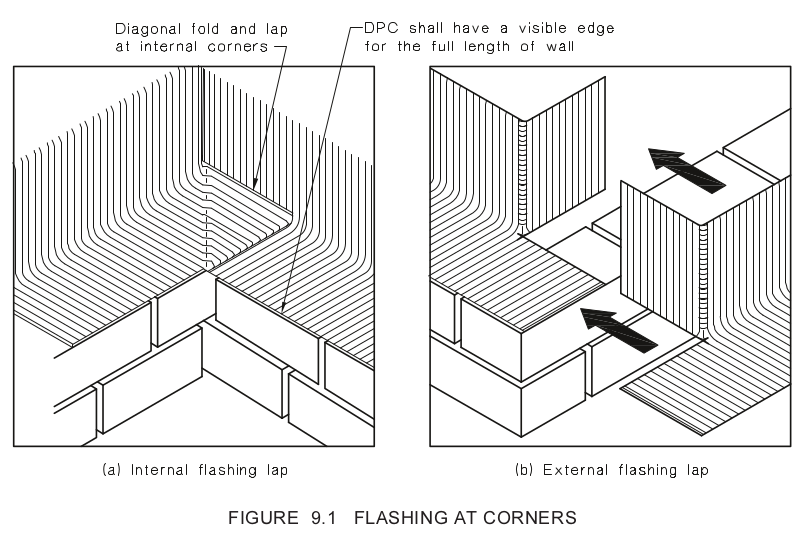
Damp Proof Course (DPC)
- Purpose: The Damp Proof Course (DPC) is an important element in brick veneer construction that prevents moisture from rising through the wall by capillary action. This horizontal barrier is typically made from a waterproof material and it is installed at the base of the brickwork.
- Materials Used: The DPC can be made from a variety of materials, including polyethylene sheeting, bituminous felt, or even slate in older constructions. The choice of material often depends on the specific requirements of the building site and local regulations.

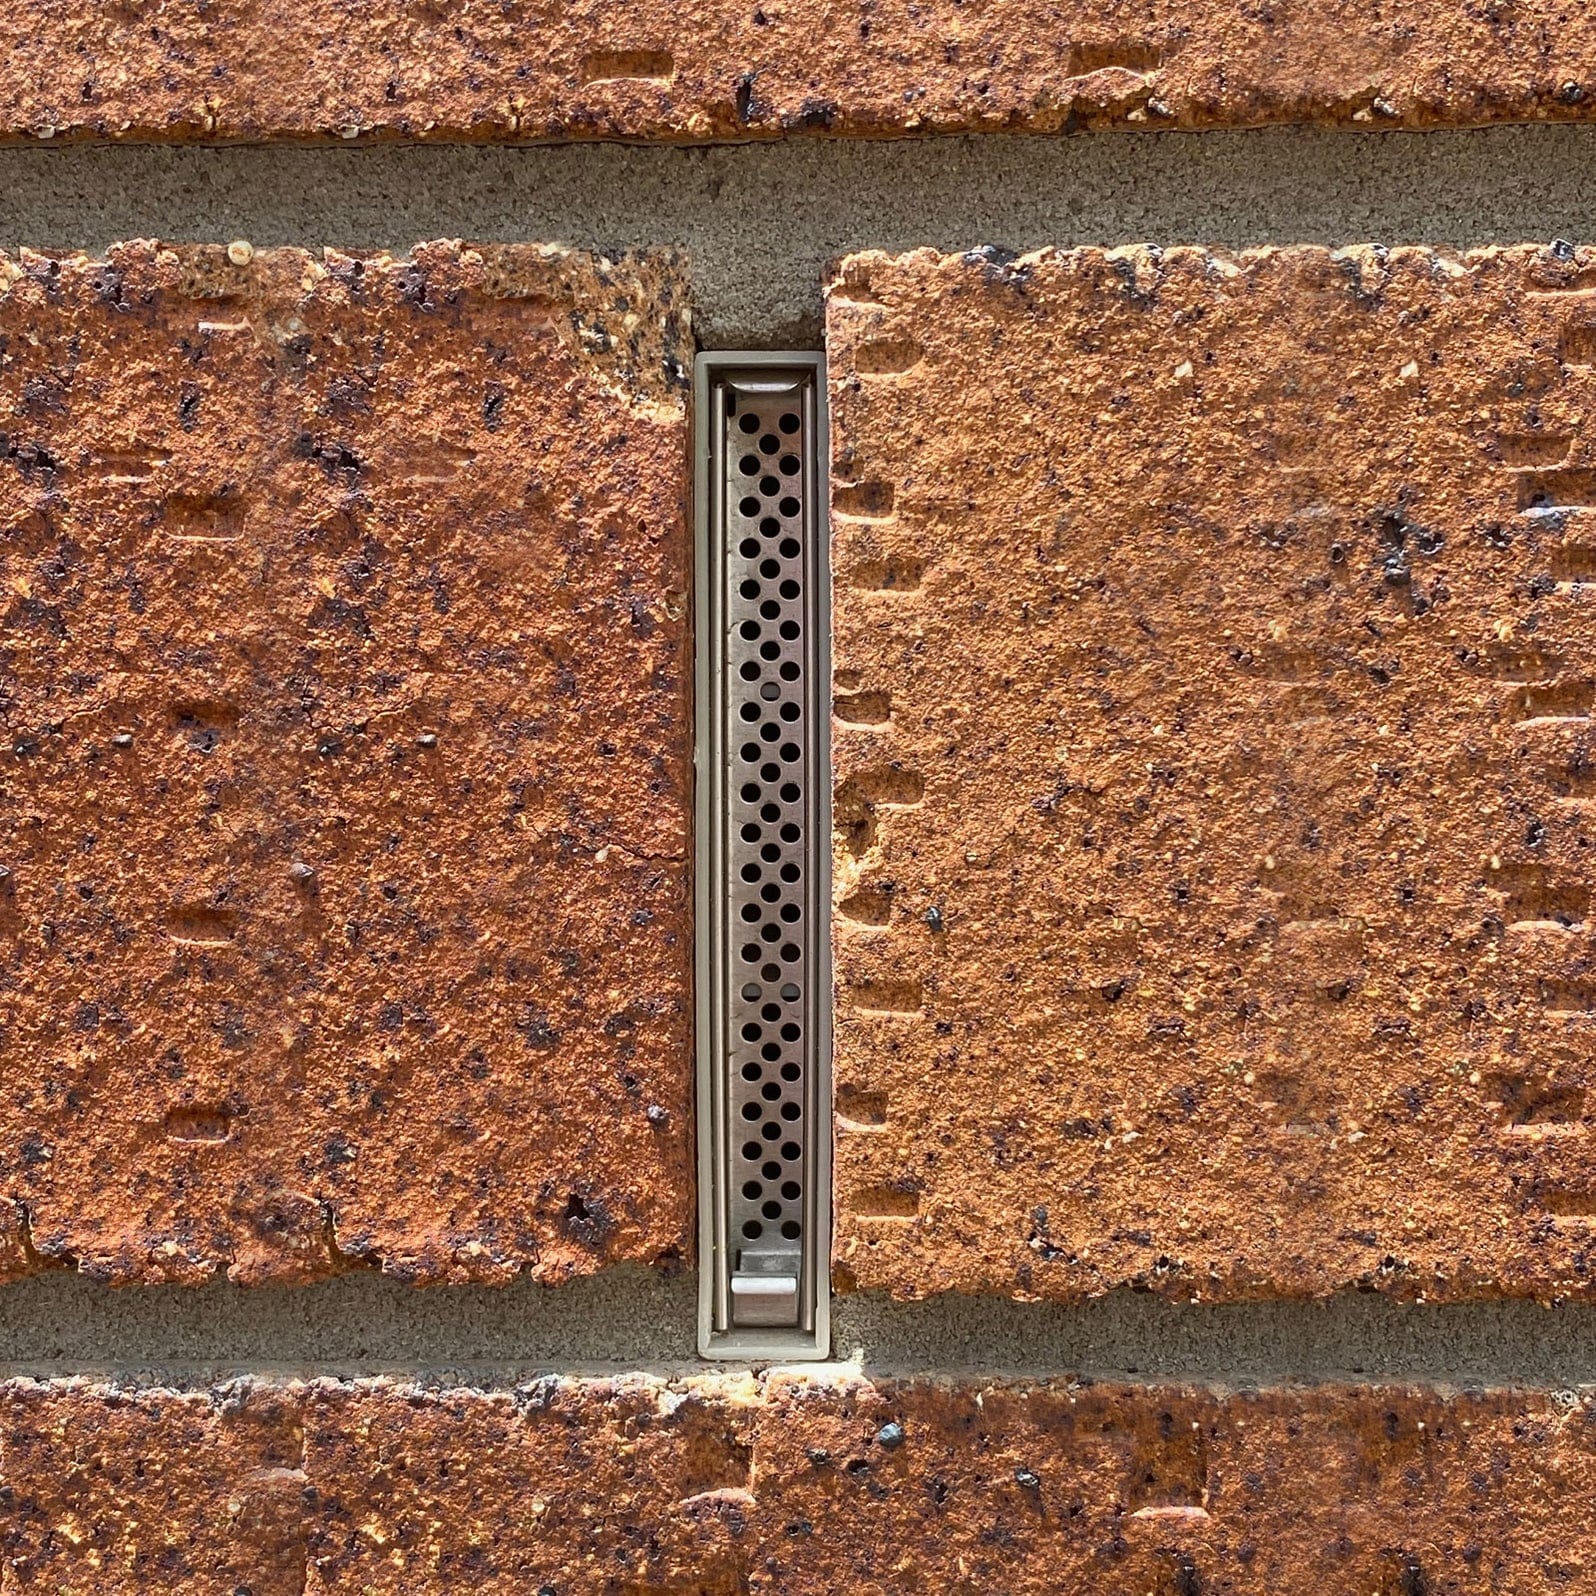
Weep Holes
- Function: Weep holes are small openings left in the external brickwork to allow moisture that accumulates in the cavity between the brick veneer and the structural frame to escape. This is essential for preventing water from building up and causing damage to the internal structure.
- Placement and Frequency: Weep holes are typically placed above the DPC, at the bottom of the brick veneer, and at regular intervals along the wall. They should be positioned every 1.2 metres horizontally to ensure effective drainage.

- Bushfire Protection:
- The Weepa System: In bushfire-prone areas, standard weep holes can become entry points for embers, posing a significant fire risk. The Weepa system is designed to address this issue by incorporating ember guards into the weep holes, preventing embers from entering the cavity while still allowing moisture to escape.
- Alternatives to Weepa: Other bushfire protection solutions include stainless steel mesh covers and specially designed bushfire-resistant weep hole inserts. These alternatives also aim to block ember entry while maintaining the functionality of the weep holes.
- Importance in Bushfire-Prone Areas: Proper protection of weep holes is required in regions susceptible to bushfires (identified by way of bushfire overlay designation - at pre-lodgement or home owner research). These solutions help prevent the ignition of the house from within, as an ember could be sucked inside the wall cavity due to differential pressure or simply being in the wrong place at the wrong time (wrong wind direction).
 Anthony Painter
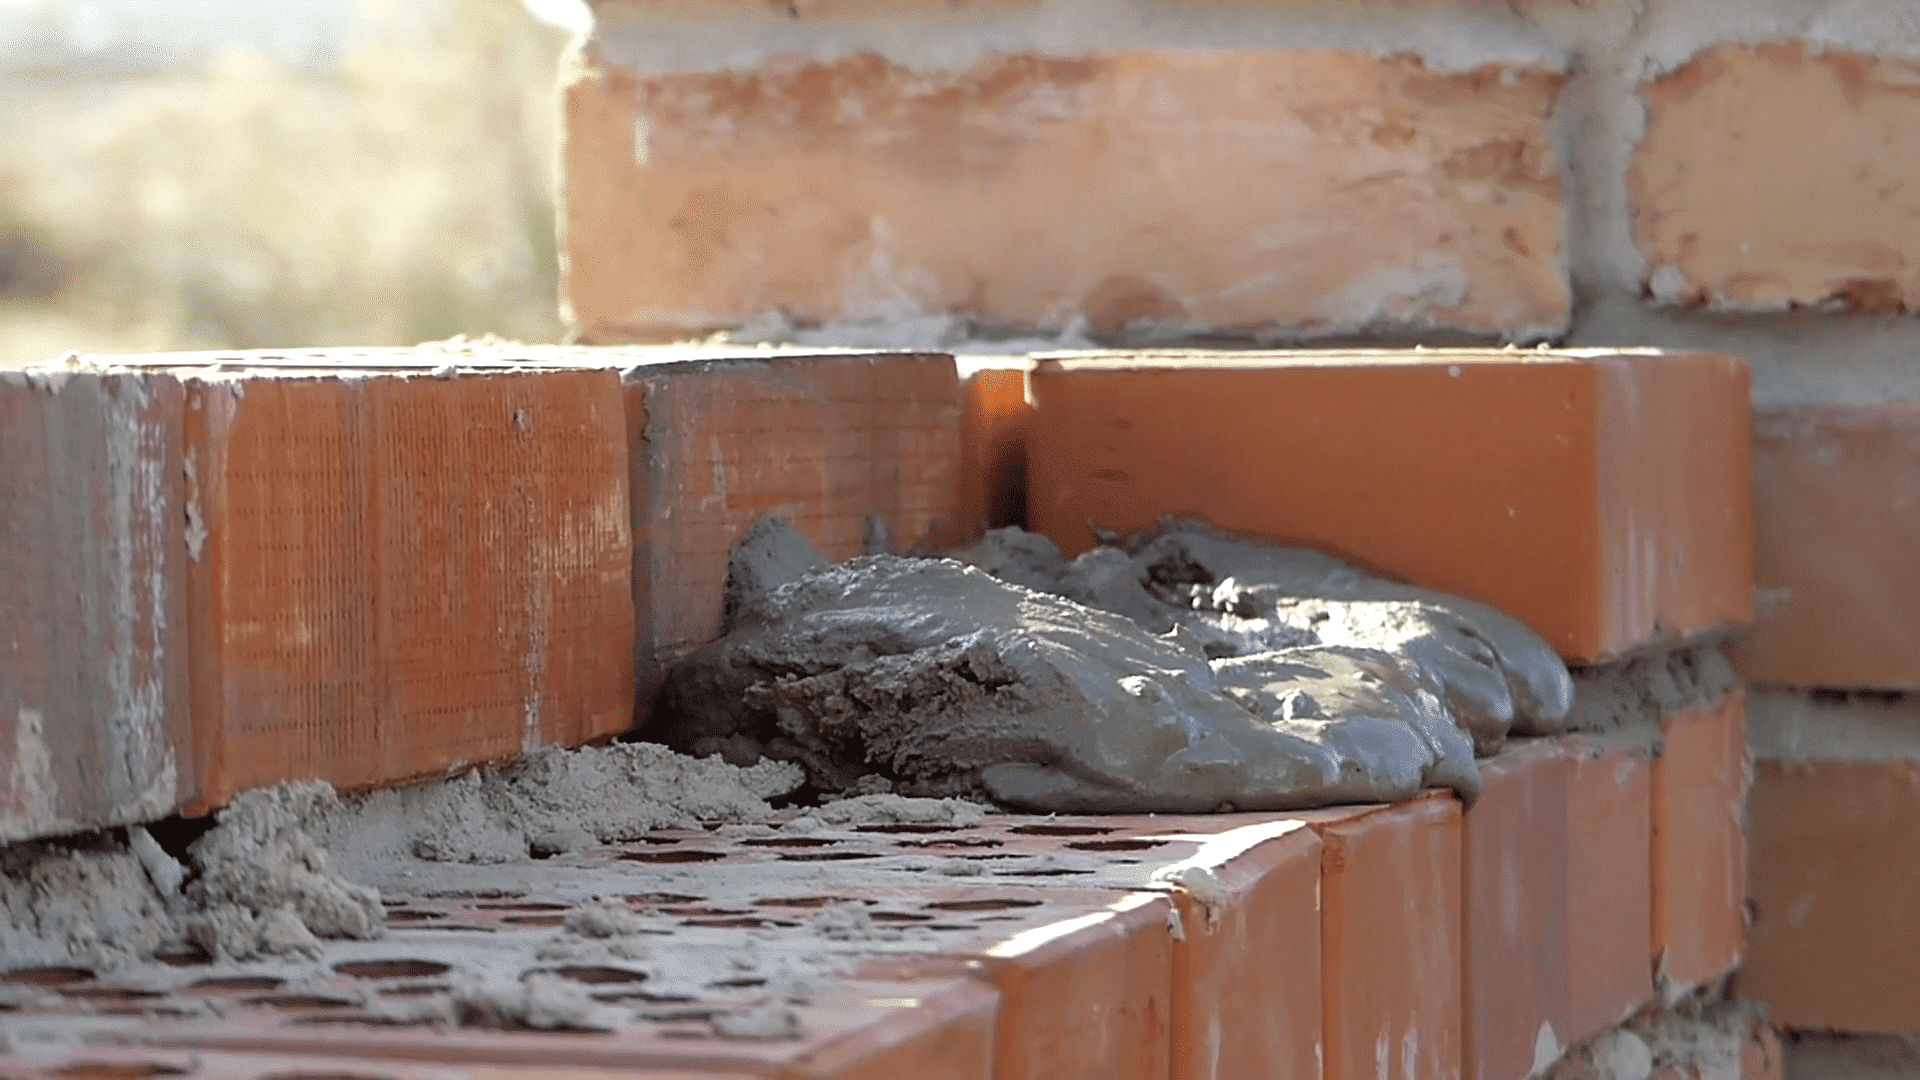
Mortar Strength and Composition
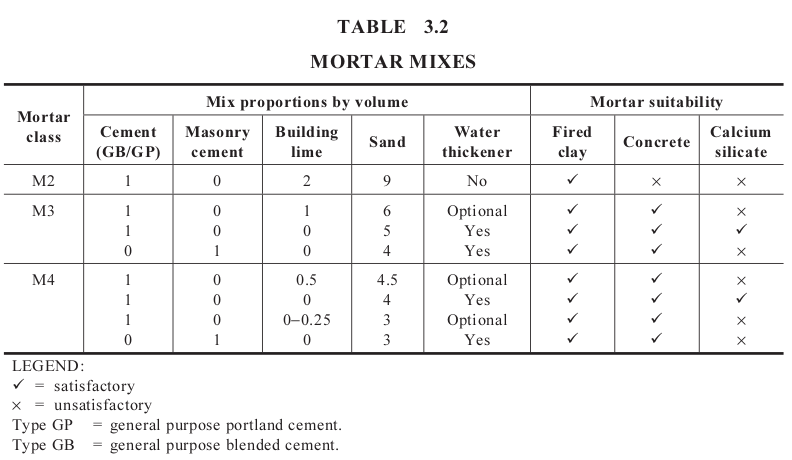
- Mortar Strength: The strength of the mortar used in brick veneer construction is required for the structural integrity of the facade. Mortar is typically composed of cement, lime, and sand, with the mix proportions adjusted to achieve the desired strength. For most brick veneer applications, a standard mortar mix is used, providing sufficient strength to hold the bricks together and resist external forces such as wind and rain.
- Composition and Mix: The most common mortar mix for brick veneer consists of one part cement, one part lime, and six parts sand (1:1:6). This mix provides a balance of strength, workability, and durability. However, the exact mix may vary depending on the specific requirements of the project and the type of bricks being used (the IRA or initial rate of absorption affects the mortar mix).
- QBCC and VBA Standards: Both the QBCC and VBA set standards for mortar composition and strength. The mortar must comply with AS 3700 and AS 4773 to ensure it meets structural requirements. Additionally, any visible voids or holes in the mortar (excluding weep holes and vents) are considered defects and should be repaired within the first 12 months after construction.
The Mortar Scratch Test:
- Choose a Discreet Area:
- Select an inconspicuous area of the brickwork, such as near the base of the wall or in a less visible corner. This way, if any minor damage occurs, it won’t be easily noticeable.
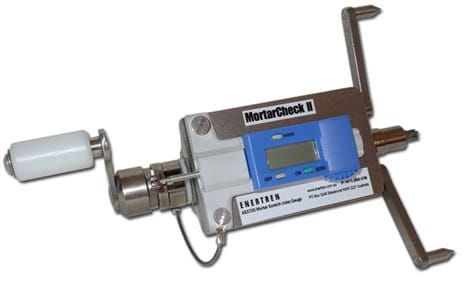
- Use a Sharp Object:
- Take a metal object, such as a screwdriver or a nail (or the MortarCheck 2), and gently attempt to scratch the surface of the mortar joint.
- Evaluate the Resistance:
- If the mortar is of correct strength, it should be hard and resistant to scratching. You might see a light mark, but the mortar should not crumble or easily gouge under light pressure.
- If the mortar crumbles, powders, or is easily scratched, it may indicate that the mortar mix was too weak or that it hasn't cured properly.
Considerations:
- Timing:
- This test is most effective after the mortar has fully cured, which can take about 28 days. Testing too early may give misleading results as the mortar might still be curing and gaining strength.
- Professional Testing:
- While the scratch test gives a quick indication, it’s not as accurate as laboratory testing. For a more precise assessment, a sample of the mortar can be sent to a lab for compressive strength testing, especially if there are significant concerns about the mortar’s quality.
Mortar Colours
- Colour Choices: The colour of the mortar can significantly influence the overall appearance of a brick veneer façade. Mortar colours can range from standard grey to white, buff, or even coloured options, allowing you to match the mortar with the brickwork for a cohesive look.
- Common Mortar Colours: Natural (Grey) is the most common mortar colour, but other popular choices include off white, which blends well with lighter bricks, and white, which provides a sharp contrast with darker bricks. Coloured mortars are also available and are often used to create a specific aesthetic effect.
- Blending and Matching: When repairing or extending brickwork, it’s important to ensure the new mortar matches the existing colour as closely as possible. According to both QBCC and VBA guidelines, any significant colour mismatch can be considered a defect. This is especially true in repair work, where achieving a perfect match may be challenging. In such cases, blending the new mortar with the existing one, or using visual breaks like windows or doors, can help minimise the impact of colour variations.
Anthony Painter
Cavity Cleanliness and Purpose
- Why Cleanliness Matters: The cavity between the brick veneer and the structural frame is important for moisture management. If this cavity becomes blocked with mortar droppings or debris, it can trap moisture, leading to potential issues such as mould growth or structural damage.
- Cavity Widths: The standard width of a cavity in brick veneer construction is typically 50mm, though this can vary depending on the specific requirements of the project. The cavity must be wide enough to allow for proper drainage and to accommodate insulation if needed.
- QBCC and VBA Tolerances: The QBCC and VBA provide specific guidelines for the acceptable width of cavities, with deviations beyond these tolerances considered defects. The cavity should be kept free of obstructions to ensure proper functionality. Regular checks during construction can help maintain cavity cleanliness and prevent future problems.
Minimum Cavity Width:
The minimum width for a cavity in brick veneer construction, according to Australian standards, is generally 40mm. This width is considered sufficient to allow for proper drainage and to accommodate ties between the inner structural wall and the outer brick veneer. However, in practice, the cavity is often designed to be wider, typically around 50mm to 60mm, to ensure that any mortar or debris does not obstruct the cavity's drainage function.
When closing a cavity, for example, at window sills or door heads, the closing must be properly detailed to ensure that moisture is directed out of the cavity via weep holes or other drainage provisions, rather than being allowed to bridge into the internal wall structure. In bushfire-prone areas, additional care must be taken to ensure that ember guards or similar measures are installed when closing cavities to prevent ember entry.
Sill Bricks
- Function and Design: Sill bricks are used at the base of windows and other openings to direct water away from the structure. They are typically laid with a slight slope to ensure water drains away from the window or door, preventing water ingress.
- QBCC and VBA Shrinkage Allowance: Both the QBCC and VBA emphasise the importance of allowing for timber shrinkage when installing sill bricks. If this is not accounted for, the timber frame may settle over time, causing the sill bricks to crack or become dislodged. A gap should be left between the timber frame and the sill bricks to accommodate any potential movement.
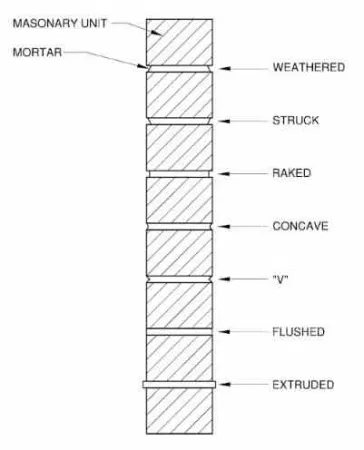
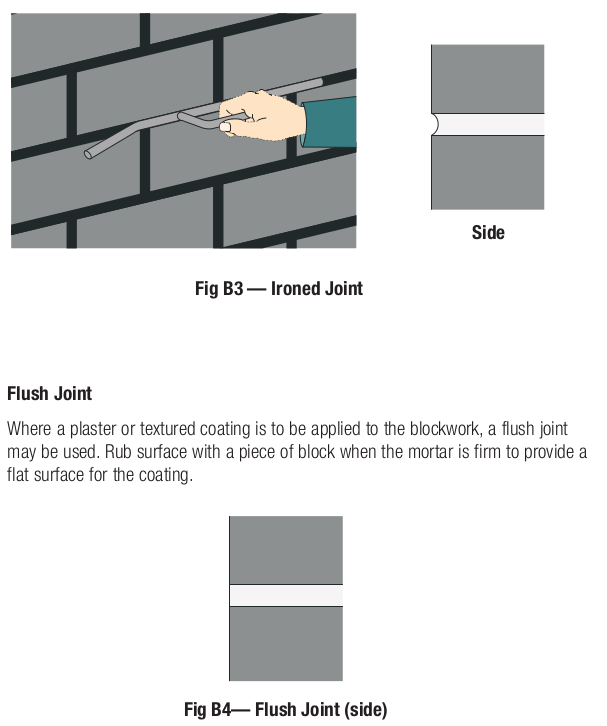
Joint Types and Finishes
- Types of Joints: The joints between bricks can be finished in several ways, including flush, raked, struck, and weather-struck joints. Each type has a different visual effect and performance characteristic. For example, raked joints create deep shadows and are often used for a more pronounced appearance, while flush joints are more subtle and better at shedding water.
- Best Practices: The choice of joint type should be based on both visual preference and practical considerations. For example, in areas with high rainfall, flush or weather-struck joints may be preferable because they are better at directing water away from the wall. Additionally, all joints should be uniform in depth and finish to meet both aesthetic and structural requirements.
- Vertical Alignment: Maintaining vertical alignment in brick courses is important for both the appearance and structural integrity of the wall. Misaligned joints can weaken the wall and detract from its visual appeal. According to VBA guidelines, a maximum deviation of 20mm per 2m height is allowed.
- QBCC and VBA Guidelines: The QBCC and VBA require that joints, especially raked joints, be consistent in depth and finish. Raking should not exceed 10mm unless otherwise specified. Any inconsistency in joint depth or finish can be considered a defect and may require rectification.
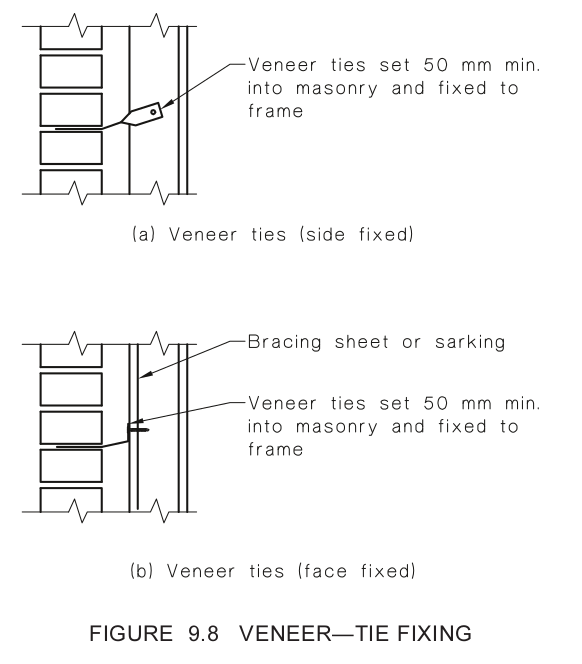
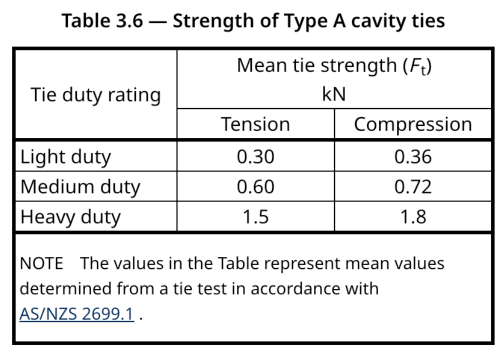
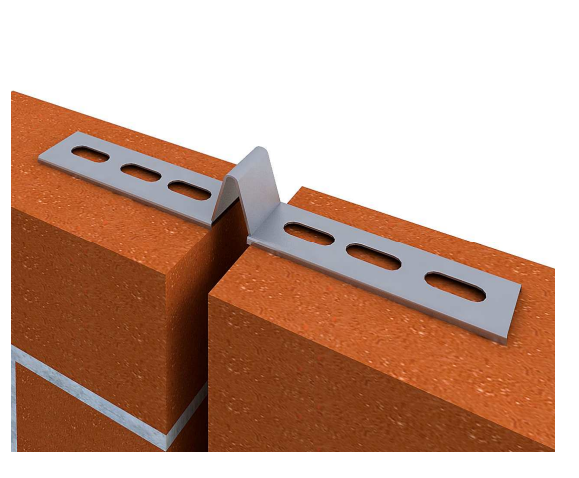
Cavity Ties
- Purpose and Placement: Cavity ties are metal connectors used to anchor the brick veneer to the structural frame. They provide stability and help prevent the brickwork from collapsing or moving away from the frame.
- Strength Ratings: Cavity ties come in various strength ratings, including light, medium, and heavy-duty options. The choice of tie depends on the height of the wall, the wind load, and other structural considerations.
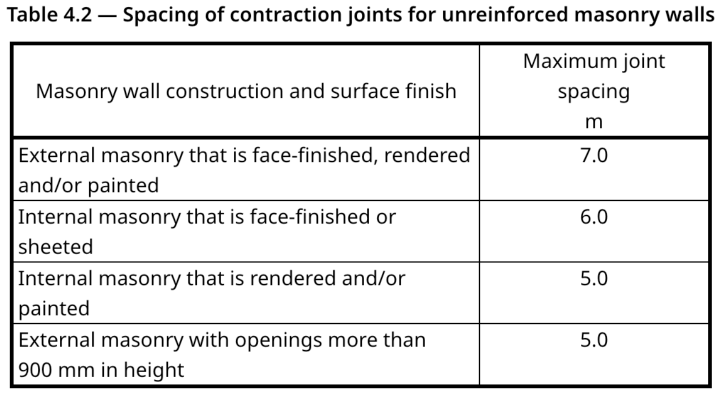
Expansion Joints
- Need for Expansion Joints: Expansion joints are essential in brick veneer construction to accommodate movement caused by thermal expansion, moisture changes, and structural settlement. Without these joints, the brickwork could crack or become distorted.
- Spacing Guidelines: Expansion joints should be placed at regular intervals along the wall, typically every 6 to 9 metres, depending on the length of the wall and the type of bricks used. The exact spacing should be determined by the project engineer or according to local building codes.
- Articulation Joints: Articulation joints are a type of expansion joint designed to allow for more significant movement. These joints are especially important in areas with reactive soils (H class or P due to Fill) or where the building is subject to large temperature fluctuations.
- QBCC and VBA Standards: Both the QBCC and VBA have specific requirements for the placement, construction, and sealing of expansion and articulation joints. These joints must be free of mortar and properly sealed to ensure they function as intended. It is important that articulation joints, when next to windows run up and through the brick sill to the window frame. Often they are not run all the way through which is not correct.
Articulation Joints
- Purpose: Articulation joints manage structural movement, especially in reactive soil conditions where the ground may expand and contract significantly.
- Placement and Sealing: Proper placement and sealing of articulation joints are crucial to prevent moisture ingress and to ensure the structural integrity of the brickwork.
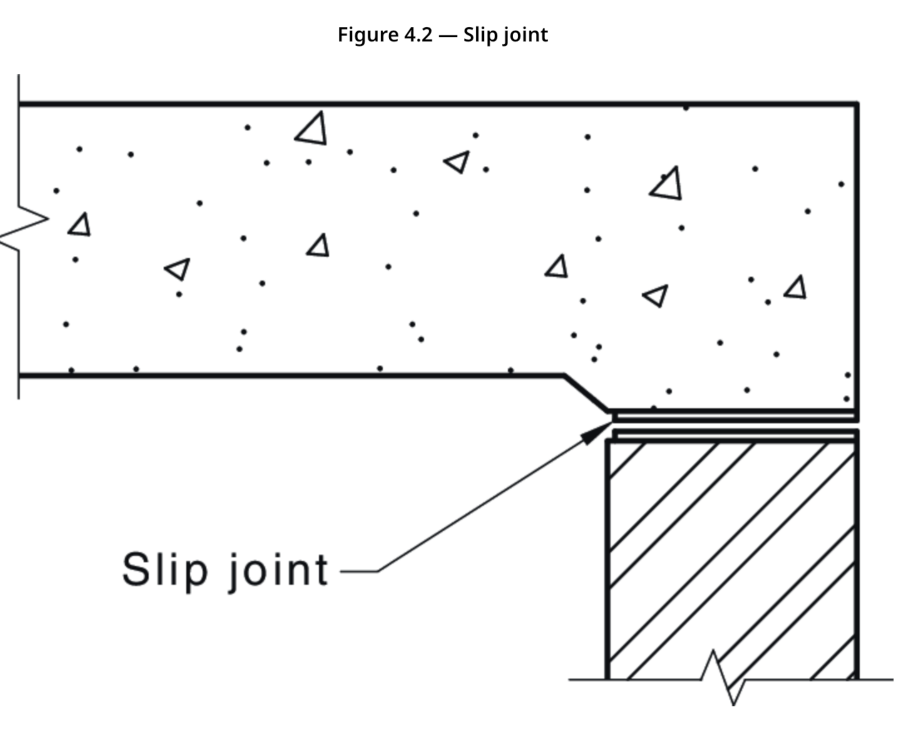
- Slip Joints: Slip joints are used within articulation joints to allow for vertical movement while preventing lateral movement. They are particularly important at points where the brickwork intersects with other materials, such as at the top of a wall or around windows.
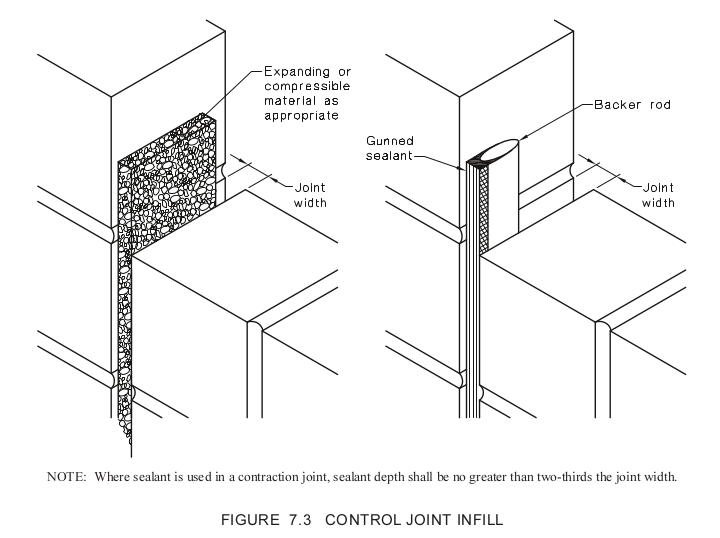
Sealing of Articulation Joints
Materials and Methods:
Articulation joints are important in brick veneer construction, especially in areas with reactive soils where movement due to expansion, contraction, or settling is common. These joints allow the building to move without causing cracks or structural damage to the brickwork. Properly sealing these joints ensures they perform their intended function while also preventing moisture ingress.
- Flexible Sealants: The most commonly used materials for sealing articulation joints are flexible sealants. These sealants are designed to accommodate movement while maintaining a watertight seal. Silicone and polyurethane-based sealants are popular choices due to their flexibility, durability, and resistance to UV radiation.
- Colour Matching: When sealing articulation joints, it’s important to match the colour of the sealant as closely as possible to the adjacent brickwork. This ensures that the joints blend seamlessly with the rest of the façade, maintaining the aesthetic integrity of the building. Both QBCC and VBA standards require that the sealant match the adjacent masonry to avoid it being considered defective.
- Backer Rods: Before applying the sealant, a backer rod is often inserted into the joint. The backer rod provides a base for the sealant to adhere to, ensuring the sealant fills the joint properly and maintains its elasticity over time. It also helps control the depth of the sealant, ensuring it is applied consistently. A sealant depth of 2:1 (width to depth) is the general rule of thumb to ensure the sealant has the correct bond for optimum joint elasticity and achieves long term performance.
Long-Term Maintenance:
Over time, the sealant in articulation joints may degrade due to exposure to the elements, including UV radiation, temperature fluctuations, and moisture. Regular inspections are recommended to check for signs of wear, such as cracking, shrinking, or peeling. If any of these issues are observed, the sealant should be removed and replaced to maintain the joint’s effectiveness.
- Re-sealing: When re-sealing articulation joints, it’s important to completely remove the old sealant before applying the new one. This ensures a strong bond and prevents moisture from seeping in behind the new sealant. Using a sealant remover or a sharp tool can help in carefully extracting the old material. Before resealing, re align or replace the backing rod to ensure the correct joint width to depth ratio is achieved (2:1 generally) and so that you do not use more adhesive than you need to (saves money and time).
- Regular Inspection: Home owners should inspect the articulation joints at least once a year, especially after extreme weather events like heavy rain or excessive dry periods. Early detection of sealant failure can prevent more significant issues, such as water ingress/mould or structural movement, which could lead to costly repairs.
Brick Construction and Materials
Types of Bricks Used:
In brick veneer construction, the choice of brick is critical as it not only defines the aesthetic appeal of the façade but also contributes to the overall durability and performance of the wall. The most commonly used bricks in Australia include:
- Clay Bricks: These are the most traditional type of bricks, known for their durability, thermal efficiency, and resistance to weathering. Clay bricks are available in a wide range of colours and finishes, making them a popular choice for various architectural styles.
- Concrete Bricks: Concrete bricks are made from a mixture of cement, sand, and aggregates. They are often used where a more uniform appearance is desired or where specific structural requirements must be met. Concrete bricks are also available in different colours and textures, though they may not have the same long-term colour retention as clay bricks.
- Calcium Silicate Bricks: These bricks are made from a mixture of sand, lime, and pigments. They are less commonly used in residential construction but offer excellent dimensional accuracy and a smooth finish, making them ideal for certain design aesthetics.
Anthony Painter
Modern Brick Finishes:
The finish of a brick veneer façade can significantly impact the overall appearance of the building. Modern brick finishes available in the Australian market include:
- Smooth Face: A smooth-faced brick offers a clean, contemporary look. This finish is achieved by pressing the brick during manufacturing, giving it a sleek surface that is easy to clean and maintain.
- Textured Face: Textured bricks have an uneven surface, providing a more rustic and natural appearance. This finish is popular in designs that aim to blend with the natural environment or mimic historical styles.
- Glazed Bricks: Glazed bricks feature a ceramic coating applied during the firing process, giving them a shiny, glass-like surface. These bricks are often used as accents in modern designs due to their vibrant colors and reflective quality.
- Sanded or Tumbled Finish: These finishes give bricks a weathered, aged appearance. Sanded bricks have a rougher surface with added sand in the mix, while tumbled bricks are distressed to create a rustic look. Both finishes are popular in heritage-style homes and in designs aiming for a timeless aesthetic.
Sustainability Considerations:
Sustainability is increasingly important in modern construction, and brick veneer facades can contribute to eco-friendly building practices. Sustainable brick options include:
- Recycled Bricks: Using recycled bricks can reduce the environmental impact of new construction. These bricks are sourced from demolished buildings and re purposed for new projects, providing a unique, weathered look.
- Low-Carbon Bricks: Some manufacturers offer bricks made with lower carbon emissions during production. These bricks may use alternative fuels or include waste materials like fly ash or slag in their composition, reducing their overall environmental footprint.
- Locally Sourced Materials: Choosing bricks produced close to the construction site can reduce transportation emissions, supporting local economies and reducing the environmental impact associated with long-distance shipping.
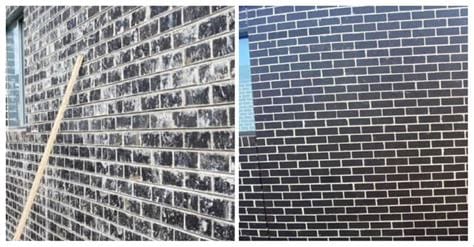
Cleaning of Brickwork (Acid Washing)
Purpose of Acid Washing:
Acid washing is a common method used to clean brickwork after construction to remove mortar smears, stains, and other debris that may have adhered to the bricks during the building process. The primary purpose of acid washing is to ensure that the brick veneer façade has a clean, uniform appearance, free from unsightly marks that can detract from the overall aesthetic of the building.
- When to Perform Acid Washing: Acid washing is typically performed shortly after the mortar has cured but before any other finishing work, such as sealing or painting, is done. The timing is important because the longer the mortar stains remain on the bricks, the harder they become to remove.
Considerations:
While acid washing is effective, it must be done with care to avoid damaging the brickwork or surrounding materials. The acid used is usually a diluted solution of hydrochloric acid, which is strong enough to dissolve mortar stains but can also etch the surface of the bricks or harm nearby surfaces if not properly controlled.
- Impact on Metals: Acid washing can corrode metal components, such as window frames, door hardware, or cavity ties, if they come into contact with the acid. It’s essential to protect these elements by covering them with plastic sheeting or another barrier before starting the acid washing process.
- Effect on Finishes: Some bricks have special finishes or coatings that can be damaged by acid. Before acid washing, it’s important to test the solution on a small, inconspicuous area to ensure it doesn’t harm the bricks' surface. If the test shows any adverse effects, an alternative cleaning method should be used.

Best Practices:
To safely and effectively perform acid washing, the following best practices should be observed:
- Dilution: Always dilute the hydrochloric acid according to the manufacturer’s instructions, typically in a ratio of 1 part acid to 10 parts water. Adding acid to water (never water to acid) helps control the reaction and reduces the risk of splashes.
- Protection: Wear protective gear, including gloves, goggles, and long sleeves, to avoid skin and eye contact with the acid. Ensure that the work area is well-ventilated to prevent inhalation of fumes.
- Application: Use a stiff brush or spray to apply the acid solution to the brickwork. Start from the top and work your way down, applying the solution evenly across the surface. Avoid letting the acid sit on the bricks for too long—typically, a few minutes is sufficient to dissolve the mortar stains.
- Rinsing: Thoroughly rinse the brickwork with clean water after the acid has done its job. This step is crucial to neutralize the acid and wash away any remaining residue. Failing to rinse properly can leave the acid on the bricks, causing long-term damage.
- Disposal: Properly dispose of any leftover acid solution and rinse water according to local environmental regulations. Never pour acid waste into storm drains or onto the ground, as it can harm the environment.
Standards & Tolerances
Both the QBCC and VBA emphasise the importance of removing all mortar smears and stains from brickwork to meet aesthetic standards.
How Brickwork Elements Work Together
In brick veneer construction, each element plays a specific role in ensuring the facade’s durability, performance, and aesthetic appeal. However, these elements do not work in isolation; they are part of an interconnected system where the proper functioning of one component often depends on the others.
- Damp Proof Course (DPC) and Weep Holes:
- The DPC serves as a barrier to prevent moisture from rising through the wall, while weep holes allow any moisture that enters the cavity to escape. Together, these elements protect the structural frame from water damage. The placement of the weep holes just above the DPC ensures that any water that reaches the DPC can exit through the weep holes, preventing it from accumulating and causing damp issues.
- Mortar and Cavity Cleanliness:
- The mortar used to bond the bricks must be strong and durable, but it must also be applied carefully to prevent mortar droppings from clogging the cavity. A clean cavity is essential for proper drainage and air circulation, which help maintain the thermal performance of the wall and prevent moisture-related problems. If mortar droppings are not removed, they can obstruct weep holes, leading to water buildup within the cavity.
- Expansion Joints and Articulation Joints:
- Expansion and articulation joints are designed to accommodate movement in the brickwork due to temperature changes, moisture content, and structural settling. These joints work together to prevent cracks and other damage that could compromise the facade’s integrity. Proper placement and sealing of these joints are crucial to maintaining the wall’s structural stability while allowing it to move as needed.
- Cavity Ties and Structural Stability:
- Cavity ties connect the brick veneer to the structural frame, ensuring that the brickwork remains stable and securely attached to the building. These ties are essential for preventing the veneer from bowing or separating from the frame, particularly in high-wind areas. The spacing and strength of cavity ties must be carefully calculated to provide adequate support without compromising the integrity of the cavity.
Common Issues and Solutions:
When the elements of a brick veneer wall are not properly integrated, several issues can arise, potentially leading to significant damage over time.
- Moisture Penetration:
- If the DPC is not correctly installed or if weep holes become blocked, moisture can penetrate the structural frame, leading to rot, mold, and other moisture-related problems. Regular inspections and maintenance of the DPC and weep holes can prevent these issues.
- Cracking:
- Cracks in the brick veneer can occur if expansion and articulation joints are not properly placed or if the mortar is too strong and rigid. To prevent cracking, ensure that joints are spaced according to local building codes and that the mortar mix is appropriate for the brick type and environmental conditions.
- Structural Movement:
- If cavity ties are not adequately spaced or if they are installed incorrectly, the brick veneer may detach from the structural frame, leading to bowing or collapse. To address this, ensure that cavity ties are installed according to the manufacturer’s specifications and that they are properly anchored to both the brickwork and the frame.
- Thermal Bridging:
- Thermal bridging occurs when the cavity is obstructed, reducing the wall’s insulation efficiency. This can happen if the cavity is filled with debris or if insulation is improperly installed. To avoid thermal bridging, keep the cavity clean during construction and ensure that insulation is correctly placed, leaving room for air circulation.
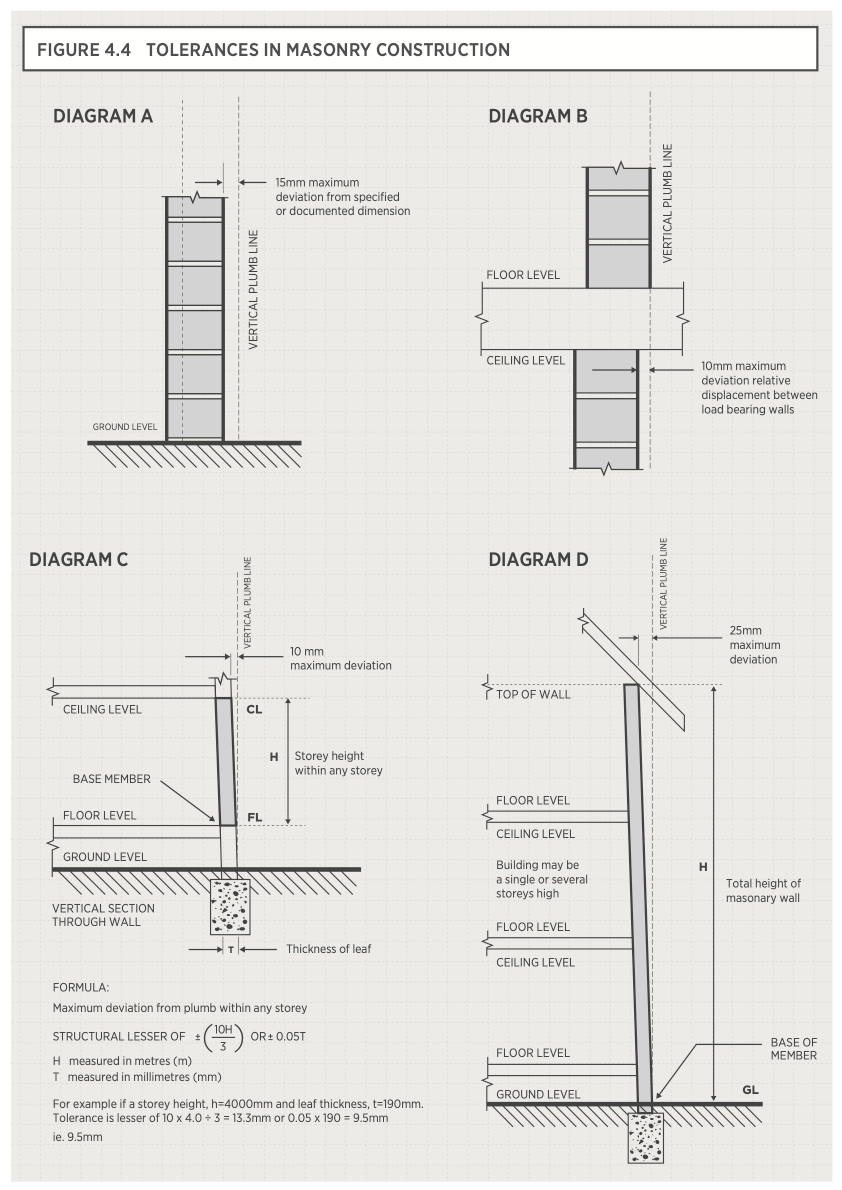
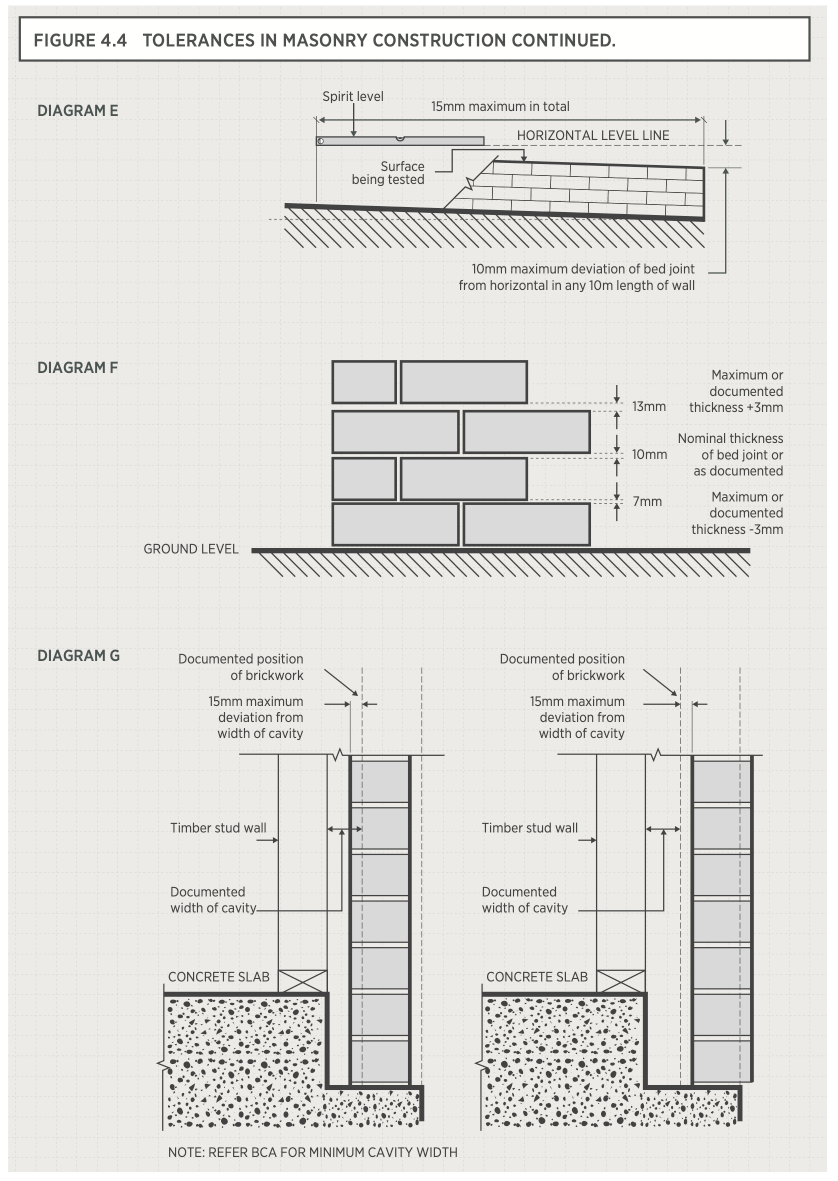
Tolerances in Masonry Construction
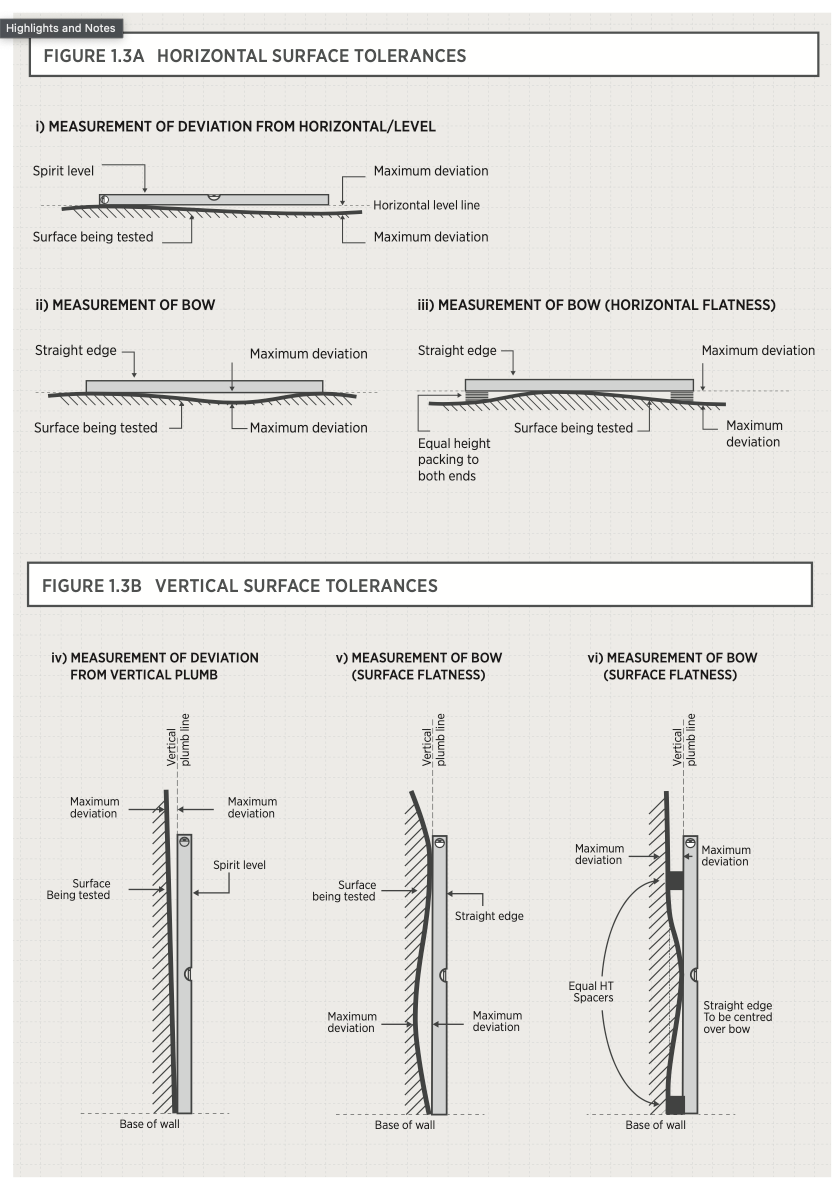
Horizontal and Vertical Tolerances:
Tolerances in masonry construction refer to the allowable deviations from the intended dimensions and alignments of brickwork. These tolerances are crucial for ensuring that the brick veneer façade is not only aesthetically pleasing but also structurally sound. Both the Queensland Building and Construction Commission (QBCC) and the Victorian Building Authority (VBA) set specific guidelines for these tolerances to ensure consistency and quality in construction.
- Horizontal Position: The horizontal position of masonry elements, as documented or shown in the plan at their base or at each storey level, should not deviate more than 15mm from the specified position. This ensures that the wall aligns properly with other structural elements and maintains its intended appearance.
- Vertical Alignment (Plumb): The vertical alignment of a wall, also known as plumb, is critical for the stability of the structure. The maximum deviation allowed from a vertical line within a storey is the lesser of 10mm per 3m of height or 0.05 times the thickness of the wall leaf. For the total height of a building, the deviation should not exceed 25mm. These tolerances ensure that the wall does not lean or bow, which could compromise its structural integrity.
- Surface Flatness and Plumb: The flatness of masonry surfaces and the plumb (vertical alignment) of the wall must be within specific tolerances to avoid unsightly bulges or indentations. The maximum horizontal or vertical deviation of a surface from a plane surface (bow) in any 2m length should not exceed 5mm for structural elements and 3mm for non-structural elements. These tolerances help maintain the wall’s aesthetic appeal and prevent potential structural issues.
- Bed Joint Thickness: The bed joint, which is the horizontal mortar joint between bricks, must be consistent in thickness. The deviation from the documented thickness of the bed joint should not exceed 3mm. Additionally, the minimum perpend (vertical joint between bricks) thickness should be 5mm, with a maximum deviation of 10mm. Ensuring consistent joint thicknesses contributes to the overall stability and appearance of the wall.
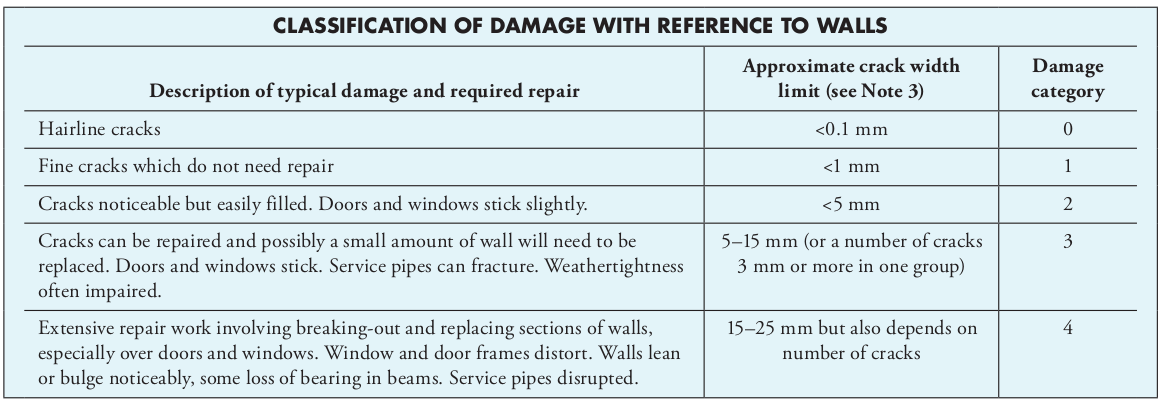
How big is your crack?
Cracks in brickwork can be a common concern for home owners. Understanding what constitutes acceptable versus unacceptable cracking is important when assessing the condition of a brick veneer wall and determining if repairs are necessary.
According to Australian standards, particularly the QBCC (Queensland Building and Construction Commission) guidelines and the Australian Standard AS 3700 (Masonry Structures), cracks are generally classified based on their width, length, and the potential impact on the structural integrity of the wall.
Acceptable Cracks
1. Hairline Cracks (Less than 1mm Wide):
- Description: Hairline cracks are very fine cracks that are typically less than 1mm wide. These cracks often occur in the mortar joints rather than the bricks themselves and are usually the result of normal settling or minor thermal expansion and contraction.
- Acceptability: These cracks are generally considered acceptable as they do not affect the structural integrity of the wall. They are often superficial and can be left as-is or filled with a flexible sealant if they are a cosmetic concern.
2. Minor Cracks in Mortar Joints (1mm to 5mm Wide):
- Description: Minor cracks in the mortar joints that are between 1mm and 5mm wide are usually caused by slight movement in the structure, such as shrinkage of materials or minor ground settlement.
- Acceptability: Cracks of this size are typically considered acceptable if they are stable and do not indicate ongoing movement. However, they should be monitored over time. If the cracks widen or additional cracks appear, further investigation may be necessary. These cracks can be repaired using tuck pointing or repointing techniques.
Unacceptable Cracks
1. Moderate to Severe Cracks in Mortar Joints (Greater than 5mm Wide):
- Description: Cracks in mortar joints that are wider than 5mm are considered moderate to severe. These cracks often indicate significant movement in the structure, such as settlement, foundation issues, or improper installation of expansion joints.
- Unacceptability: Cracks of this size are typically unacceptable as they can compromise the structural integrity of the wall. Immediate investigation is required to identify the underlying cause. Repairs may involve repointing the mortar joints, addressing the root cause of the movement (such as foundation stabilization), and possibly installing additional expansion joints.
2. Cracks in Bricks (Any Size):
- Description: Cracks that appear directly in the bricks themselves, rather than in the mortar joints, are usually a sign of more serious structural issues. These cracks can range from hairline to wide cracks and often indicate excessive movement or stress in the wall.
- Unacceptability: Any crack in the bricks, regardless of size, is generally considered unacceptable. Cracked bricks can weaken the wall’s structural integrity, lead to moisture ingress, and reduce the facade’s overall durability. Depending on the severity, repairs may involve replacing the cracked bricks and addressing the underlying cause, such as poor drainage, inadequate support, or foundation problems.
3. Stepped Cracks Along Mortar Joints:
- Description: Stepped cracks follow the mortar joints in a stair-step pattern, often extending vertically and horizontally across the wall. These cracks are typically associated with significant structural movement, such as differential settlement or reactive soil conditions.
- Unacceptability: Stepped cracks are considered unacceptable, particularly if they are wide or extensive. They indicate that the wall is experiencing uneven movement, which can lead to further cracking, structural failure, or even collapse if not addressed. Professional assessment and repairs are required, potentially including foundation stabilisation or wall reinforcement.
4. Vertical Cracks at Corners or Around Openings:
- Description: Vertical cracks that appear at the corners of walls or around openings (such as windows and doors) are often caused by differential movement or inadequate support at these points. These cracks can widen over time and may indicate that the wall is under stress.
- Unacceptability: Vertical cracks of this nature are typically unacceptable because they suggest that the structure is not accommodating movement as it should. Repairs may involve installing additional articulation joints, reinforcing the affected areas, and addressing any underlying issues contributing to the movement.
Assessing Cracks
Monitoring and Documentation:
- If cracks are observed, it’s important to monitor them over time to determine whether they are stable or worsening. Documenting the size, location, and pattern of cracks can help in assessing the severity and identifying potential causes.
Professional Inspection:
- For any cracks that are of concern, especially those classified as unacceptable, it’s advisable to speak with a professional such as a structural engineer or building surveyor. They can provide a thorough assessment and recommend appropriate re-mediation measures.
Repair and Maintenance:
- Regular maintenance, including repointing mortar joints and sealing minor cracks, can help prevent more serious issues from developing. For more severe cracks, repairs may involve structural interventions, such as underpinning foundations or reinforcing walls.
Thermal Performance and Insulation
Relevance of Thermal Performance:
Thermal performance is an important factor in the design and construction of brick veneer walls, especially in Australia's diverse climate zones. The Australian Standards AS 3700 (Masonry Structures) and AS 4773 (Masonry in Small Buildings) highlight the importance of ensuring that masonry walls provide adequate thermal insulation to maintain energy efficiency and comfort within the home.
Role of Insulation in Brick Veneer Construction:
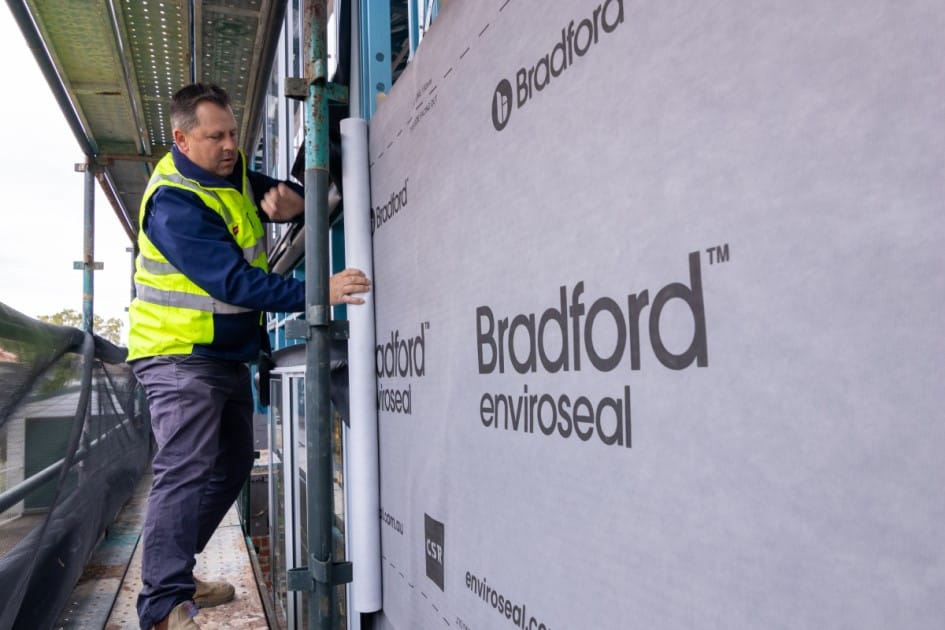
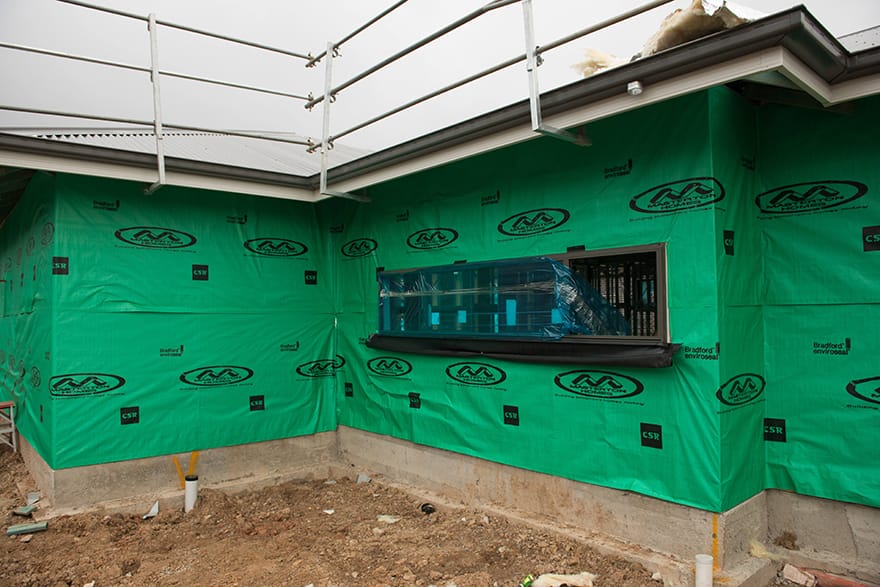
In brick veneer construction, the cavity between the brick veneer and the internal structural frame provides an opportunity to enhance thermal performance. Proper insulation within this cavity helps to reduce heat transfer, keeping homes cooler in summer and warmer in winter. The insulation material should be selected carefully to match the climate zone, ensuring it meets the energy efficiency requirements outlined in the National Construction Code (NCC). Read more about wall wrap in the two posts below on the topic:
 Anthony Painter
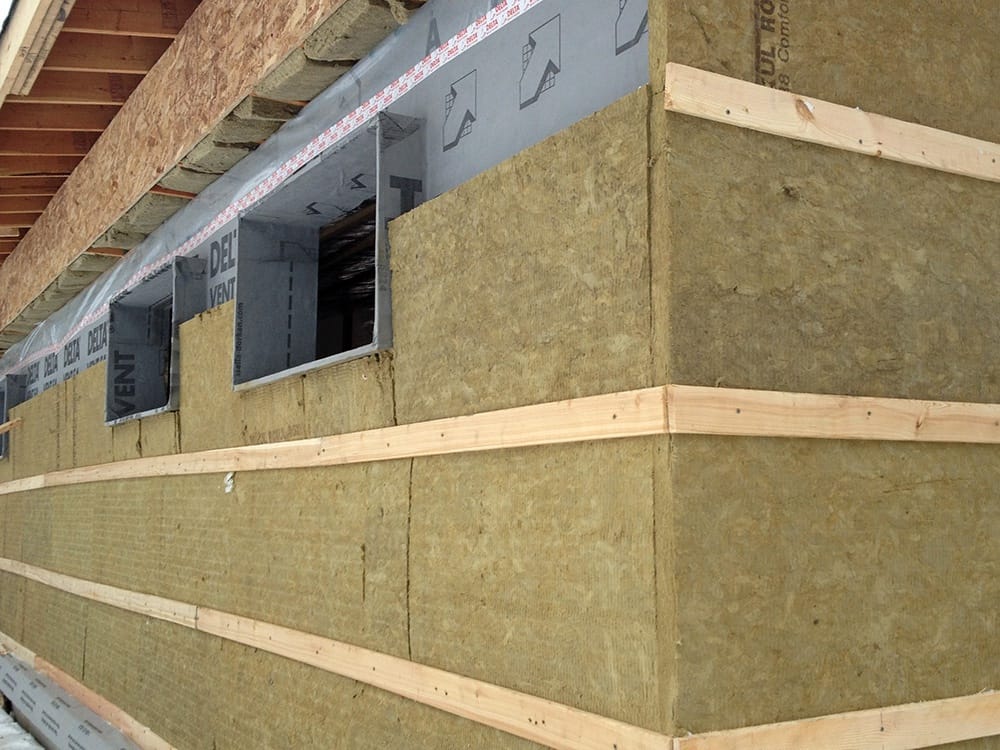 Anthony Painter
Cavity Width and Its Impact on Thermal Performance:
The width of the cavity plays a significant role in the effectiveness of insulation. A wider cavity allows for thicker insulation, improving the overall thermal resistance (R-value) of the wall. However, the minimum cavity width, typically around 40mm to 50mm, must be maintained to ensure proper drainage and air circulation. Builders must balance the need for insulation with the requirements for cavity width and drainage to achieve optimal thermal performance.
Insulation Material Selection:
Common insulation materials used in brick veneer construction include reflective foil insulation, bulk insulation (such as fibreglass batts), and foam boards. The choice of material should be based on the specific climate zone and the desired thermal resistance. Reflective foil insulation is effective in hot climates, reflecting radiant heat, while bulk insulation is better suited for cooler climates, where it reduces heat loss.
Fire Resistance in Brick Veneer Construction
Importance of Fire Resistance:
Fire resistance is a vital consideration in brick veneer construction, particularly in bushfire-prone areas of Australia. Australian Standard AS 1530 (Methods for Fire Tests on Building Materials) provides guidelines on the fire resistance of building materials, including masonry. Ensuring that brick veneer walls are constructed to withstand fire can significantly improve the safety of a home.
Fire-Resistant Bricks and Mortars:
Brick itself is inherently fire-resistant, making it an excellent choice for building in areas at risk of bushfires. However, the fire resistance of a brick veneer wall also depends on the mortar used. Mortars with fire-resistant properties should be used, especially in areas identified as high-risk according to the Australian Standard AS 3959 (Construction of Buildings in Bushfire-Prone Areas). These mortars help maintain the integrity of the wall during a fire, preventing the spread of flames and heat.
Cavity Barriers and Ember Guards:
In addition to using fire-resistant materials, it is important to incorporate cavity barriers and ember guards within the brick veneer construction. Cavity barriers help to prevent the spread of fire within the wall cavity, while ember guards are essential in bushfire-prone areas to prevent burning embers from entering the cavity through weep holes and other openings. These measures are particularly important in ensuring compliance with AS 3959.
Movement Control in Masonry: Expansion and Articulation Joints
Causes of Movement in Masonry Walls:
Movement in masonry walls can be caused by various factors, including thermal expansion, moisture content changes, and structural settling. Australian Standard AS 3700 (Masonry Structures) provides detailed guidance on controlling movement in masonry walls.
Expansion Joints:
Expansion joints are integral to controlling movement in brick veneer walls. They allow the masonry to expand and contract without causing damage. The placement of expansion joints is determined by the length and height of the wall, as well as environmental factors such as temperature and moisture levels. Typically, expansion joints are placed every 6 to 9 metres along the wall, but this can vary depending on the specific requirements of the project. Your structural engineer typically locates expansion and articulation joints (shown on the site and soil test data) and they will be shown on your floor plan and elevations.
Articulation Joints:
Articulation joints are a type of expansion joint specifically designed to accommodate movement in areas with reactive soils. These joints are required to ensure that the brick veneer wall can move independently of the structural frame, preventing cracks and other issues. The proper placement and sealing of articulation joints are required for compliance, particularly in regions with high soil movement.
Slip Joints:
Slip joints are often used in conjunction with articulation joints to allow for vertical movement while preventing lateral displacement. These joints are important at the tops of walls or around windows and doors, where differential movement is likely. Slip joints help to maintain the integrity of the brick veneer façade while allowing for the natural movement of the building.
Acoustic Performance
Sound Insulation in Brick Veneer Walls:
Acoustic performance is an important consideration in residential construction, particularly in urban areas or near busy roads. The Australian Standard AS/NZS 2107 (Acoustics—Recommended Design Sound Levels and Reverberation Times for Building Interiors) provides guidelines for achieving appropriate sound insulation levels in homes.
Enhancing Acoustic Performance:
The acoustic performance of brick veneer walls can be enhanced by adding insulation within the cavity. Bulk insulation materials, such as fibreglass batts or rock wool, are effective at reducing sound transmission through the wall. The thickness of the insulation and the width of the cavity play key roles in determining the wall’s overall sound insulation properties.
Cavity Width and Acoustic Performance:
A wider cavity provides better sound insulation by increasing the distance between the external brick veneer and the internal structural frame. This reduces the transfer of sound vibrations from the outside to the inside of the building. For homes in noisy environments, increasing the cavity width and using high-density insulation can significantly improve acoustic comfort.
Double Glazing and Other Measures:
In addition to wall insulation, other measures such as double-glazed windows and acoustic seals around doors and windows can further enhance the acoustic performance of a brick veneer home. These elements work together to create a quieter, more comfortable living environment.
Durability and Weathering
Durability of Brick and Mortar in Australian Climates:
The durability of brick and mortar in Australian climates is governed by their ability to withstand environmental factors such as UV radiation, temperature fluctuations, and moisture exposure. Australian Standard AS 3700 (Masonry Structures) outlines the requirements for ensuring that masonry materials are durable enough to withstand the specific conditions they will face.
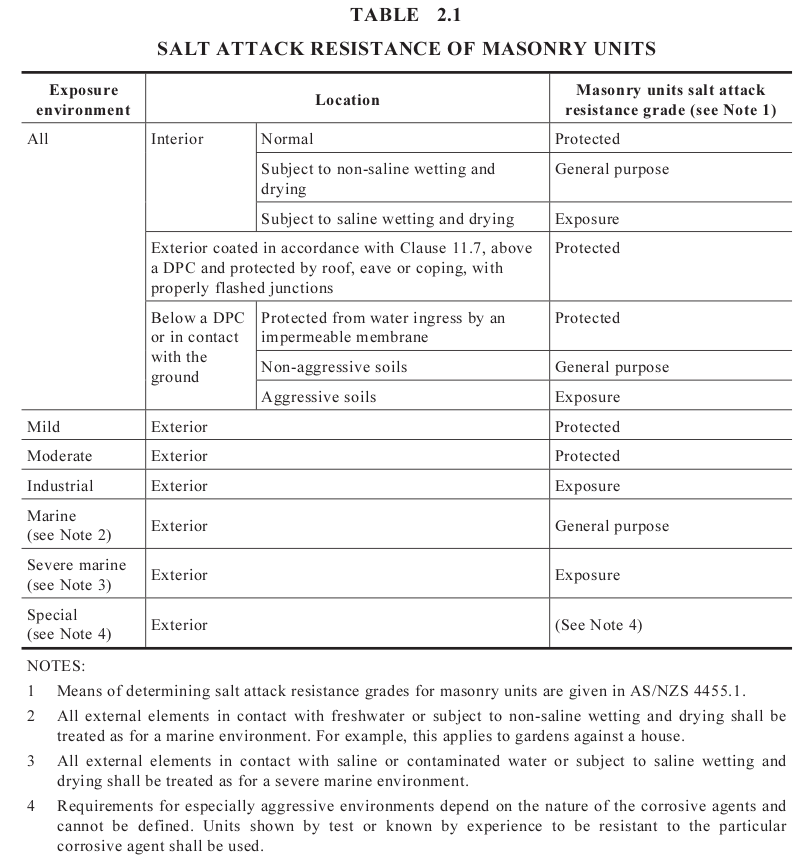
Impact of Coastal Exposure:
In coastal areas, brick veneer walls are exposed to salt-laden air, which can accelerate the weathering process and lead to the deterioration of both bricks and mortar. Using bricks with low salt content and selecting a mortar mix that is resistant to salt attack are required to ensure the long-term durability of the facade.
Resistance to Frost and UV Radiation:
In colder regions, frost resistance is a key consideration. Bricks and mortars used in these areas must be able to withstand freeze-thaw cycles without cracking or spalling. Similarly, in areas with high UV exposure, it’s important to choose materials that are resistant to UV degradation to prevent fading and weakening over time.

Conclusion
In this guide we covered the important parts of brick veneer facades, providing you with insights into best practices for installation, maintenance, and compliance with local building standards.
Remember, the success of brick veneer construction lies in the integration of its elements. Each component, from the bricks and mortar to the articulation joints and cavity ties, plays a role in the overall performance of the wall.
For further reading and additional resources, be sure to explore the related articles on Constructor.net.au. These articles provide valuable information on various aspects of residential construction, helping you make informed decisions and ensuring the longevity and beauty of your home.
FAQs
Q1: What is the difference between brick veneer and double brick?
- Answer: Brick veneer consists of a single layer of bricks that serves as an exterior facade, with a separate structural frame (usually timber or steel) behind it. Double brick construction, on the other hand, involves two layers of bricks with no separate structural frame. In double brick, both layers contribute to the structural integrity of the building, whereas in brick veneer, the bricks are purely decorative, with the structure relying on the internal frame.
Q2: How often should weep holes be placed in a brick veneer wall?
- Answer: Weep holes should be placed every 1.2 metres horizontally along the base of the brick veneer wall, directly above the damp proof course (DPC). This spacing allows for adequate drainage of any moisture that enters the cavity, helping to prevent water buildup and potential damage to the structural frame.
Q3: Can I choose any colour for the mortar, or are there limitations?
- Answer: While you can choose from a wide range of mortar colours to match or contrast with your bricks, it’s important to consider both aesthetic and practical factors. Mortar colour can affect the overall look of the facade, and in some cases, local building regulations or building covenants may require certain colours for specific types of construction.
Q4: What maintenance does a brick veneer facade require?
- Answer: Regular maintenance of a brick veneer facade includes inspecting the weep holes and ensuring they remain clear of debris, checking the condition of the mortar joints, and inspecting the articulation and expansion joints for signs of wear or damage. Additionally, it’s important to periodically clean the brickwork to remove dirt and stains, using appropriate cleaning methods like acid washing or pressure washing, depending on the type of bricks.
Q5: How do expansion joints prevent damage in brick walls?
- Answer: Expansion joints allow the brickwork to expand and contract in response to temperature changes, moisture content, and structural movement. By providing space for this movement, expansion joints prevent the bricks from cracking or distorting, which can otherwise occur if the wall is rigidly constructed without allowances for expansion.
Q6: Is acid washing necessary for all brick facades?
- Answer: Acid washing is not always necessary, but it is commonly used to remove mortar smears and stains from brick facades after construction. It is particularly useful for cleaning textured or porous bricks where mortar residues can be more challenging to remove. However, if your bricks have a special finish or are particularly sensitive to acid, alternative cleaning methods should be considered.
Q7: What are the signs of poor cavity cleanliness?
- Answer: Signs of poor cavity cleanliness include blocked weep holes, damp patches on the interior walls, and visible mortar droppings at the base of the cavity. These issues can lead to moisture problems, such as mould growth and structural damage, if not addressed. Ensuring the cavity is clean and free of debris during construction is the best way for the long-term performance of a brick veneer wall.
Q8: How can I tell if my brick veneer wall has been properly constructed?
- Answer: Indicators of a well-constructed brick veneer wall include evenly spaced and aligned bricks, consistent mortar joints, properly placed weep holes, and correctly sealed expansion and articulation joints. Additionally, the wall should be free from visible cracks, bowing, or leaning. If you have concerns about the construction quality, a professional inspection by a building surveyor or structural engineer can provide a more detailed assessment.
Q9: What materials are best for sealing articulation joints?
- Answer: The best materials for sealing articulation joints are flexible sealants, such as silicone or polyurethane-based sealants. These materials are durable, UV-resistant, and capable of accommodating the movement of the brickwork without cracking or losing adhesion. The sealant should also match the colour of the surrounding masonry to ensure a seamless appearance.
Q10: What are the risks of not having a damp proof course (DPC)?
- Answer: Without a DPC, moisture from the ground can rise through the brickwork by capillary action, leading to damp problems within the building. This can cause damage to the structural frame, promote mould growth, and result in unsightly and unhealthy conditions inside the home. Installing a DPC is essential to protect the building from these moisture-related issues.
Further Reading

 Anthony Painter