

So you're thinking of building a timber retaining wall in your garden. Excellent choice - timber is a natural, sustainable and attractive material that can create stunning landscaped features. But before you dive right in, there are a few things you need to consider to make sure you end up with a wall that will stand the test of time.
How high do you want the wall to be?
The height will determine how much soil it needs to hold back and the size of timbers required.
What sort of soil do you have?
Clay, sand or rock - each needs a different approach.
Do you want it to curve or have corners?
Angled sections require extra support. How will you fix the timbers in place?
And most importantly, what timber should you use?
There are many options from pine to hardwoods, each with pros and cons.
This article will walk you through all these considerations to help you design and build a timber retaining wall that ticks all the boxes. By the end, you'll have the knowledge to create a stunning garden feature that will last for years.
What Is a Timber Retaining Wall?
A timber retaining wall is a landscape structure that holds back soil and prevents erosion on sloping ground. It’s made of wooden posts, boards, logs or sleepers that are anchored into the ground.
Timber retaining walls are popular for residential gardens because wood is attractive, durable, and blends well. The natural appeal of timber complements plants and landscaping. Timber walls are also more affordable and easier to construct than concrete or stone.
There are a few types of timber retaining walls:
- Post and board walls use vertical posts with horizontal boards attached. This style has gaps between each board, allowing for drainage and plant growth.
- Log walls stack whole logs on top of each other, with each tier stepped back from the one below it. Log walls create a rustic look but require more timber.
- Sleeper walls use railway sleepers laid horizontally and stacked in a stair-step pattern. Sleepers are an inexpensive, recycled option but can be difficult to work with due to their size and weight.
The key considerations for a timber retaining wall are:
- Choose durable, weather-resistant wood. Treated pine (75mm sleepers over 50mm thickness) and hardwood hold up well outdoors.
- Bury about a third of the posts or sleepers in the ground for stability. Secure them in concrete for extra support. Always ensure that there is at least 100mm of drainage gravel placed at the base of each post hole. This will help compact and reduce the instance of settlement and post rot by keeping the end of the post above water that may accumulate in the base after rain.
- Step the wall back as it gets higher, with each tier angled slightly towards the slope. This helps the wall resist the pressure from the soil.
- Include drainage behind the wall. Add a gravel or crushed rock layer and instal drain pipes to prevent water buildup. Drainage gravel is your friend when building a retaining wall so don't skimp on it!
- Backfill and compact the soil behind the wall as you build up. This anchors the structure in place.
- Consider the slope and any extra loads like buildings or vehicles near the wall. Get professional advice for more complex sites.
With the proper design and construction, a timber retaining wall can last for decades and create an attractive landscaping feature. But for the best results, you’ll want to choose high quality, durable materials and take the necessary steps to ensure maximum stability.
Timber Qld has developed two fantastic technical data sheets all about retaining wall design and construction considerations. View them by clicking on the button below:
Key Design Considerations for Timber Retaining Walls
So, you’ve decided to build a timber retaining wall in your yard. Excellent choice—timber is attractive, natural and long-lasting. But before you dive in, there are a few key things to consider to ensure your wall stands strong for years to come.
Slope and drainage
The slope of the ground in front of and behind the wall is critical. Steeper slopes mean more pressure on the wall, so you’ll need thicker timber and deeper footings. Make sure water drains away from the wall in both directions. Add drains, swales or pipes if needed. Standing water is the enemy here.
Choice of timber
Use durable hardwoods that can handle ground contact and better resist moisture and pests. Pressure-treated pine is also a good, affordable option. The bigger the timber, the more stable the wall. For most small residential walls, 200mm x 75mm is a good size when using treated pine and 200x50mm for hardwood.
Anchoring and footings
Bury about a third of the timber in the ground for stability. Concrete footings under the first row of timber help prevent settling. You'll also want to anchor the wall to the ground, especially for higher walls. Deadman anchors, concrete pads and rebar rods are all options. If you use threaded rod attached to deadmen you can add a small amount of adjustment to your wall to account for future settlement.
Backfill
The material you use to fill behind the wall is important. Choose a free-draining granular fill like drainage gravel. Compact the fill as you go to maximise stability. Leave at least 6 inches between the fill and the top of the wall for drainage and to allow for settling and top up 6 months after wall installation.
Get help when needed
If your wall is over 1 metre high, you need to get professional help. An experienced structural engineer can assess the site, choose suitable materials and design a wall that will resist applied loads. They can also handle more complex installations, like walls on steep slopes, walls with surcharges or walls with foundations that bridge over services (like stormwater, sewer or electrical trenches). You will also require an engineer to inspect footings and at other stages during the wall construction to ensure compliance to the design and for them to sign off and certify the wall installation (provide you with a Form 15 or Form 12).
With the right materials and techniques, a timber retaining wall can create usable yard space and add value to your property. But do it right the first time—it’s not a job you’ll want to do over again!
Construction and Installation of Timber Retaining Walls
Now that you’ve designed your timber retaining wall and have all the necessary materials, it’s time to start building. Construction typically takes place over a few weekends for a DIY homeowner. The key is to go slowly and ensure each layer is level and secure before moving on to the next. One of the main considerations you will have is "what is the spacing of my uprights?" 1.8m centres is the maximum I would ever do and if you would like to keep your wall straighter for longer periods of time then reduce this down to 1500mm or 12oomm. Obviously, reducing the post spacing means more material and more labour to install.
Excavation
The first step is to mark out the area and dig out the soil to the required depth. Use stakes and string lines to define the shape of the wall clearly. Dig about 150mm to 200mm deeper than the first course of timber to allow for drainage material. Wheelbarrow the soil away or stockpile it nearby for backfilling later.
Base preparation
Once excavated, level and compact the base. Lay down a 6-inch layer of free-draining material like gravel or road base and rake smooth. This will provide stability and allow water to move away from the wall. Instal an agricultural pipe at the base of the wall to carry water to a suitable outlet. Cover the pipe with drainage material.
Post-installation
Prep each post end to be buried in the ground with sump oil or similar preservative treatment. Place at least 100mm of drainage gravel in the base of each post hole to prevent post rot. Stand the first posts in place, spacing them as per your design. Brace the posts to keep them plumb while backfilling. Secure posts in place by concreting them in holes in the base. Check each post with a level to ensure they are all perfectly vertical before the concrete sets.
Installing wales
With the posts installed, lay out the wales (horizontal members) and mark where they cross the posts. Cut notches in the posts so the wales sit flush, then bolt the wales to the posts. Stagger the joints between wales for maximum stability. Instal corner bracing if required for your design.
Drainage Installation
Before backfilling, you need to install drainage behind the retaining wall. At the bare minimum, an agg line, a flexible slotted PVC pipe must be installed at the base of the wall. There is debate about using sock-wrapped agg lines vs no sock as in, will the sock become clogged with sediment collecting on and blocking the porosity of the sock, rendering the agg line useless? If you would like to err on the side of caution, don't use a sock-wrapped agg line but ensure there is at least 8" of drainage gravel fully surrounding the pipe to ensure water filters through and into the agg line where it can discharge into the stormwater line. The main purpose of agg lines is to remove pressure from behind the wall to prevent the "overturning moment" caused when pressure builds up.
If you would like to go "full defcon-3" on retaining wall draining I highly recommend the Geofabrics or Polyfabrics drainage cell products and the Terradrain Sheet drain product. To install the drainage cell product, first lay your agg line and drainage gravel then assemble the draining cell and pin it to the back of the retaining wall with roofing nails (2.5" long). This product captures lateral water and will direct it into the agg line.
Links
Terradrain Sheet Drain - LINK
Drainmasta DrainCel - LINK
Geofabrics - Geosheet - LINK
Backfilling
Once the frame is complete, you can start backfilling behind the wall. Use the soil excavated earlier, compacting it in layers as you go. With each layer, check that the wall remains plumb and make any necessary adjustments. Leave about 6 inches between the final backfill level and the top of the wall to allow for settlement.
Capping (optional)
You can install timber capping or fix metal gang nail plates to the top of each post for added protection. The caps help prevent water from getting into the wall and improve the appearance, and plates will help reduce the tops of the posts splitting. Secure them in place with construction adhesive and galvanised batten screws for the best result. Treat the tops of all posts with a timber preservative to help reduce moisture absorption.
Maintenance Tips for Timber Retaining Walls
Maintenance Tips for Timber Retaining Walls
Regular maintenance and inspections are key to keeping your timber retaining wall in good shape for years to come.
Check your wall frequently, especially after heavy rains or other extreme weather events. Look for signs of excess movement, cracks, drainage issues or damage. If you notice the wall leaning or bulging, contact a professional immediately. Small cracks can often be repaired, but an expert must address major structural issues immediately.
Inspect the drainage system and clean out any blokages to ensure proper water flow. Blocked drains or gutters can lead to a buildup of hydrostatic pressure behind the wall, causing instability.
Treat the wall with a wood preservative every few years, especially the parts in direct contact with soil. This will help prevent rot, decay and insect damage. Re-stain or paint the visible face of the wall as needed to maintain an attractive appearance. Creasote and sump oil are popular and affordable preventative treatments.
Trim back any plants or trees growing next to the wall. Their roots can damage the structure and drainage pipes. Likewise, don't pile heavy materials or equipment against the wall.
For log walls, check that the logs are still tightly joined with no major gaps. You may need to re-seal or chink the logs to prevent soil erosion.
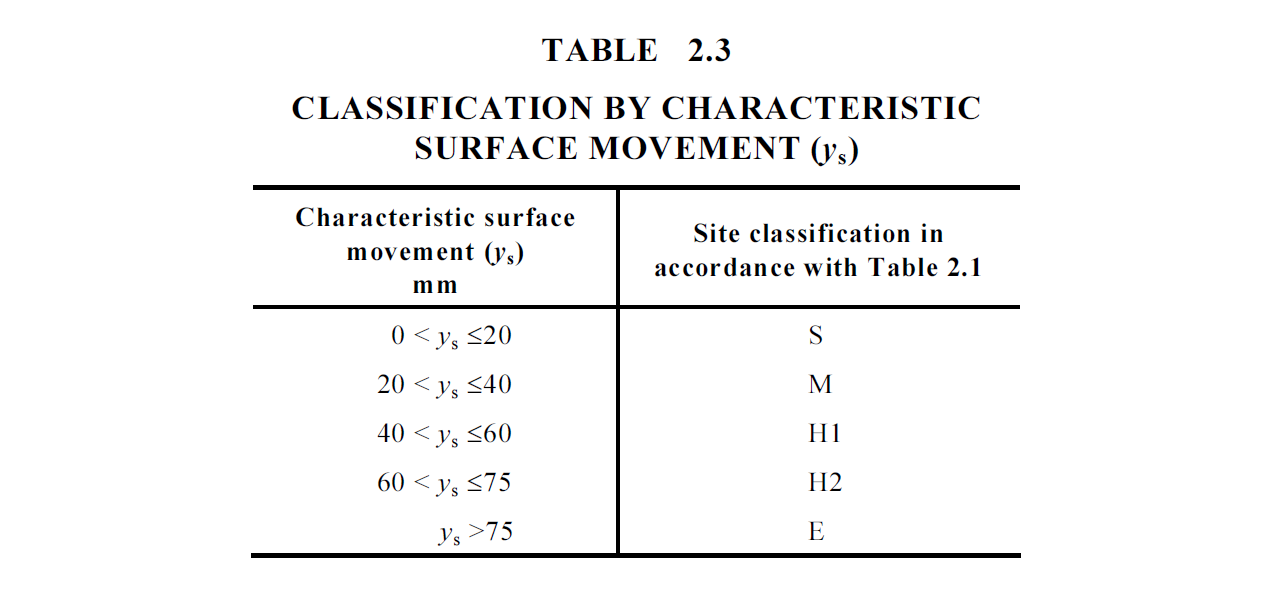
Contact an expert to assess the situation if you notice the wall moving more than normal seasonal expansion. The amount of seasonal movement to expect is determined by the types of soil onsite. The easiest way to know the expected movement value is to consult the engineer's site and soil assessment report and look for the Ys value. Stable sites have lower Ys values, whereas reactive sites have higher Ys values. See the table below for example soil types and expected Ys values. Small adjustments can often stabilise the wall, but reconstruction may be needed in severe cases. It's best to address retaining wall issues early before failure occurs.
Regular maintenance and monitoring will help ensure your timber retaining wall provides safe and effective service for many years. Address any problems promptly to avoid costly repairs down the road. Keeping your wall in peak condition adds value and curb appeal to your property.
When to Engage an Engineer for Timber Retaining Walls
When to Engage an Engineer for Timber Retaining Walls
Sometimes a timber retaining wall project becomes complicated enough that you’ll want to bring in a structural engineer. It’s best to do this before starting construction to ensure your design is sound and safe.
If your wall will be over 1.0 metres high you need to engage a structural engineer. They can properly assess the forces involved and specify an appropriate wall design. Higher walls require more robust structures to hold back the additional soil weight. An engineer will determine the right post sizes, depths and spacing, as well as bracing, to handle the load.
Sloping backfill or surcharge loads also call for engineering input. The angled soil increases the horizontal pressures, and extra loads like vehicles, equipment or buildings add more weight the wall must sustain. An engineer can design the wall to suit the site’s unique conditions. They may specify larger posts, closer spacing, extra bracing or anchoring to provide adequate support.
Drainage and moisture conditions impact a wall’s stability. Reactive soils that expand and contract with moisture changes require careful design consideration. An engineer will evaluate the site and design a wall able to handle potential soil movement to avoid issues like cracking or bowing. They can also design an effective drainage system to properly control moisture levels.
In areas with aggressive insects like termites, an engineer may specify particular wood treatments or alternative materials not susceptible to damage. They have the expertise to choose options suited to your local conditions and the wall’s expected lifespan.
For any timber retaining wall, it’s a good rule of thumb to consult an engineer if you have doubts about the design or site complications. An engineer’s input helps ensure your wall is structurally sound, safe and built to last. Their guidance can prevent problems down the road and provide peace of mind that your wall will stand the test of time.
Conclusion
So there you have it, everything you need to know before tackling that timber retaining wall project in your garden. While the planning and construction may seem daunting, by following the steps and with the help of an experienced engineer or a landscaping contractor, you'll have a beautiful new timber wall before you know it.
Think of how satisfying it will be to stand back and see the transformation of your outdoor space. All the effort will be worth it for a wall that not only looks great but stands the test of time. Now get out there, roll up your sleeves, and start building!


