Test Your Knowledge Of Concrete Construction

Introduction
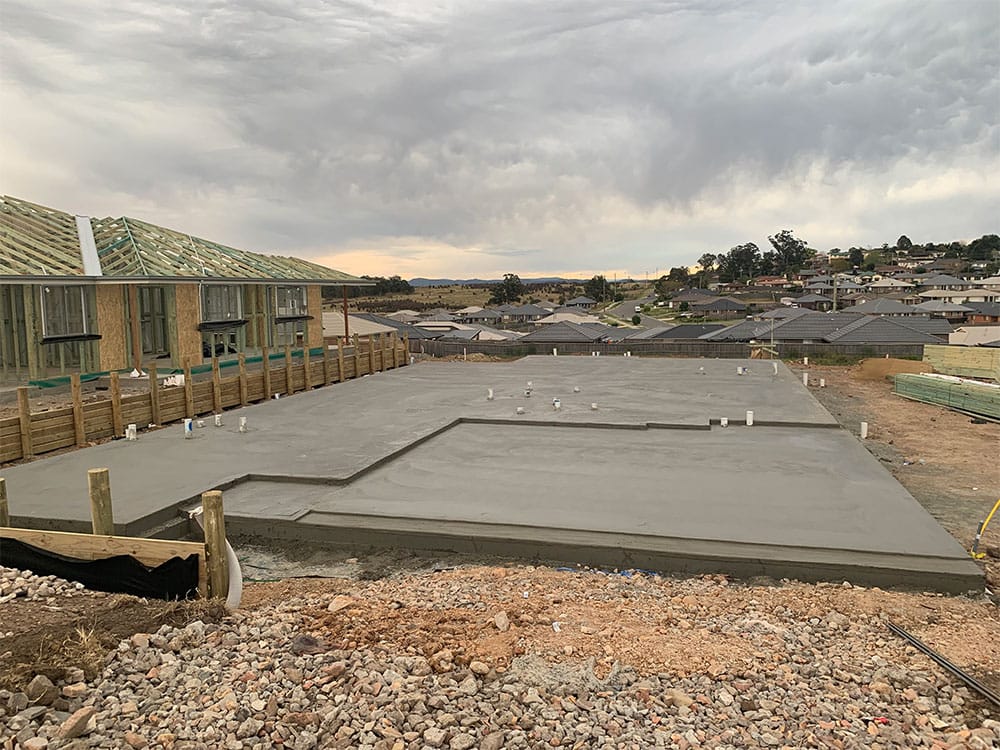
Building a home is one of the biggest investments you’ll ever make, so ensuring quality every step of the way is key to its longevity—and to your peace of mind. One stage you don’t want to overlook is the post-pour concrete slab inspection. Sure, the pre-pour inspection (our C5 Checklist) is arguably the MVP of stage inspections, but the post-pour inspection is just as essential.
Why? Because once the concrete is down, it’s time to check what really happened. Did the pour go as expected, how was it finished? Were there any surprises lurking beneath the surface? Did a concretor kick a pipe over by accident? This step ensures your foundation is as solid as it looks—and that you’re not in for unwelcome issues down the track.
Think of it as double-checking your homework after the concrete has done its thing. After all, it’s better to catch any problems now than to let them show up later (when they’ll cost a lot more to fix).
In this post, we introduce our C6 Post-Pour Slab Inspection Checklist designed specifically for residential homes.
Whether you’re building your first home or managing a construction project, this checklist will help you identify and address potential problems early—saving you time, money, and stress.
We’ll also touch on the importance of sediment and erosion control (ESC) during construction. By following this guide, you’ll gain the tools and confidence needed to ensure your construction project runs smoothly and generally complies with Australian standards like AS2870 for residential slabs and footings.
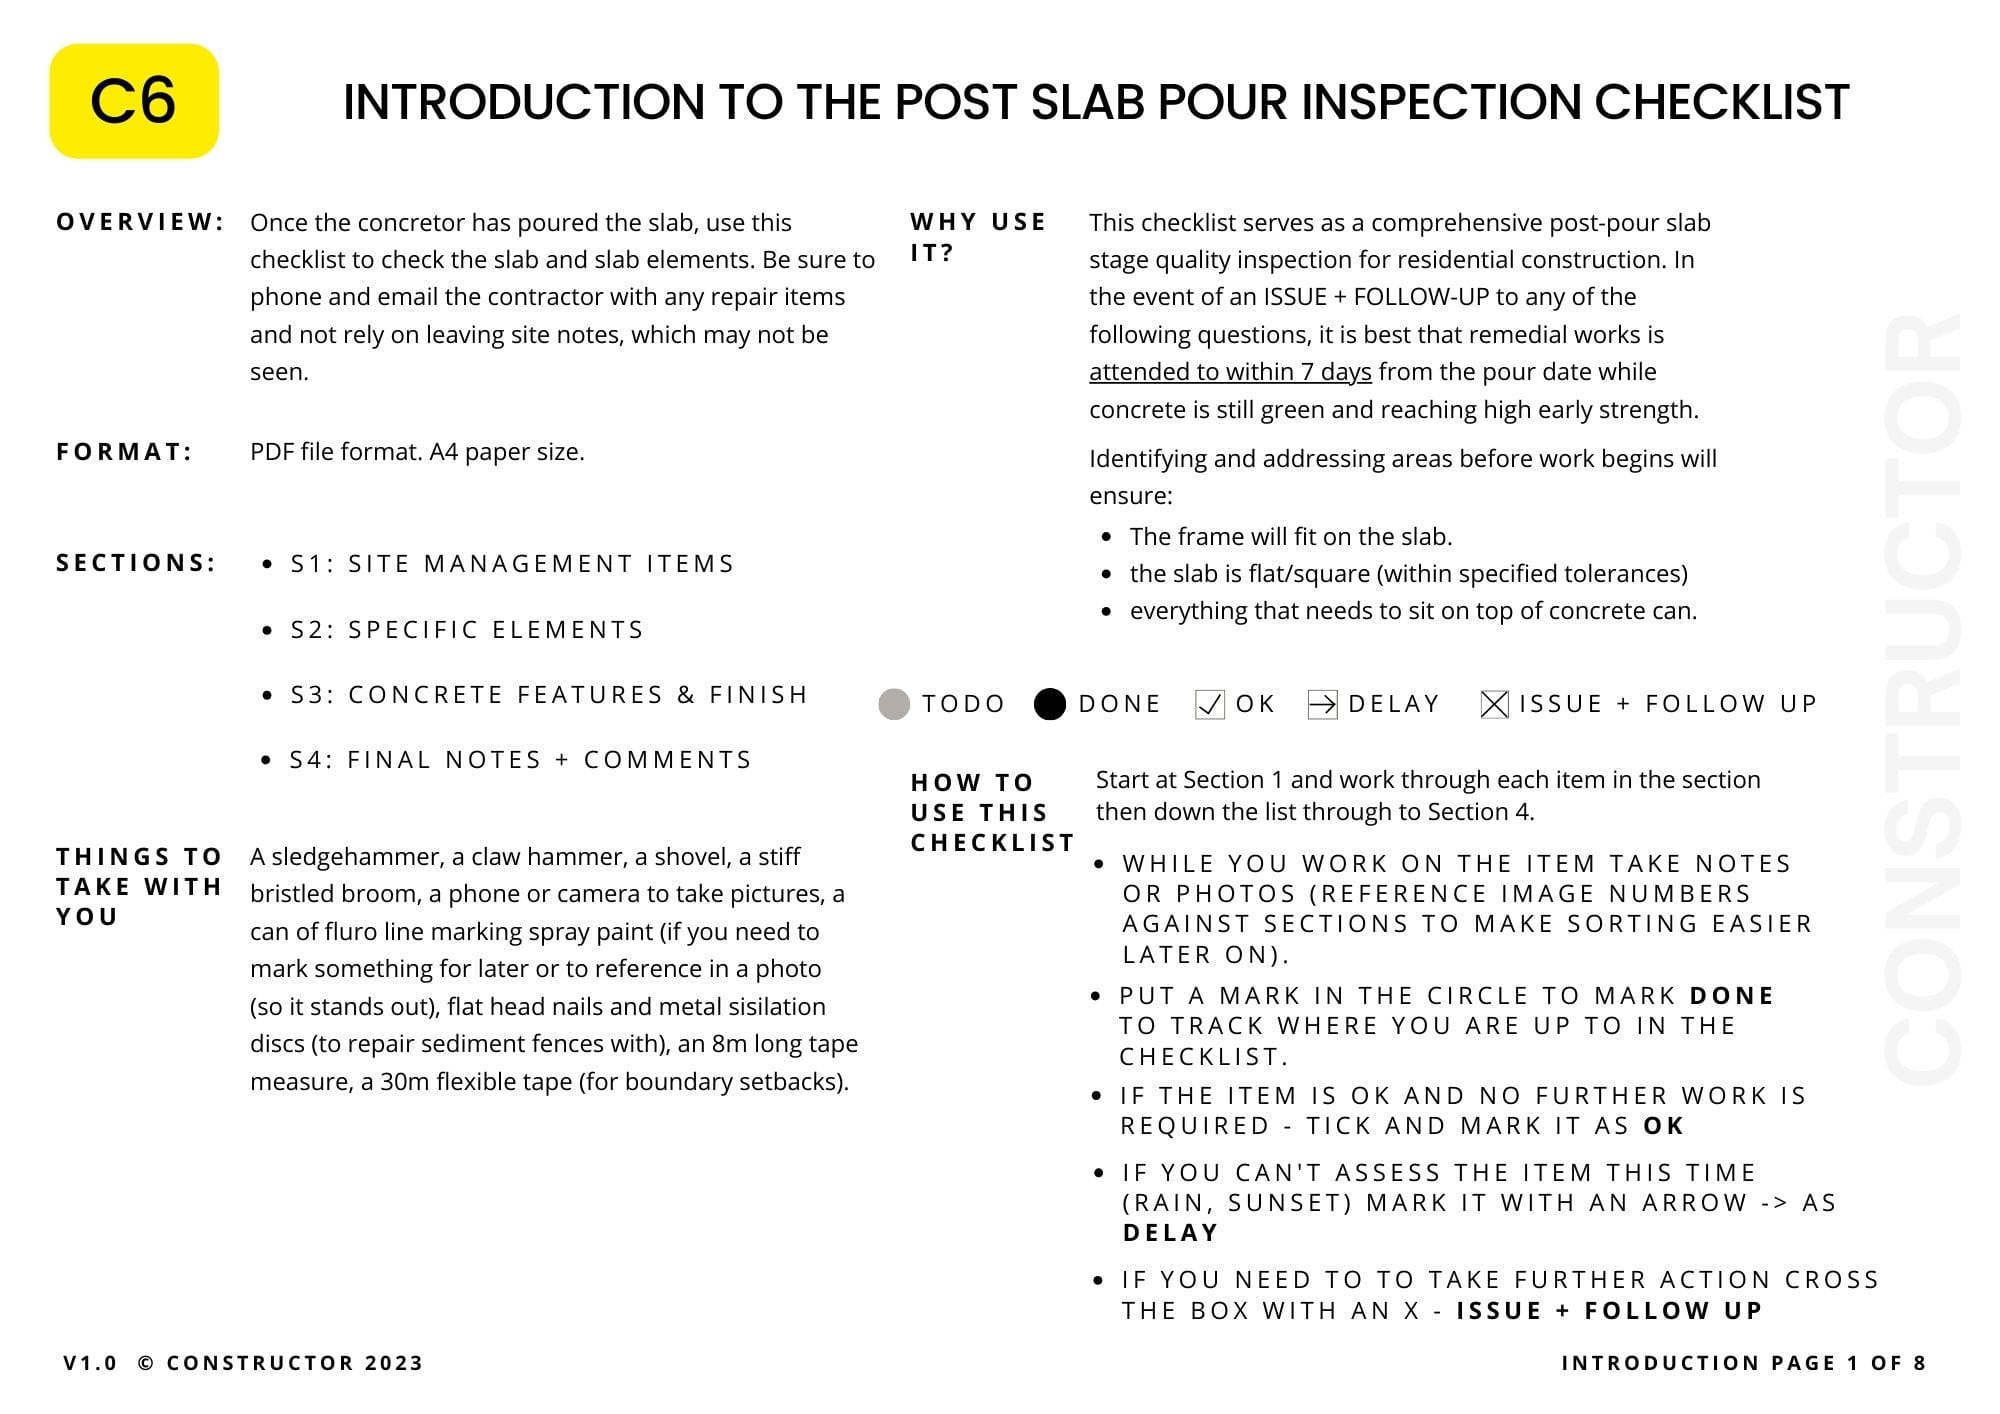
What Is the Post-Pour Concrete Slab Inspection Checklist?
The Post-Pour Concrete Slab Inspection Checklist is a practical tool designed to help homeowners, builders, and project managers ensure the quality and compliance of a freshly poured residential house slab. Our checklist simplifies the inspection process, breaking it down into actionable steps that are easy to follow, even if you’re not a construction expert. This is a follow up checklist to our C5 Pre-Pour Inspection checklist. If you haven't seen this already, read all about it using the link below:
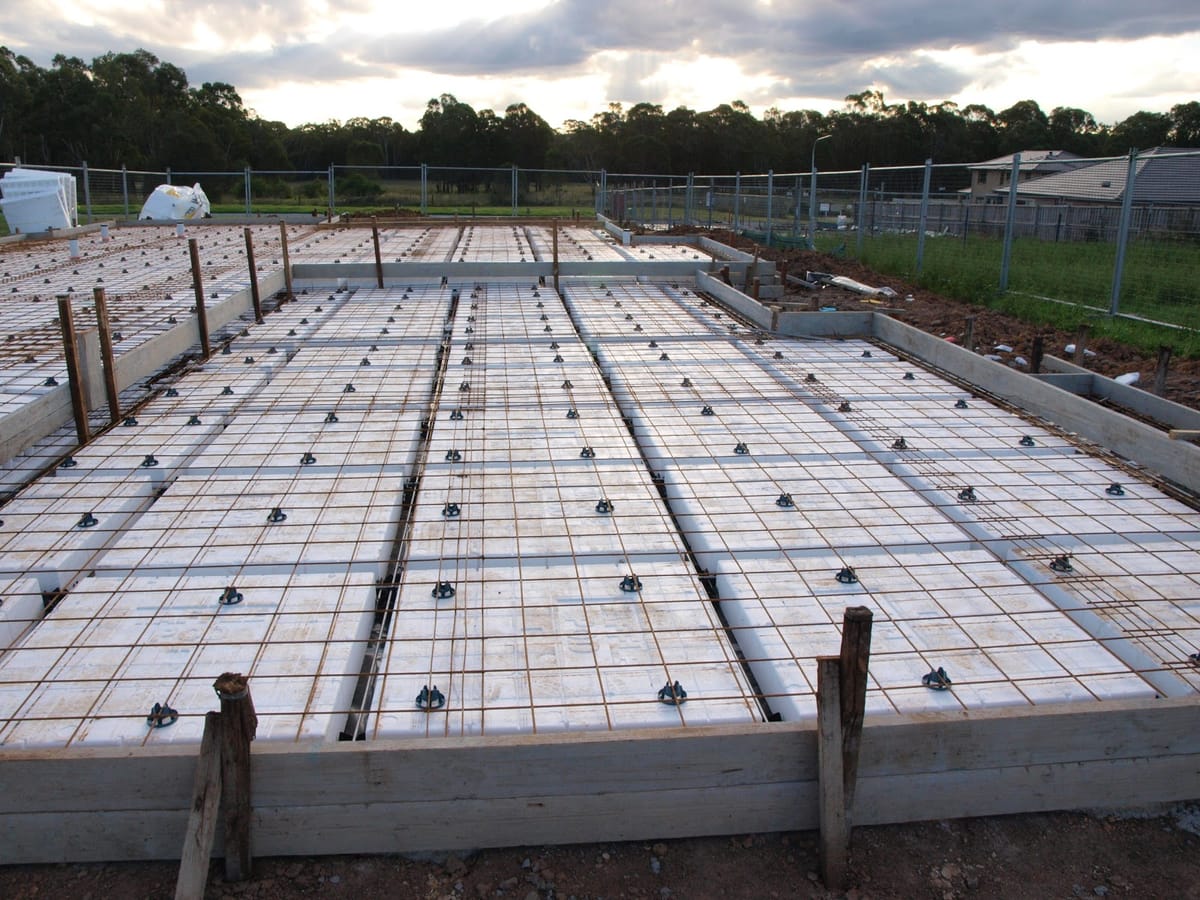
First comes our C5 checklist then post pour, use our C6 checklist - for a buttery smooth slab surface finish 😄
Purpose of the Checklist
The checklist is a guide to identify common issues that can arise immediately after a slab is poured. By addressing these issues early, before subsequent construction stages begin, you can prevent problems such as:
- Misalignment or unevenness in the slab that affects the framing stage.
- Poor-quality finishes that compromise the slab’s longevity.
- Incorrectly installed damp-proof membranes, which can lead to moisture ingress.
- Non-compliance with sediment and erosion control (ESC) regulations, potentially resulting in fines or environmental harm.
Structure and Scope
The checklist is divided into several key areas of focus:
- Site Management: Ensuring the construction site is organised, safe, and compliant with sediment control measures.
- Concrete Features and Finishes: Inspecting the slab’s flatness, levelness, curing, and finishes to meet Australian Standard AS2870.
- Erosion and Sediment Control: Checking that ESC measures are properly implemented to prevent runoff and sedimentation issues.
Why Use the Checklist?
Quality control at this stage of construction is essential for avoiding:
- Long-term structural issues that may require costly repairs.
- Delays in subsequent construction phases due to rectification work.
- Potential legal and regulatory complications from non-compliance.
Key Terms Defined
Understanding the terminology associated with post-pour slab inspections is helpful, especially if you’re not familiar with construction processes. Below, we’ll break down some of the key terms mentioned in the checklist, making it easier for you to follow along and spot potential issues during your inspection.
1. Sediment and Erosion Control (ESC)
ESC refers to measures implemented to prevent soil, sand, and construction debris from being washed into stormwater drains or neighbouring properties. These measures include sediment fences, straw wattles, and stockpile covers, all of which are important for compliance with environmental regulations.
2. Concrete Curing
Curing is the process of maintaining adequate moisture in the poured concrete to ensure it achieves its desired strength and durability. Common curing methods include applying curing compounds, sprinkling water, or using damp coverings like hessian or plastic sheets.
3. Green Concrete
Green concrete refers to freshly poured concrete that has not yet reached its full strength. Most repairs or corrections to the slab are easiest to perform during this stage, typically within 7 days (high early strength) of pouring.
4. Tolerances (Flatness and Levelness)
Tolerances define the acceptable limits of variation in the slab’s surface. For example:
- Flatness: How even the slab surface is across its length. The standard deviation is typically no more than 4mm in any 2m length.
- Levelness: The degree to which the slab matches its designed elevation, usually no more than 10mm in any room area.
- The overall deviation of floor level to an entire building footprint shall not exceed 20mm within 12 months.
5. Damp-Proof Membrane (DPM)
A plastic sheet or similar material placed beneath or extending from the slab edges to prevent moisture from seeping through the concrete into the structure. DPM must be intact and properly extended to ensure effectiveness.
6. Penetrations
These are openings in the slab for plumbing, electrical, or other services. They must remain plumb (vertical) and properly sealed or capped to prevent water ingress and termite infestation.
7. Termite Protection
Measures such as chemical barriers or physical seals applied around slab penetrations to prevent termites from entering the structure through gaps in the concrete.
8. Erosion Rills
Small channels or streamlets carved into exposed soil by running water. These can indicate poor erosion control on the site.
9. Control Joints
Deliberately created weak points in the slab to allow for controlled cracking as the concrete dries and shrinks. Properly installed control joints help prevent random, unsightly cracks. Learn more about the different type of concrete joints, their purposes and uses in our blog post below.

10. Curing Compounds
Specialised chemical products applied to the slab surface to retain moisture during the curing process. They help prevent premature drying, which can lead to cracking.
Essential Checks After Pouring the Slab
A post-pour slab inspection is your opportunity to address potential issues before they escalate into costly problems. By following this section of the checklist, you can systematically assess key areas of the slab and the site to ensure everything meets construction best practices.
Site Management Items
Managing the site after a slab pour is important for maintaining order and compliance. Here’s what to check:
- Sediment Fences: Ensure that sediment fences are upright, intact, and effectively preventing runoff. Damaged or improperly installed fences can lead to environmental fines.
- Road Kerbs and Gutters: Verify that streets and drainage areas are free of sediment and debris. Sweep as necessary to maintain compliance.
- Signage and Security:Confirm that all required safety signs are visible from the street.Ensure the site is secure to prevent theft or vandalism.
- Neighbouring Properties: Check for any accidental damage to neighbouring yards, fences, or structures. Document issues with photos and address them promptly.
Concrete Features and Finishes
Concrete quality and adherence to specifications are critical for a durable slab. Pay close attention to these elements:
- Flatness and Levelness:
- Use a laser or spirit level to ensure the slab is within specified tolerances (±5mm levelness and maximum deviation of 10mm over a 3m span).
- Address areas outside these limits before framing begins.
- Curing:
- Confirm that curing methods are applied, such as water sprinklers, damp coverings, or curing compounds. Proper curing prevents surface cracking and ensures long-term strength.
- Damp-Proof Membrane:
- Verify that the DPM extends at least 300mm beyond the slab edges as per AS2870 requirements. This protects the structure from rising moisture.
- Building Dimensions: Check to ensure that sizing is +-5mm from plan dimensions or exceed (length)/(200) or L/200 (which ever is the greater)
- Finished Floor Levels: Finished Floor Levels (FFL) or Reduced Levels (RL) are defective if the depart from the plan RL or FFL by more than 40mm
Penetrations and Termite Protection
Service penetrations, such as pipes and conduits, require careful inspection:
- Alignment:
- Ensure all penetrations remain vertical (plumb) and are capped or taped to prevent debris ingress.
- Termite Barriers:
- Confirm that termite protection measures around penetrations are intact and covered in concrete. Any gaps can compromise termite resistance.
Erosion and Sediment Control (ESC)
Sediment and erosion control measures help protect the environment and prevent regulatory penalties:
- Drainage:
- Inspect sediment traps, fences, and straw wattles for proper installation and maintenance. Check for any signs of water bypassing these measures
- Stormwater Inlets:
- Confirm that all stormwater inlets are safeguarded against sediment infiltration. Clear any blockages immediately.
Visual Inspection and Documentation
A visual inspection can reveal issues that measurements might miss:
- Edge Finishes:
- Walk the slab perimeter to ensure edges are straight, clean, and properly sponged or vibrated to avoid pitting.
- Photos and Notes:
- Take photos from multiple angles, around the site including the front of the site clearly showing the sediment fence installation and ensuring the builder's & safety sign is visible.
- Use fluro line marker paint to highlight areas requiring repair for clear communication with contractors.
- Only use marking paints, crayons and the like when it will not affect future floor coverings or systems - like grinding or honing. Check with the suppliers to ensure product compatibility before using markers and applied products on slabs to ensure there is not a reaction or it creates further issues. Examples of surface finishes that may be affected by builders crayons are polished concrete and some vinyl flooring.
By conducting these checks systematically, you can identify and address potential issues before they disrupt the next stages of construction. If any significant issues arise, document them thoroughly and contact your contractor immediately for resolution
Common Post-Pour Issues
Even with a detailed checklist, issues can arise after the concrete slab has been poured. Promptly identifying and addressing these problems ensures they don’t escalate into costly delays or structural defects. Here are some common post-pour issues and the steps you can take to manage them.
1. Slab Flatness and Levelness
- Issue: The slab surface is uneven or slopes incorrectly, exceeding the tolerances specified in AS2870 (e.g., 10mm over a 3m span) - yes, 10mm is alot and will not help rectified edge tiling in any way (surface preparation like filling and grinding is required to make these tiles work) - unavoidable and must be factored into building costs.
- Solution:
- Use a laser or long spirit level, or long straight edge with a medium sized spirit level to identify problem areas.
- Mark uneven sections with spray paint and discuss options with your contractor, such as grinding high points or filling low areas (plus the products to be used, the costs, and the timing when it is to be done.
- Ensure any remedies are documented in writing and agreed upon, including the method, who is responsible and when. All talk no documentation makes Jake annoyed as he pays another invoice to fix up someone else's problem.
2. Inadequate Curing (Hot Weather Curing)
- Issue: The slab surface shows signs of premature or rapid drying, such as cracks or flaking.
- Solution:
- Ensure curing compounds are applied or water curing is initiated immediately. If the concrete has already started cracking, consult with your contractor about applying a surface sealer or repairing the affected areas.
3. Damp-Proof Membrane (DPM) Misplacement
- Issue: The DPM does not extend sufficiently beyond the slab edge or has been damaged during the pour.
- Solution:
- Inspect the membrane for any tears or insufficient overlap (minimum 300mm).
- Request repairs if torn
- If DPM does not extend past boxing, is unable to fold up against the slabe edge then a performance solution or edge treatment will be required.
- Most likely a liquid penetrating waterproofing agent (something from Xypex or similar) will need to be applied or a topical membrane system such as WPA butyl tape sealed against visible membrane then to the slab edge along with two coats of WPA200 cementitious membrane applied to exposed areas.
- Note WPA200 and the Sika Equivalent are fantastic external waterproofing products. These are negative membranes meaning they do not allow water to pass from the back face through the front face or the fron face through to the back face.
- be sure to consult with your structural engineer and or a waterproofing consultant prior to breaking out and applying products. The main thing, like everything in construction, is liability and sign offs. Who is left holding the bag if things go tits up? (i couldn't resist saying this - its Friday after all).
4. Termite Barrier Gaps
- Issue: Gaps are visible between concrete and penetrations, compromising termite protection.
- Solution:
- Add or repair termite collars around penetrations and ensure they are sealed with concrete.
- Termite sealants are available - just hard to find sometimes.
- Depending on the extent of the gaps, concrete scabble, cutting may be required to reset protection and allow sufficient coverage over the repair to prevent fouling of future floor coverings.
5. Edge Finishes and Surface Defects
- Issue: Slab edges are pitted, irregular, or improperly finished, which can impact aesthetics and durability.
- Solution:
- Use sponging or grinding to smooth rough edges and eliminate pits. Ensure these adjustments comply with AS2870’s surface tolerances.
- Filling and patching of slab edges can only be done as directed by the structural engineer.
- If there is excessive honeycombing or cold joists, consult with your structural engineer.
6. Sediment and Erosion Issues
- Issue: Soil or construction debris has washed into stormwater drains or neighbouring properties, violating sediment and erosion control (ESC) regulations.
- Solution:
- Clear blocked drains and repair sediment fences. Reinforce ESC measures to prevent further runoff.
- Check the kerb and channel is clear, ensure sediment fences are trenched in, taught and upright.
- Ensure vehicle access or parking areas are designated and prepared with 40-50mm gravel/rock to avoid offsite tracking.
8. Excess Concrete and Debris
- Issue: Excess concrete has been dumped on-site, or debris remains uncollected, creating safety hazards.
- Solution:
- Arrange for immediate removal of waste materials and leftover concrete.
- Break up green concrete into smaller batches before it sets which may save disposal costs later (may not need machine hire to place into skips shift).
- Sweep kerbs and roadways to prevent fines from local councils.
- Note down excess concrete make adjustments to future deliveries/ordering processes (to avoid waste) - minimise waste where you can.
9. Cracking in Green Concrete
- Issue: Hairline cracks have appeared in the slab before it has fully cured.
- Solution:
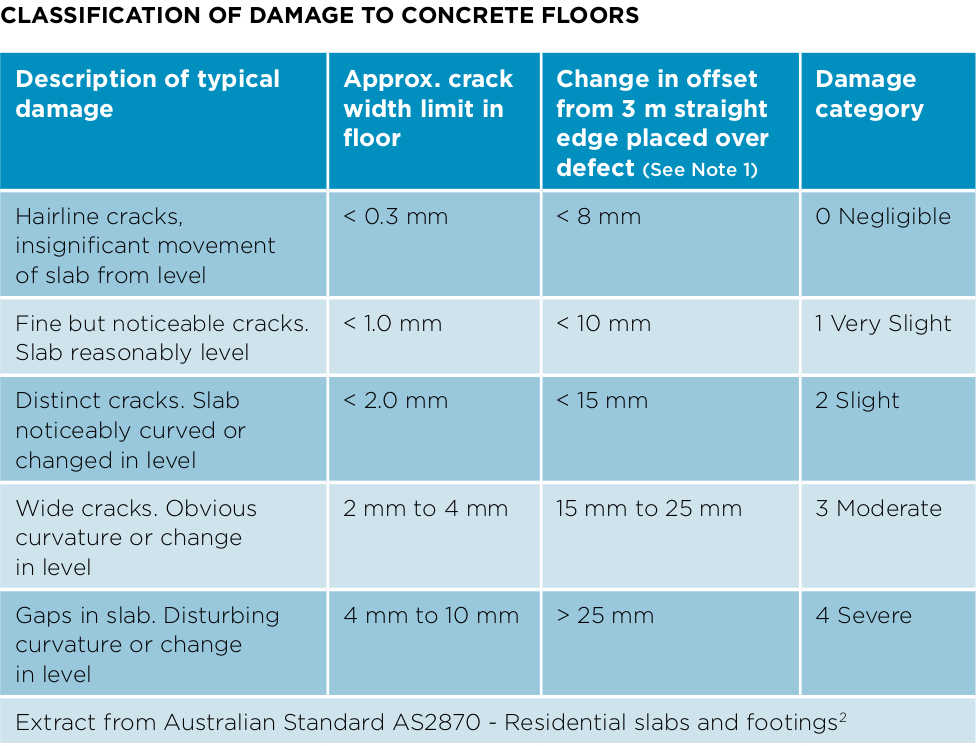
- Minor hairline cracks can often be monitored, but significant cracks may require filling with epoxy or other sealants. Discuss with your contractor to assess the severity and ensure it won’t affect structural integrity.
- How big is your crack?
10. Documentation and Follow-Up
- Issue: Issues identified during the inspection are not being addressed promptly by contractors.
- Solution:
- Keep detailed records of all identified problems, including photos and written notes. Follow up with contractors via email and phone, ensuring you have a record of all communications.
How to Manage Erosion and Sediment Control (ESC)
Erosion and sediment control (ESC) is not just a regulatory requirement—it’s a critical part of ensuring your construction site remains environmentally responsible and free from potential fines. Properly managing ESC after a slab pour helps protect nearby properties, stormwater systems, and your site’s compliance with Australian construction standards.
1. Why ESC Matters
During the post-pour phase, soil disturbances can lead to erosion, while sediment from the construction site may contaminate nearby stormwater systems. Poor ESC management can result in:
- Regulatory fines from councils or environmental authorities.
- Damage to neighbouring properties from sediment runoff.
- Delays in construction if issues require remedial work.
2. Key ESC Elements to Monitor
After the slab pour, ensure the following ESC measures are in place:
- Sediment Fences:
- Check for proper installation and no signs of damage or sagging.
- Confirm that sediment fences effectively trap debris while allowing water to flow through.
- Stormwater Drain Protection:
- Inspect drains for sediment infiltration. If sediment traps are installed, ensure they are functional and not clogged.
- Site Cleanliness:
- Verify that concrete slurry, debris, and washout are confined to the designated areas and not entering drains
- Stockpile and Soil Protection:
- Ensure that any soil stockpiles are securely covered with tarpaulins or erosion-control mats to prevent wind and water erosion.
- Driveway and Kerb Areas:
- Confirm that the road and kerb are swept clean of debris, and erosion control measures (such as straw wattles) are protecting the edges.
3. How to Prevent Erosion Issues
Proactive measures can help avoid erosion problems during this stage:
- Divert clean water away from the site using temporary drainage channels.
- Install and maintain spoon drains to manage water flow across the site.
- Use mulch or stabilisation blankets on exposed soil to reduce runoff and erosion
- Ensure that any soil stockpiles are securely covered with tarpaulins or erosion-control mats to prevent wind and water erosion.
4. Maintaining ESC Compliance
To avoid penalties and ensure your site complies with regulations:
- Conduct periodic inspections of ESC measures, especially after heavy rain or wind events.
- Keep a record of all ESC-related actions and maintenance to demonstrate compliance if questioned by regulators.
5. Best Practices for ESC After the Slab Pour
- Plan for Rain:
- Before heavy rainfall, inspect and reinforce sediment fences, stormwater traps, and stockpile covers.
- Wastewater Management:
- Prevent wastewater from trades (such as concrete washout) from entering stormwater drains. Use designated washout stations instead.
- Neighbour Communication:
- Notify neighbours about measures in place to prevent sediment runoff onto their property, building goodwill and trust.
Read our blog post on ESC and get our ESC checklist below:

Tips for Documenting and Communicating Issues
Effective documentation and communication are vital during the post-pour slab inspection process. Clear records and proactive engagement with contractors can prevent misunderstandings, delays, and disputes. Here’s how you can ensure a smooth process:
1. Take Detailed Photos
- Capture All Angles: Photograph the slab from multiple perspectives, ensuring that key features like penetrations, edges, and finishes are clearly visible.
- Highlight Issues: Use a line marker or tape to indicate areas of concern in your photos. This visual aid helps contractors quickly identify the problem.
- Include Context: Ensure that each photo includes identifiable elements, such as the builder's sign or surrounding landmarks, to provide context.


2. Maintain Comprehensive Notes
- Record Observations: Write down specific details about each issue, including its location, nature, and potential impact on the project.
- Use Checklists: Tick off completed items on the inspection checklist and annotate any delays, follow-ups, or unresolved issues.
3. Communicate Clearly with Contractors
- Use Multiple Channels:
- Follow up verbal discussions with written communication, such as emails or text messages, to maintain a clear record.
- Attach annotated photos and checklist entries to ensure clarity.
- Be Prompt: Notify contractors of any issues immediately to prevent delays in remedial work.
4. Focus on Resolution
- Provide Clear Instructions: Specify the corrective actions you expect for each identified issue.
- Set Deadlines: Request that repairs or adjustments be made within a reasonable time frame, especially if the slab is still green and corrections are easier to perform.
5. Use a Collaborative Approach
- Involve Your Builder or Site Manager: Share your observations and concerns during site visits to encourage collaborative problem-solving.
- Request Updates: Ask contractors for progress updates and confirm when issues have been addressed.
6. Keep an Risk/Issue Log and or a Communication register
- Track Actions: Maintain a log of all communication and follow-ups, including the date, time, and nature of each interaction.
- Monitor Progress: Revisit the site as necessary to verify that issues have been resolved and document the changes.
7. Be Prepared for Escalation
If contractors fail to address critical issues:
- Engage a Third Party: Consider hiring an independent building inspector to assess the slab and provide recommendations.
- Escalate Through Formal Channels: If necessary, escalate the matter through your builder or relevant construction authority.
Conclusion
Building your dream home is an exciting journey, but it’s also a big investment—and getting the details right is key to avoiding headaches down the track. That’s where a post-pour slab inspection can make all the difference. By taking the time to go through the checklist, you’re not just ticking boxes—you’re ensuring your home has a solid, high-quality foundation.
Think of this process as your chance to catch any small issues before they become big (and expensive) problems. Whether it’s double-checking the slab’s levelness, ensuring penetrations are properly sealed, or confirming sediment controls are doing their job, every step adds up to a smoother construction process and peace of mind.
And don’t worry if some of these terms or steps feel a bit technical. With the checklist in hand and this guide to refer to, you’ll feel more confident and in control of your project. Plus, open communication with your builder or contractor can go a long way in resolving any concerns quickly.
Support the CSIRO
Support the CSIRO and grab a copy of their Footing Performance and Maintenance Guide (view-only version linked below).
While your builder might hand it over at the end of construction, why wait?
Get it early, read it thoroughly, and actually apply it to your home. Don’t let it end up as an afterthought—or worse, gathering dust in your kitchen drawer or handover packet, never to be opened..
FAQs
1. Why is a post-pour slab inspection important?
A post-pour inspection ensures your slab meets Australian standards (like AS2870) and is free from defects that could cause delays, extra costs, or structural issues later on.
2. What tools do I need for a slab inspection?
A spirit level, laser level, tape measure, line marker, a camera or smartphone for photos, and a copy of the checklist will be your best tools.
3. How soon after pouring should the slab be inspected?
You should inspect the slab within 24–48 hours of the pour. This is when any immediate issues, like flatness or curing problems, can be most effectively addressed.
4. What are the acceptable tolerances for slab flatness and levelness?
For residential slabs, the flatness tolerance is generally no more than 10mm variation over a 3m span, and levelness should be within ±5mm of the intended elevation.
5. How do I check for termite protection around slab penetrations?
Look for termite collars or chemical barriers around any pipes or conduits penetrating the slab. These should be sealed in concrete without gaps.
6. What should I do if I find cracks in the slab?
Small hairline cracks (≤0.3mm) are usually not a concern, but larger cracks may need professional assessment. Your contractor can repair these with epoxy or other fillers if needed.
See 9. Cracking in Green Concrete (above) and below on plastic shrinkage cracking.
7. What are the penalties for not complying with sediment and erosion control (ESC) measures?
Non-compliance with ESC regulations can lead to fines from local councils or environmental authorities, as well as costly remediation work.
8. How do I document issues effectively during the inspection?
Take clear photos from multiple angles, mark problem areas with spray paint or tape, and write down detailed notes about the issue and its location.
9. Can I perform the inspection myself, or do I need a professional?
Homeowners can perform most of the inspection using the checklist, but for complex issues or peace of mind, you may want to hire an independent building inspector.
10. What should I do if my contractor ignores the issues I report?
If your contractor doesn’t address your concerns, escalate the matter by contacting your builder or relevant regulatory authority. You may also engage an independent inspector to support your case.
Further Reading
