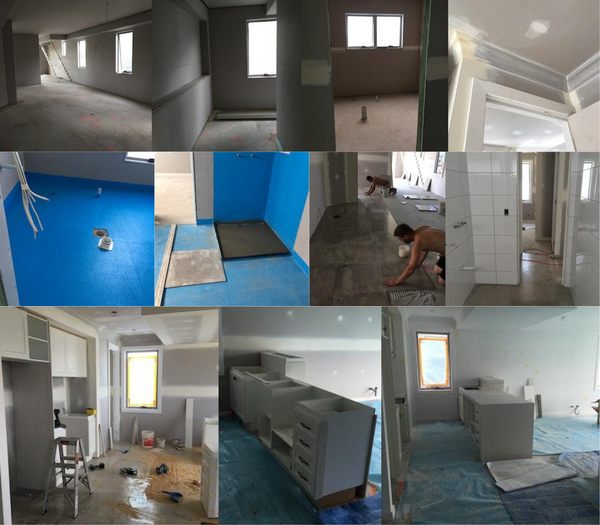
Even if you’re unsure whether you’ll use it or feel it’s too detailed, a quick read-through might inspire ideas and offer valuable insights into what to watch for at each stage of construction.
After all, it’s always good to keep everyone honest, isn’t it?
Introduction
When it comes to building or renovating your home, the roof is one of the most important parts to get right. A well-installed roof not only protects your home from the elements but also ensures long-term durability and energy efficiency. However, without proper inspections during the construction process, even small mistakes can lead to costly repairs, water damage, or structural issues down the line.
That’s where our C9 Tile Roof, Box Gutter, and Flashing Inspection Checklist comes in.
This comprehensive checklist is designed to empower you, especially those new to the construction process, to identify and address potential quality issues early.
By following this checklist, you can ensure that your roof meets Australian Standards, adheres to the National Construction Code (NCC), and is built to withstand the test of time.
In this blog post, we’ll break down the checklist into simple, actionable steps.
You’ll learn how to inspect key areas, understand technical terms in plain English, and gain insights into common roofing pitfalls. Whether you’re a prospective homeowner or managing your own construction project, this guide will help you take control of the roofing process and avoid unnecessary headaches.

Understanding the Checklist
The C9 Tile Roof, Box Gutter, and Flashing Inspection Checklist is a tool for homeowners overseeing roof installation. Whether you're building a new home or renovating an existing property, this checklist ensures roof installation quality.
Here’s an in-depth look at its structure and how to use it effectively:
Overview of the Checklist
Roofing is a process involving multiple components that need to work together. The checklist is designed to:
- Help you identify potential quality issues early.
- Ensure compliance with Australian Standards, the NCC, and standard building practices.
- Save time and money by catching problems before they escalate.
The checklist is divided into sections, each focusing on specific elements of the roof, such as roof finish, sarking/anticon installation, battens, fasteners, hips valleys, bedding & pointing + guttering, downpipes, box gutters and flashings. This structure allows for a systematic inspection, ensuring nothing is overlooked.
How to Use the Checklist
- Step-by-Step Inspection: Start at the beginning and work through each section. The checklist guides you through key inspection points, ensuring each element of the roof is installed correctly. Example: Begin with Site Management, checking for erosion controls and sediment fences, before progressing to detailed roofing elements like roof finish, sarking, gutters, bedding and pointing.
- Documenting Observations: During the inspection, make sure to:
- Take clear, high-resolution photos of each element.
- Note down any issues or concerns against the corresponding checklist items.
- Attach checklist item numbers (CINS) to physical and digital records for easy reference.
- Tracking Progress:
- Mark items that meet standards as "OK."
- Use an arrow ("→") for tasks delayed due to weather or access issues.
- Cross and note items requiring corrections under "Follow-Up."
This structured approach simplifies communication with contractors and ensures all parties are on the same page.
Practical Tips for Effective Use
- Start Early: Conduct inspections as soon as roofing work begins to catch issues before they compound.
- Stay Organised: Use separate folders for photos and notes related to different checklist sections.
- Communicate Clearly: Share findings with contractors promptly and document their responses to ensure accountability.
By using the checklist as your guide, you’ll have the confidence to oversee the roofing process effectively, minimising the risk of costly repairs or defects.

Why Inspections Matter
Roofing inspections are an essential step in ensuring that your home is protected from the elements and built to last. Without thorough checks during installation, even minor oversights can escalate into significant issues, leading to costly repairs or long-term structural damage.
Here’s why conducting inspections is crucial during your roofing project:
Key Benefits of Inspections
- Defect Prevention:
- Small errors, such as improperly installed flashing or unsecured tiles, can cause water ingress, leading to mould, rot, and weakened structural integrity.
- Catching these issues early ensures they are fixed before they become major problems.
- Compliance with Australian Standards:
- Roofing elements must meet the guidelines outlined in the National Construction Code (NCC) and referenced Australian Standards.
- Inspections confirm that your roof complies with these requirements, giving you peace of mind and reducing the risk of future legal or insurance complications.
- Cost and Time Savings:
- Identifying problems during construction saves money compared to addressing them after your home is complete.
- Timely fixes prevent delays that could disrupt your construction timeline.
Common Roofing Issues Identified in Inspections
- Water Ingress:
- Often caused by poorly sealed flashing or inadequate box gutter gradients, water ingress can result in serious damage to your home’s interior and structure.
- Swarf & incompatible materials:
- Swarf, or metal shavings, left on roof surfaces can oxidise and cause unsightly rust stains on roof sheets if not properly cleaned. Additionally, using incompatible materials can trigger galvanic corrosion—a chemical reaction where one material sacrifices itself to the other, leading to degradation and corrosion.
- Box Gutter Overflow:
- Insufficient fall or lack of overflow measures can lead to water pooling and spilling into the building, causing damage to ceilings and walls.
- Sealant Failures:
- Incorrect or inadequate application of sealants can lead to leaks and degraded roofing performance over time.
Galvanic action, also known as galvanic corrosion, occurs when two dissimilar metals come into contact in the presence of an electrolyte, such as water. This creates an electrochemical reaction where one metal (the anode) corrodes or "sacrifices" itself to protect the other metal (the cathode).
How It Happens:
1. Dissimilar Metals: When metals like steel, zinc, or copper are in contact, their differing electrochemical properties can create a small electric current.
2. Electrolyte: Moisture or condensation acts as a conductor, completing the circuit and allowing corrosion to begin.
3. Corrosion: Over time, the anode metal degrades while the cathode remains intact.
Roof Tie Down Rating - Why Is the Wind Classification Important and how does it affect your roof?
Wind tie-down systems secure roof tiles and structural components against wind uplift forces during high winds or storms. Without proper tie-downs, roofs can suffer significant damage, including tile displacement, structural failure, or even complete detachment. Compliance with wind tie-down requirements ensures the roof’s safety, durability, and alignment with Australian Standards like AS 1562.1.
How Is Wind Classification Determined?
Wind classifications, as per AS 4055, are based on factors including:
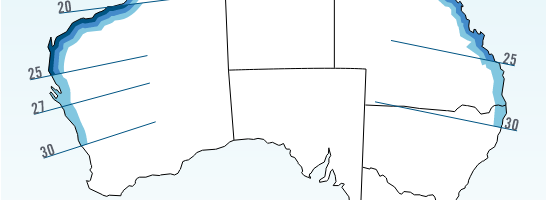
- Region: Australia's wind regions (A to D) specify the likelihood of cyclonic or high-wind events.
- Site Conditions: Terrain roughness, shielding from nearby structures, and topography (e.g., hills or open plains).
- Building Height and Location: Taller or exposed buildings are subject to higher wind forces.
The classification system ranges from N1 (low wind areas) to N6 (high wind areas) and C1 to C4 (cyclonic regions), with higher numbers indicating stronger wind forces.
How Tie-Fixing Differs by Wind Classification
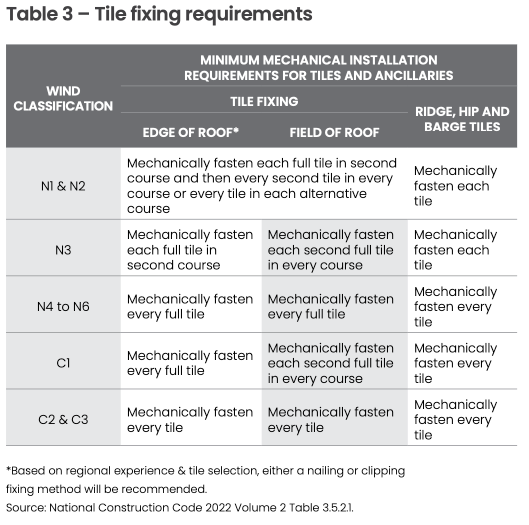
The tie-fixing requirements vary based on the site’s wind classification:
- N1 to N2 (Low Wind Zones):
- Typically, every second or third tile is fastened.
- Mechanical clips or screws are used at roof edges and ridges where uplift forces are stronger.
- N3 to N6 (High Wind Zones):
- Every tile is secured with screws or proprietary fasteners rated for high-wind resistance.
- Special attention is given to corners, ridges, and hips, which are most vulnerable to uplift.
- Cyclonic Regions (C1 to C4):
- Full mechanical fixing of all tiles is mandatory.
- Reinforced battens and stronger fasteners, such as stainless steel screws, are used to comply with cyclonic wind ratings.
- Additional bracing and tie-down straps are employed to secure the roof structure to the walls.
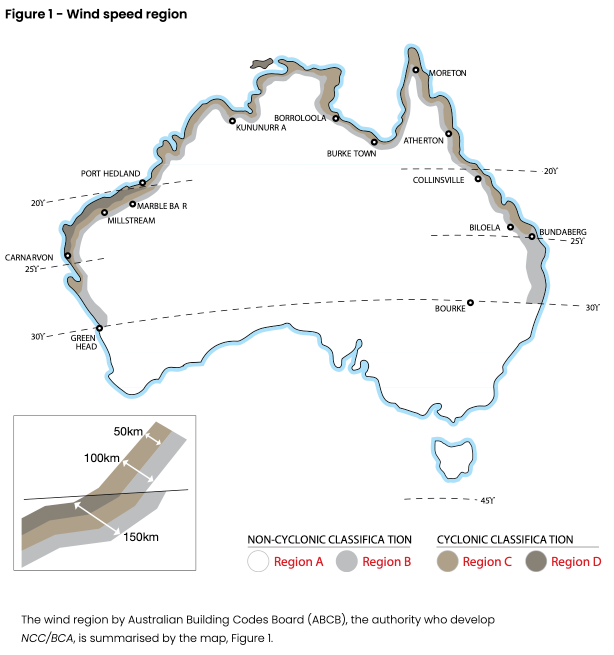

Read more on the 5 factors that determine the wind classification for homes
This is a handy calculator. Note:You should always have someone else determine this rating (like your builder or an engineer). If you bugger it up, you will be liable. Use this as a reference to help qualify information, unless your happy to assume the liability.
How Inspections Improve Time, Cost, and Quality Management
- Time: A structured inspection process minimises delays by addressing issues as they arise, preventing them from impacting later stages of construction.
- Cost: Catching defects during installation avoids the financial burden of major repairs or replacements down the road.
- Quality: Routine checks ensure that roofing materials and workmanship meet the highest standards, protecting your investment for years to come.
Key Areas Covered by the Checklist
The Checklist is a detailed tool that covers important elements of roofing installation. From ensuring the tiles are installed properly to verifying the integrity of gutters, downpipes and flashing, it is a step-by-step guide to maintaining construction quality and compliance. Below, we’ll break down the key areas it addresses.
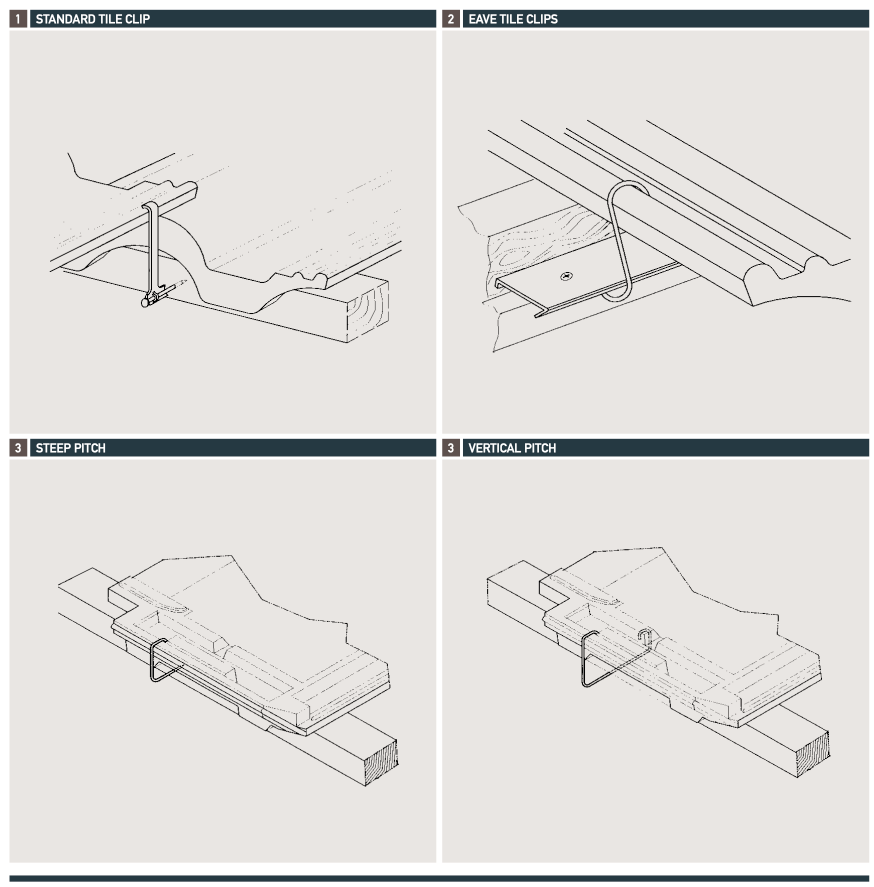
Tile Roof Installation
- Fasteners:
- Fasteners must meet AS 3566.1 standards, ensuring durability and corrosion resistance.
- Proper placement and tightening of fasteners with sealing washers are essential to prevent water ingress.
- Over-tightening can damage the roof materials, while under-tightening compromises the seal.
- Laying of Tiles:
- Tiles must be securely battened and aligned, sitting flush in their grooves and notches.
- The first course of tiles should project 50mm over the fascia to ensure effective water runoff.
- Wind-rated fixing is essential, especially in high-wind areas like N3 zones, where every second tile must be fixed.
- Hips and Valleys:
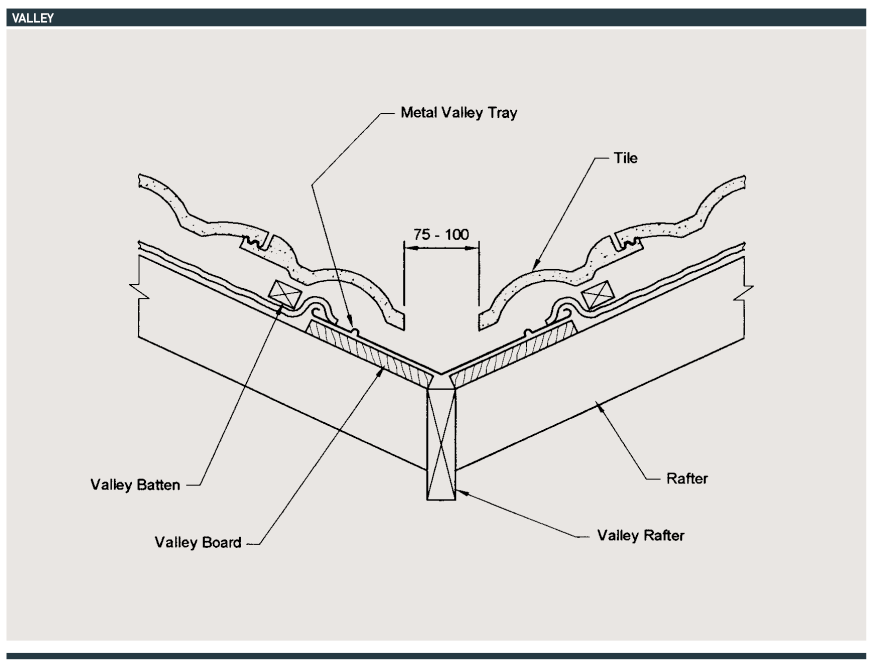
- Valleys must have a gap of 75-100mm between tiles for proper drainage.
- Use storm seals or bitumen foam inserts in high-rainfall or wind-prone areas to prevent water ingress.
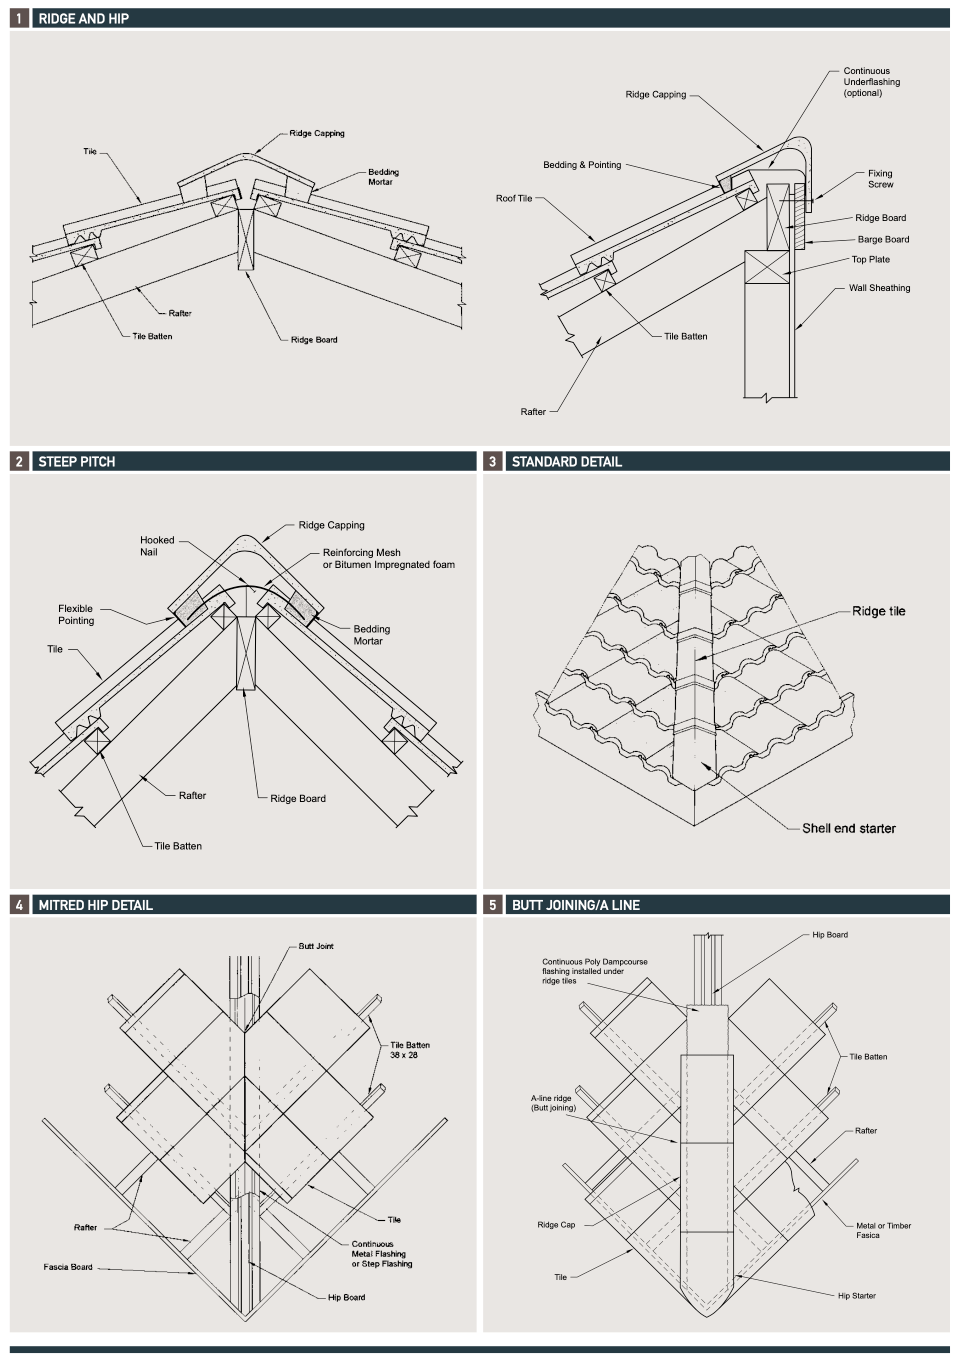
- Ridges:
- Ridge tiles should align straight with the roof’s natural contour.
- Overlap ridge tiles away from prevailing winds to reduce water infiltration risk.
- Use flexible pointing material for durability and compliance with modern standards.
- Barges:
- Barge boards must be flush with tile battens, with bedding strips extending 19-25mm for a neat finish.
- Ensure proper sealing to prevent water ingress at barge ends.
- Securing of Tiles:
- All cut tiles, particularly in valleys and roof edges, must be securely clipped to prevent displacement by wind or rain.
- Tiles on pitches above 70 degrees require double mechanical fixing for added security.
Ensure valleys are free from debris, tile offcuts, or mortar, as these can obstruct water flow.
Guttering, Downpipes, and Sealants
- Guttering:
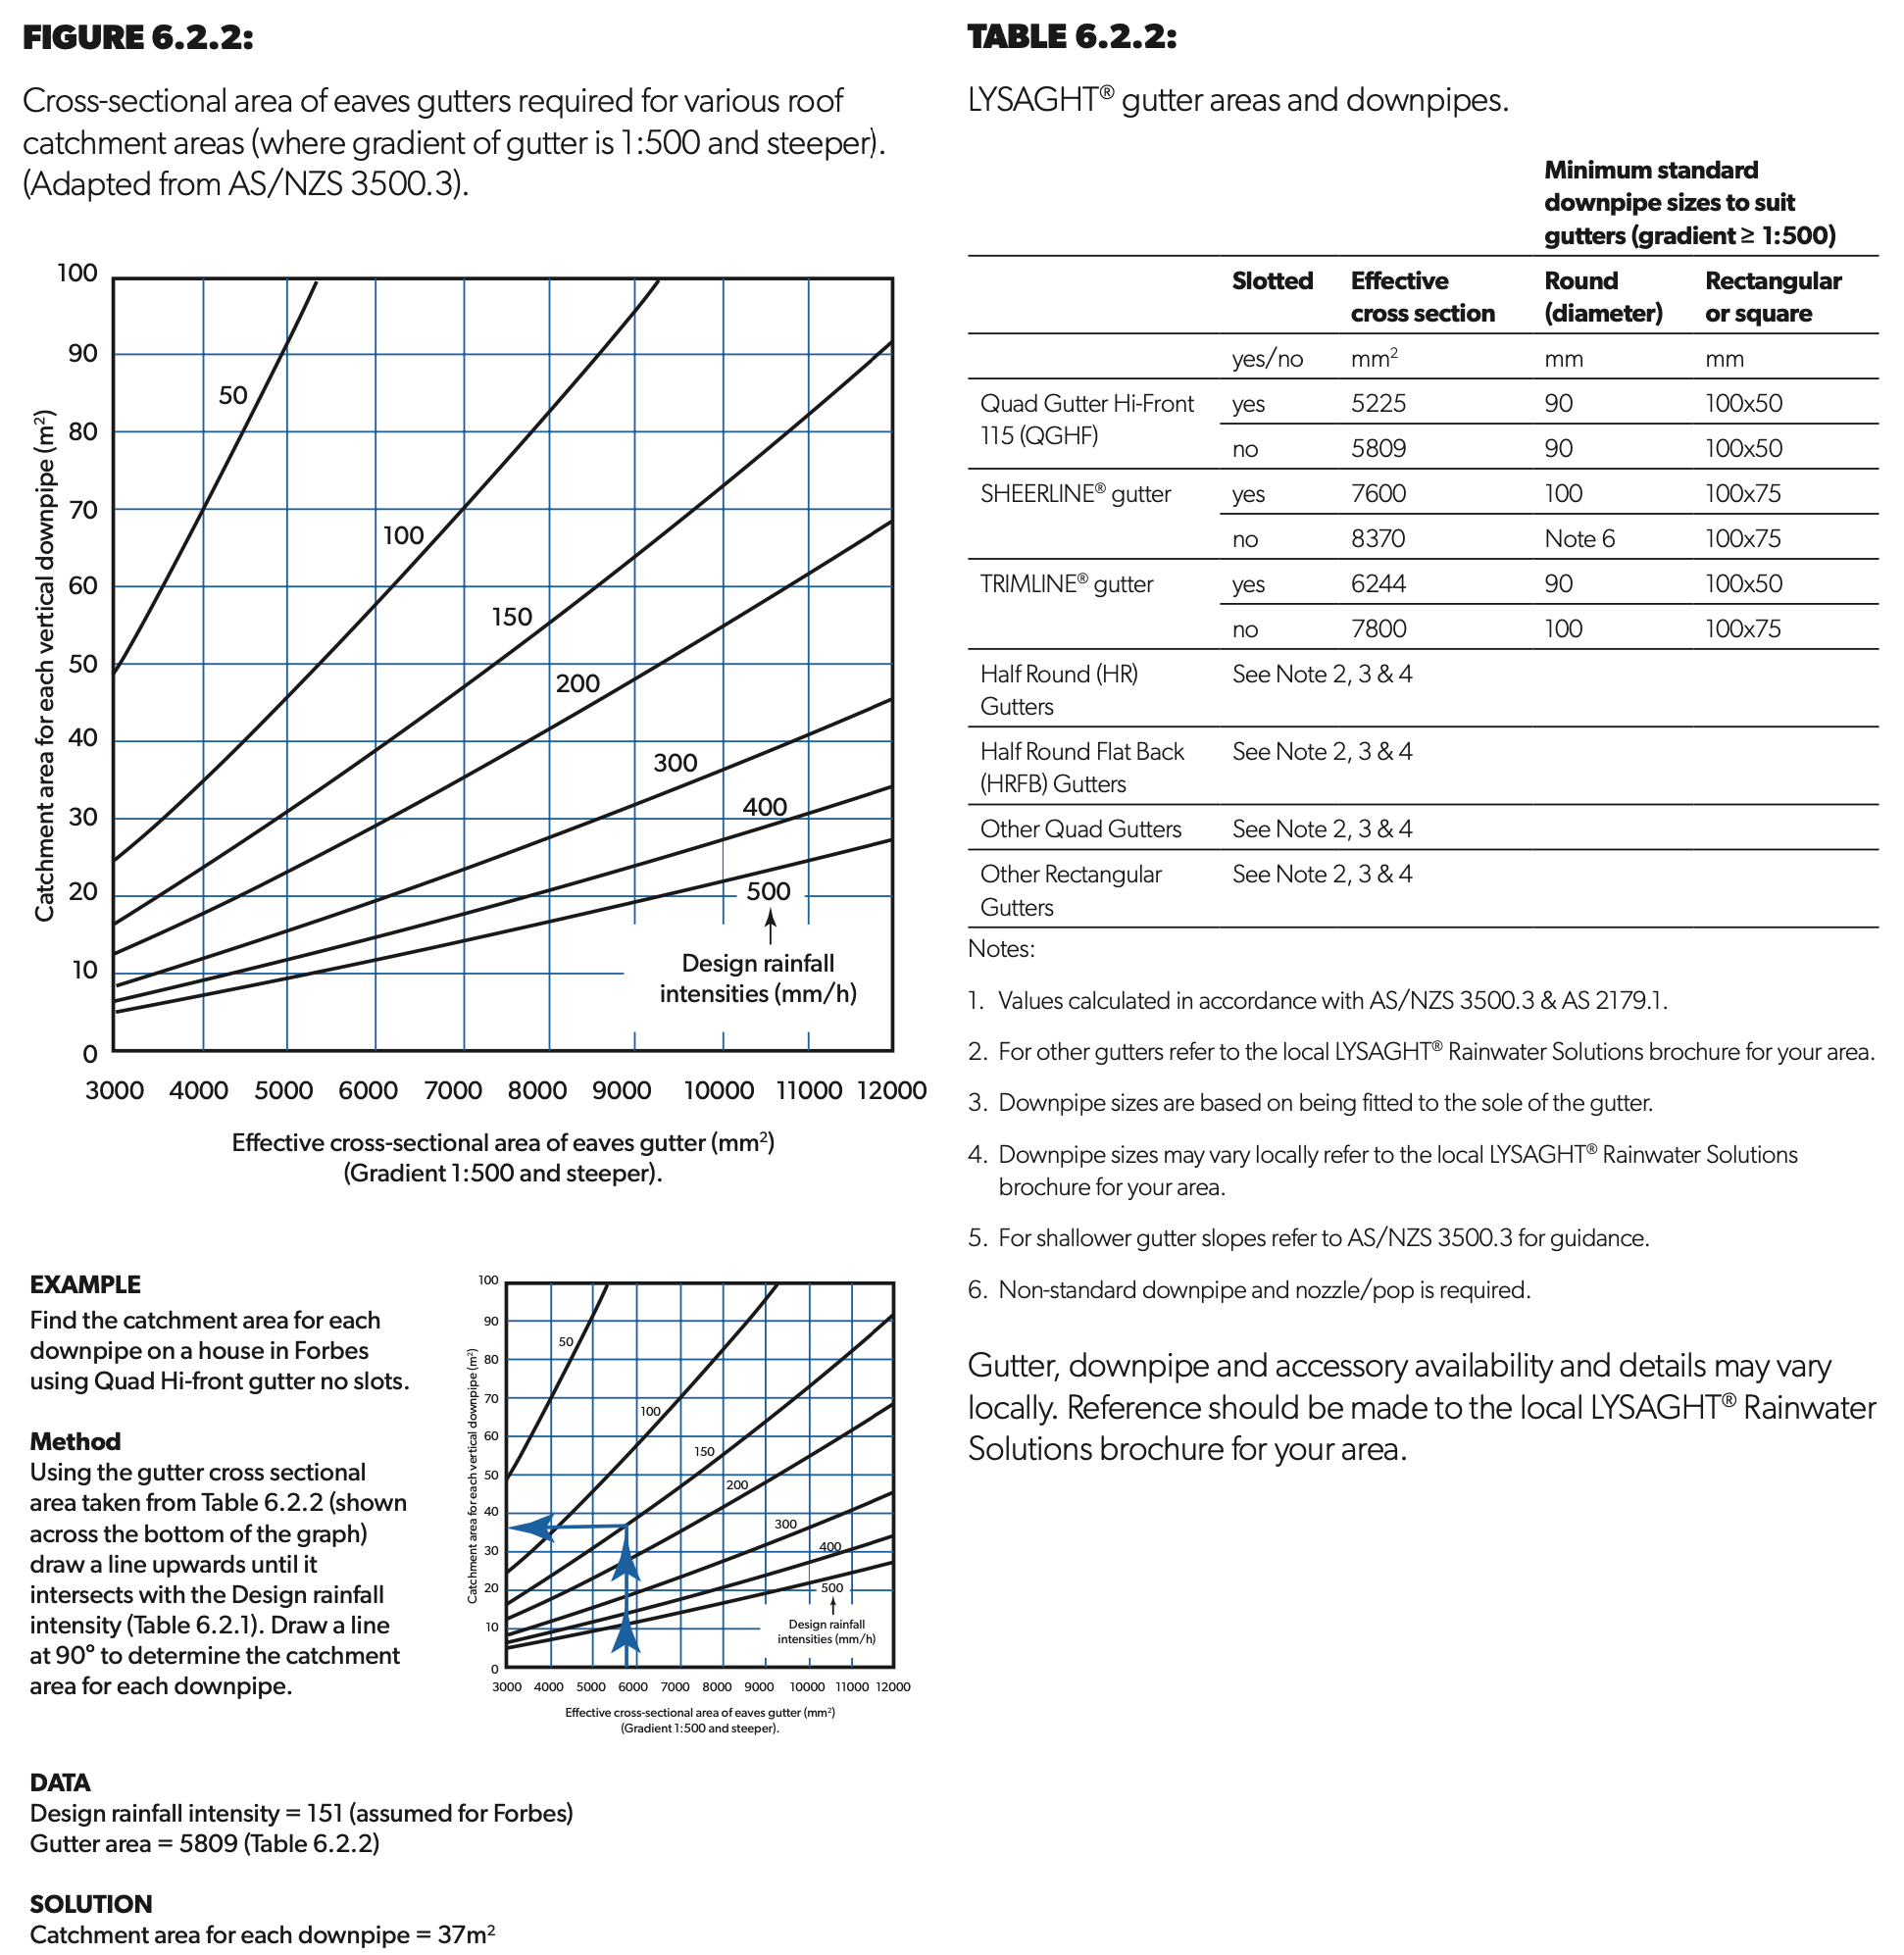
- Ensure gutters have a minimum fall of 1:500 for efficient water drainage.
- Overflow measures such as standoff brackets, slots, or high-flow designs prevent backflow into the house during heavy rain.
- Inspect for proper rivets and silicon sealing at joints to avoid leaks. Remember, silicon degrades in sunlight over time so in 4-5 years your gutter joints will leak, drip and need to be resealed.
- Downpipes:
- Downpipes must be correctly sized and placed to handle the roof’s drainage requirements.
- Maximum catchment areas should not exceed 12m per downpipe, and placement should avoid interference with windows, AC units, or taps.
- Check for temporary downpipes during construction to manage stormwater effectively.
- Sealants:
- Use neutral-cure silicone compatible with roofing materials like ZINCALUME® or galvanised steel.
- Sealants should be applied continuously and compressed enough to create a durable, watertight bond.
Box Gutters
- Ensure a minimum fall of 1:200 to prevent water pooling.
- Install overflow devices such as high-capacity rainheads or sump channels to handle excess water during storms. This is another design and construction area often poorly done.
- Verify that box gutters are fabricated from compatible, corrosion-resistant materials.
Ensuring box gutter design compliance requires attention to detail and adherence to Australian Standards. Unfortunately, many installed systems are non-compliant and not designed in accordance with these requirements.
DamBusters has created "standard" overflows and box gutter solutions, collaborating with builders and designers to ensure roof water systems and box gutters are both compliant with standards and function effectively. Their product line provides valuable insight into the complexity of achieving compliance, especially when compared to non-compliant solutions that may prioritise aesthetics over functionality.
Below is an overview of their offerings.
Flashings
- Types and Applications:
- Apron Flashing: Used where the roof meets a vertical wall.
- Soaker Flashing: Installed under the roof material, typically around chimneys.
- Transverse Flashing: Runs across ridges or valleys.
- Parapet Capping: Waterproofs parapet walls.
- Installation:
- Flashings must overlap by at least 75mm and incorporate anti-capillary breaks to prevent water ingress.
- Materials should be compatible with the roof cladding to avoid corrosion.
- Ensure proper sealing with continuous beads of compatible sealant.

Technical Terms Simplified
Roofing and guttering installations often involve technical terminology that can be confusing for homeowners new to construction. This section simplifies key terms from the checklist, helping you better understand the inspection process and communicate effectively with contractors.
Sarking
Sarking is a reflective, pliable membrane installed beneath roof tiles or sheets. It acts as a secondary waterproof barrier, protecting your home from moisture and dust while also improving insulation by reflecting heat.
Why It Matters: Properly installed sarking prevents water ingress during heavy rain and helps maintain a consistent indoor temperature.
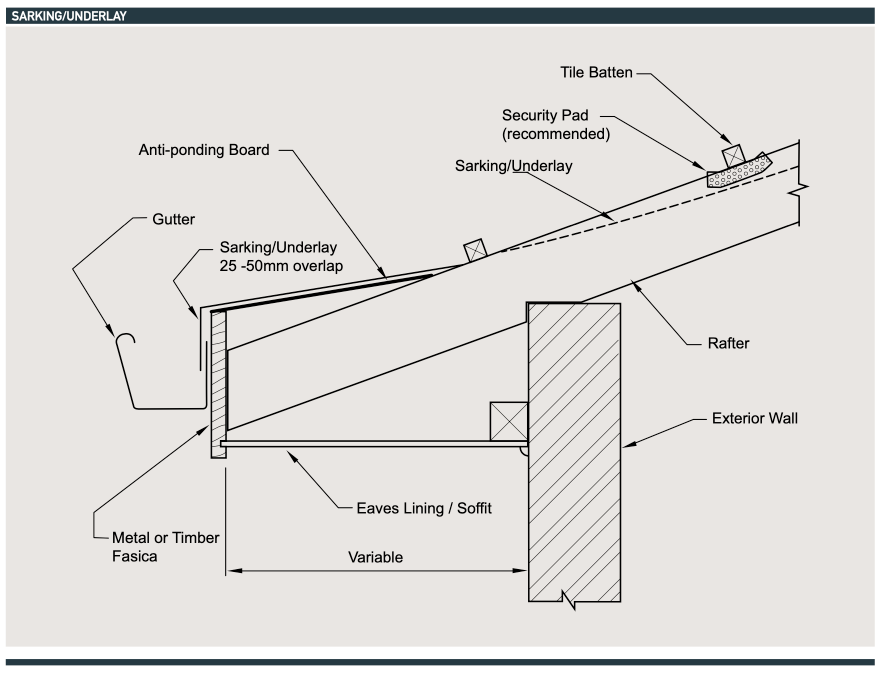
Anti-Ponding Board
An anti-ponding board is a flat strip of material placed under the roof’s edge, near the gutter, to prevent water from pooling on the sarking.
Why It Matters: Without anti-ponding boards, water can accumulate and cause the sarking to sag or fail, leading to leaks.
Flashing
Flashing refers to thin sheets of metal or other waterproof materials used to seal gaps around roof penetrations, such as chimneys, vents, or where the roof meets a vertical wall.
Why It Matters: Correctly installed flashing prevents water from seeping into your home through vulnerable areas.
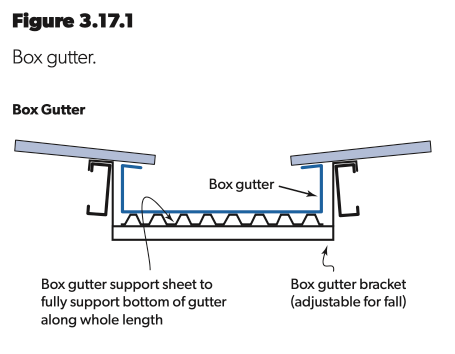
Box Gutters
A box gutter is a rectangular, internal gutter system designed to collect rainwater from roofs and direct it to downpipes or stormwater systems.
Why It Matters: Box gutters must have sufficient gradient and overflow measures to handle heavy rainfall without causing water ingress or structural damage.
Valley
The valley is the internal angle formed where two roof slopes meet. It channels water down to the gutter system.
Why It Matters: Proper clearance between tiles and a clear valley are essential to ensure water drains efficiently.
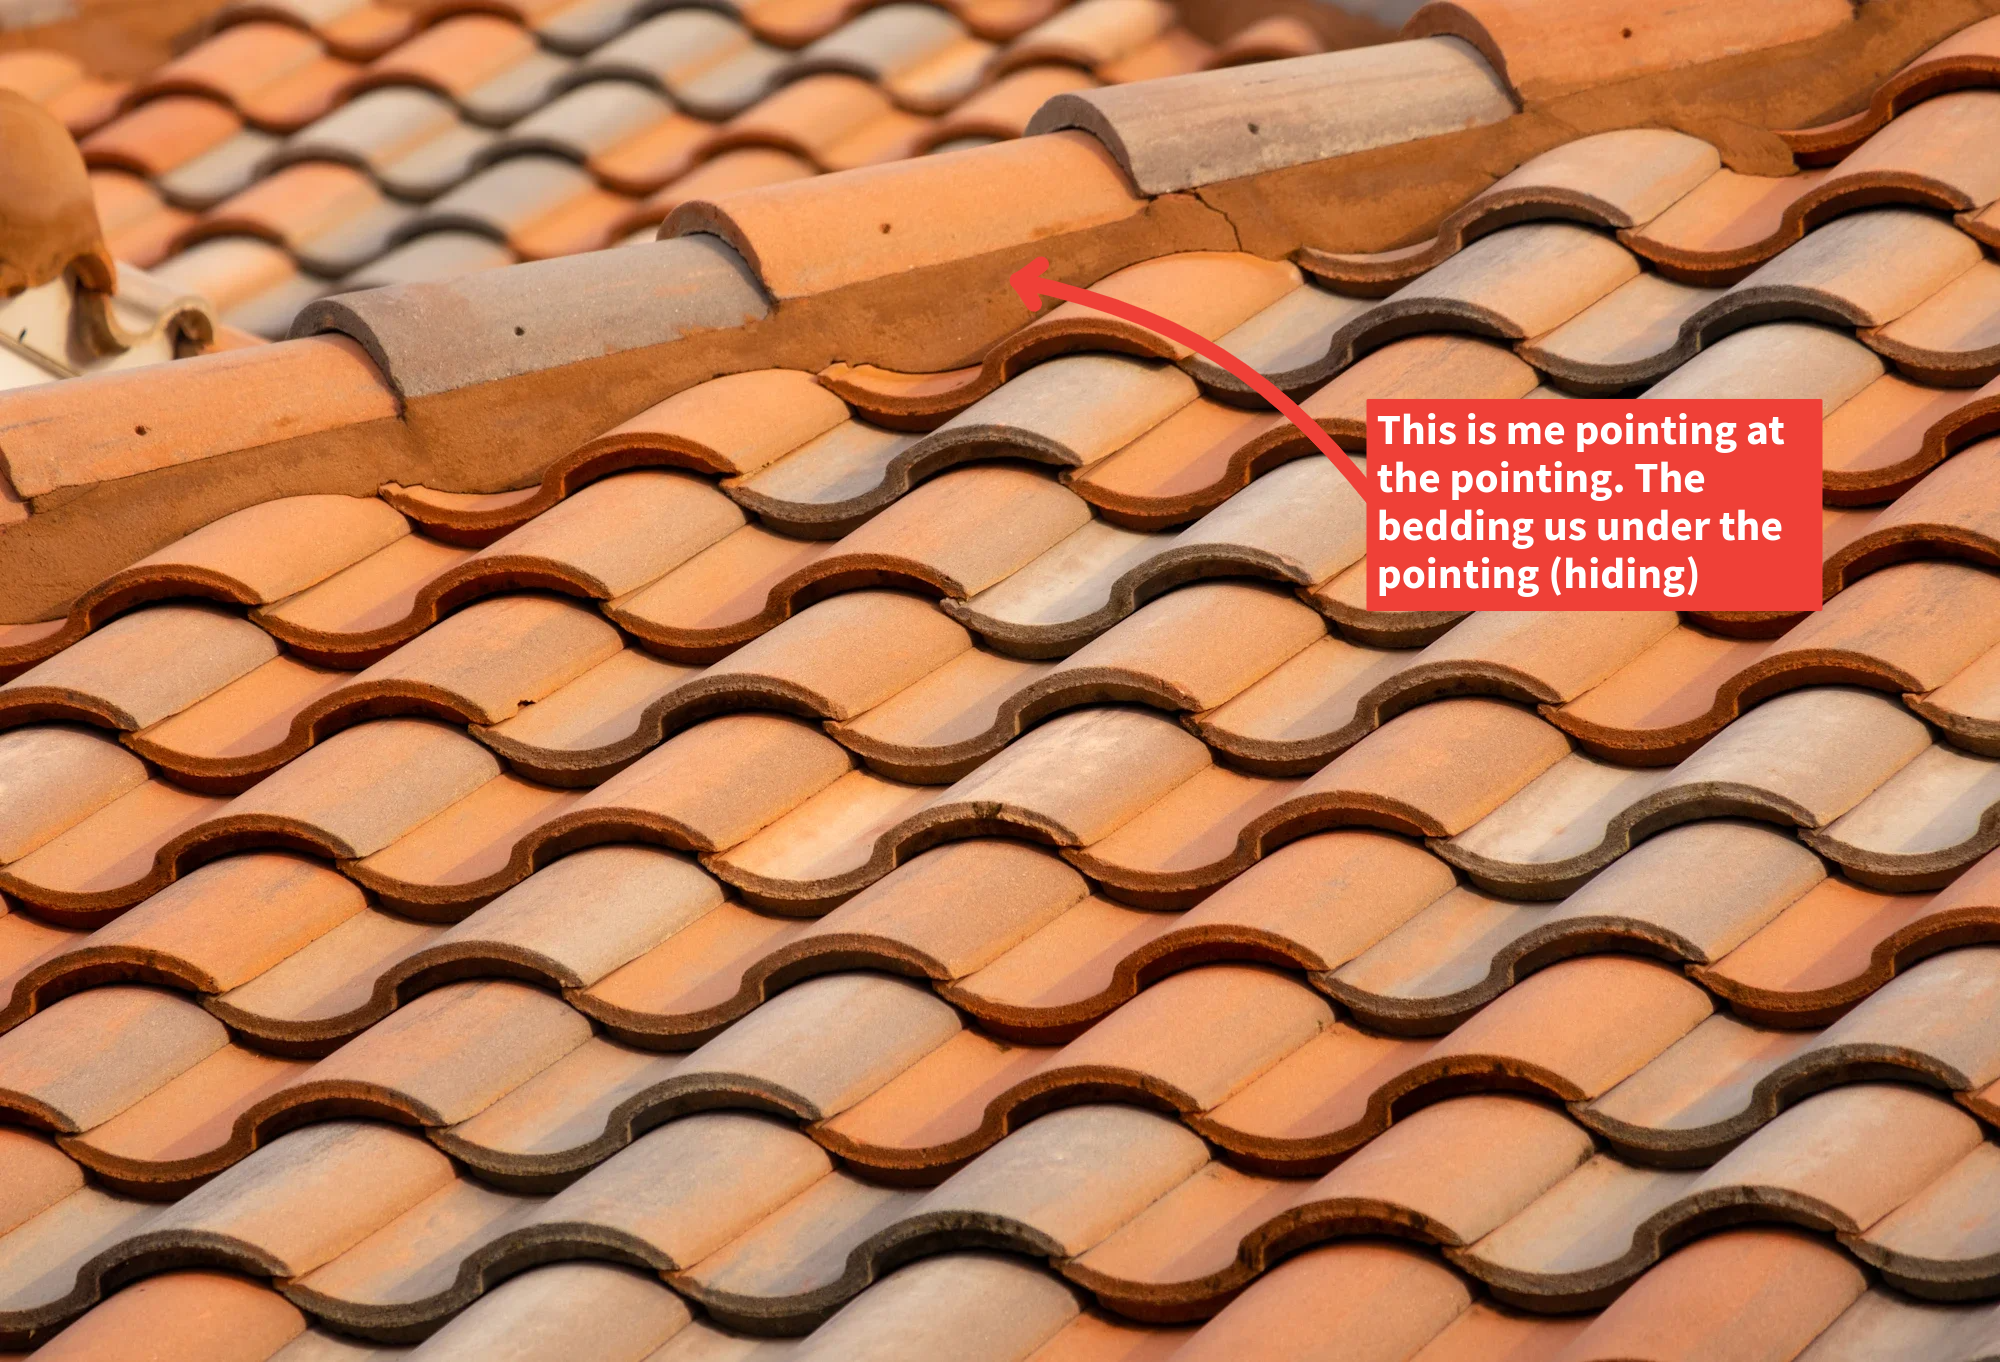
Flexible Pointing
Flexible pointing is a weatherproof adhesive applied to secure ridge and hip tiles to the roof.
Why It Matters: It provides a durable, long-lasting bond that accommodates roof movement caused by temperature changes or settling.
Ridge and Hip Tiles
Ridge tiles run along the highest point of the roof, while hip tiles cover the external angles where roof slopes meet.
Why It Matters: These tiles must be securely fastened and aligned to protect the roof’s structure and ensure an aesthetically pleasing finish.
Neutral-Cure Sealant
A type of silicone sealant that does not release acidic substances during curing, making it safe for use with metal roofing materials like ZINCALUME® or galvanised steel.
Why It Matters: Using the wrong sealant can cause corrosion or inadequate sealing, leading to leaks.

Gradient
The slope of a roof or gutter system, usually expressed as a ratio (e.g., 1:500).
Why It Matters: Adequate gradient ensures water flows efficiently, preventing pooling and overflow issues.
Overflow Measures
These are features such as rainheads, high-flow slots, or scuppers designed to manage excess water during heavy rain.
Why It Matters: Without overflow measures, gutters can flood, leading to backflow into the house and structural damage.
Checklist Application for Homeowners
The Tile Roof, Box Gutter, and Flashing Inspection Checklist is a tool for homeowners who want to take control of their roofing stage installation. Whether you’re inspecting the work yourself or overseeing a contractor, here’s how to effectively use the checklist to ensure a quality outcome.
Tips for Effective Use
- Start Early
Begin inspections as soon as construction or roofing work starts. Early checks allow you to catch potential issues before they escalate, saving time and money.Example: Check the installation of sarking and anti-ponding boards before tiles are laid. Ensuring these elements are correct from the start can prevent water pooling or leaks later. - Inspect in Phases
Break down inspections into manageable stages aligned with construction milestones:- Pre-installation: Inspect site preparation, sarking, and battens.
- Mid-installation: Review tile placement, flashing, and gutters.
- Post-installation: Check sealants, secure tiles, and overall drainage.
- Document Everything
- Take high-resolution photos during each inspection, focusing on areas of concern like valleys, box gutters, and flashing.
- Use the checklist to record observations, marking items as “OK,” “Delayed,” or requiring follow-up.
- Collaborate with Contractors
Share your findings with your contractor as soon as possible. Prompt communication ensures issues are addressed quickly and efficiently.Example: If you notice misaligned tiles, document the issue with photos and highlight it during your discussion. - Know Your Limits
While the checklist empowers you to identify potential issues, some tasks—like pressure testing box gutters or assessing fastener compliance—may require a professional. Recognise when to bring in an expert.
Examples
To illustrate the importance of the Tile Roof, Box Gutter, and Flashing Inspection Checklist, let’s explore some real-world examples of common issues homeowners encounter during roofing projects. These scenarios demonstrate how using the checklist can save time, money, and stress by identifying and addressing problems early.
Example 1: Poorly Installed Flashing
Issue: A homeowner notices water stains on the interior walls shortly after moving into their new home. Upon inspection, it’s revealed that the flashing around a roof penetration was not installed correctly, allowing water to seep in during heavy rains.
How the Checklist Helps:
- The checklist highlights the need to verify that all flashing overlaps by at least 75mm (industry best practices is between 50mm and 100mm normally - SA HB39 or AS1562.1 refer) and is sealed with compatible sealant.
- During an inspection, this issue could have been identified and corrected before the roof was completed.
Outcome: The flashing is reinstalled according to the standards or manufacturers specifications (if proprietary), preventing further water damage.
Example 2: Insufficient Gutter Gradient
Issue: A homeowner notices water pooling in the box gutters during moderate rainfall. Upon inspection, it’s found that the gutters were installed with an insufficient slope, causing water to stagnate instead of flowing to the downpipes.
How the Checklist Helps:
- The checklist specifies a minimum fall of 1:200 for box gutters.
- Early inspection would have identified this problem, allowing contractors to adjust the gradient during installation.
Outcome: The gutters are reinstalled with the correct slope, ensuring proper drainage and avoiding future water damage.
Example 3: Misaligned Roof Tiles
Issue: Strong winds dislodge several roof tiles, exposing the underlayment (sarking/anticon) to the elements. The homeowner discovers that many tiles were not properly aligned or secured with the right amount of clips during installation.
How the Checklist Helps:
- The checklist requires confirmation that tiles are securely fixed, especially in wind-prone areas, and that ridge and valley tiles are correctly placed, bed and pointed.
- A mid-installation inspection could have caught this issue before the roof was completed.
Outcome: The tiles are refastened using wind-rated fixing methods, ensuring they remain secure during future storms. Stormseal is installed to the valleys, or the valleys are bed and pointed to prevent windblown rain from entering.
Example 4: Blocked Valleys
Issue: After a heavy storm, water overflows from the roof into the home. The inspection reveals that the valleys were blocked with debris and valley iron wasn't turned up properly to prevent water ingress.
How the Checklist Helps:
- The checklist includes a step to inspect valleys for debris and ensure proper clearance between valley tiles.
- This issue could have been resolved during the post-installation phase by checking and clearing the valleys.
Outcome: The debris is removed, and the valleys are left clear, ensuring smooth water flow during future storms.
Example 5: Sealant Failure
Issue: Within a year of installation, leaks develop in the roof. The inspection reveals that the sealant used was not neutral-cure and had corroded the flashing, compromising the roof’s waterproofing.
How the Checklist Helps:
- The checklist specifies the use of neutral-cure sealants compatible with roofing materials like ZINCALUME® and galvanised steel.
- An early inspection could have flagged the use of incompatible sealants and prevented corrosion.
Outcome: The flashing and sealant are replaced, restoring the roof’s integrity.
Conclusion
Your roof is one of the most important components of your home, making its proper installation essential for long-term protection, durability, and peace of mind. This checklist lets you to take control of your roofing installation’s quality management, ensuring a high-quality finish that complies with Australian Standards.
By using the checklist, you can:
- Identify potential issues early and address them before they escalate.
- Ensure your roof meets the requirements of the NCC and other Australian Standards, including AS 1562.1, AS 4200.2, and SA HB39.
Roofing quality management isn’t just about avoiding faults—it’s about ensuring your roof performs as designed, protecting your home for years to come.
Having said that (above) here is a link to our opinion on Standards Australia.

Pay walled knowledge. Helping Aussie owners when they need it.
This makes it tough to access construction standards unless you’re willing to pay the yearly subscription fee (around $660) for most of the ones you need.
That’s why hiring a professional is invaluable—not just for their expertise but also for quality inspections when you’re unsure. I get that having checklists alone doesn’t guarantee quality control—you need to know what you’re looking for and how to interpret it to use them effectively.
FAQs
The Tile Roof, Box Gutter, and Flashing Inspection Checklist often raises questions from homeowners who are new to construction and inspections. Below are some frequently asked questions to help clarify key points and provide actionable advice.
1. What is a box gutter, and why is its gradient important?
A box gutter is a rectangular channel used to collect rainwater from roofs and direct it to downpipes. Its gradient, typically a minimum of 1:200, ensures water flows efficiently towards the downpipes and prevents pooling, which could lead to leaks or overflow.
2. How can I tell if my roof flashing is installed correctly?
Properly installed flashing overlaps by at least 75mm, is securely fixed, and is sealed with a compatible neutral-cure sealant. Inspect the flashing around areas like chimneys, valleys, and where the roof meets vertical walls for gaps, improper alignment, or corrosion.
3. What should I look for in mortar bedding and pointing?
Check that the mortar bedding is smooth, evenly applied, and securely holds ridge and hip tiles. Flexible pointing materials should be used to allow for minor roof movements without cracking.
4. Why are overflow measures required for box gutters?
Overflow measures, like rainheads or high-capacity slots, prevent water from backing up into the building during heavy rain. Without these features, water can spill into ceilings or walls, causing significant damage.
5. Can I inspect the roof myself, or do I need a professional?
You can conduct basic inspections, such as checking tile alignment, gutter slopes, and sealant application. However, for technical assessments like pressure testing gutters or verifying compliance with Australian Standards, it’s best to hire a professional inspector.
6. What is “anti-ponding,” and why does it matter?
Anti-ponding boards are installed under the roof’s edge to stop water from pooling on the sarking. This prevents sagging, leaks, and potential structural issues, especially in areas prone to heavy rainfall.
When are anit-ponding boards required?
Low Roof Pitches
- Roofs with pitches less than 20 degrees are more susceptible to water pooling, as water doesn't drain off as quickly as on steeper roofs.
High-Rainfall Areas
- Regions with heavy or frequent rainfall increase the likelihood of water accumulation, making anti-ponding boards essential to maintain the sarking’s performance.
- These boards help direct water into the gutters efficiently.
Large Roof Spans
- Roofs with wide spans can exert significant weight on the sarking, particularly during heavy rains, causing it to sag. Anti-ponding boards provide additional support.
Proximity to Gutters
- In areas near roof edges or valleys, water flow is concentrated. Without anti-ponding boards, the sarking can trap water at these points instead of directing it into the gutters.
Wind-Driven Rain
- In wind-prone areas, rain can be pushed under the roof covering, increasing the chance of water pooling on the sarking. Anti-ponding boards act as a barrier to mitigate this risk.
7. How can I ensure tiles are securely fastened?
Inspect for properly aligned and clipped tiles, especially at edges, valleys, and ridges. In high-wind areas, ensure tiles are fastened according to wind ratings, such as every second tile for N1/N2 zones.
8. What Australian Standards apply to roofing installations?
Key standards include:
- AS 1562.1: Covers design and installation of roof tiles and coverings.
- AS 3566.1: Specifies requirements for fasteners used in roofing.
- AS 4200.2: Focuses on the installation of pliable building membranes, such as sarking, for thermal and waterproofing performance.
- AS 3500.3: Details requirements for stormwater drainage, including gutters and downpipes.
- AS 3500.5: Addresses water services, including overflow and drainage management in roof installations.
- SA HB39: Provides guidelines for metal roofing and cladding, including flashings and gutters.
- SA HB114: Offers insights on correct roofing practices for compliance with Australian Standards.
- National Construction Code (NCC) Volume Two: Serves as the overarching compliance document for residential construction, incorporating the standards above.
9. How do I address defects found during inspections?
- Document the defects with photos and notes, referencing the specific checklist item.
- Share these with your contractor and request corrective action.
- Follow up after corrections to ensure the issues have been resolved.
10. What tools or resources can help me use the checklist effectively?
- A spirit level for checking gutter gradients.
- A flashlight for inspecting dark or hard-to-reach areas.
- A camera or smartphone for documenting findings.
- Access to the National Construction Code (NCC) or Australian Standards for reference.


