Introduction
Building your new home is an exciting journey, but it can also be overwhelming—especially when it comes to managing the quality of construction.
One of the most important areas that requires your attention is the roof.
A well-installed roof does more than keep you dry; it protects your home, ensures the structural integrity of your home, and contributes to its energy efficiency. Yet, many builders overlook the importance of inspecting their roof during construction, leaving potential issues unnoticed until it’s too late.
That’s where our C8 Metal Roof + Flashing Inspection Checklist comes in.
Designed specifically for new residential homes, this checklist is your guide to understanding, ensuring quality and compliance in your roof installation. Whether you’re overseeing the work of a project builder or simply want peace of mind that everything is being done right, this tool is invaluable.
In this blog post, we’ll take you through the checklist, breaking down its purpose, how to use it, and the key areas you need to focus on.
We’ll also explain some of the technical terms you may encounter, helping you feel confident and informed when assessing your roof’s quality. From identifying common issues like misaligned gutters and poorly sealed flashings to ensuring compliance with Australian standards, this checklist empowers you to proactively manage your construction project.
By the end of this guide, you’ll understand why it’s important to perform these inspections, how they can save you time and money, and how to effectively communicate any concerns with your contractor. Let’s get started on protecting your home, your investment, and your peace of mind.

Why Use our Roof and Box Gutter/Flashing Inspection Checklist?
Building a new home is an investment, and ensuring that every component is of high quality is essential for long-term performance of your new home.
Roof installations, including metal roofs, box gutters, and flashings, are key areas where small mistakes can lead to major issues down the line. Here’s why the C8 Metal Roof + Flashing Inspection Checklist is a must-have tool for homeowners:
- Early Detection of Issues During Construction: The checklist allows you to identify problems such as poor workmanship, material defects, or deviations from the plan before they escalate. For instance, improperly sealed flashings or incorrect roof slopes can lead to water leakage, structural damage, and costly repairs.
- Avoiding Time and Cost Overruns: Construction delays are not only frustrating but also expensive. By systematically inspecting each aspect of the roof installation, you can catch potential issues early, saving time and money. For example, identifying misaligned gutters or insufficient fasteners early on can prevent rework that might otherwise disrupt the project schedule.
- Ensuring Compliance with Standards: The checklist is designed with Australian standards and building codes in mind, such as AS 3566.1 for fasteners and the Plumbing Code of Australia for box gutters. Using this tool helps you verify that the work meets these standards, ensuring a safe and compliant build.
- Simplifying Communication with Contractors: Homeowners often find it challenging to convey technical issues to contractors. The checklist provides a clear framework for documenting observations, including photos and notes, making it easier to discuss concerns with your builder or roofing specialist.
Real-Life Impacts of Not Using a Checklist
Imagine completing your new home only to discover water stains on the ceiling after the first heavy rain. Investigating the issue reveals improperly sealed flashings and undersized gutters—issues that could have been identified and rectified during construction with the help of this checklist. The repair costs not only eat into your budget but also add stress to what should be an exciting time.
By using the Metal Roof + Flashing Inspection Checklist, you take control of quality management, ensuring your home is built to last. It’s a proactive step that safeguards your investment and gives you peace of mind.
Getting Started – How to Use the Checklist
Using the Metal Roof + Flashing Inspection Checklist is straightforward, even if you’re new to quality management in construction. By following a systematic approach, you can ensure every aspect of your roof installation meets the required standards and specifications. Here’s how to get started:
Step-by-Step Guide to Using the Checklist
- Familiarise Yourself with the Checklist
- Begin by reviewing the entire checklist to understand its structure and purpose. The checklist is divided into sections, each focusing on a specific aspect of roof installation, such as site management, roof finish, gutters, and flashings. Familiarity with these sections will make the inspection process more efficient.
- Gather Essential Tools
- Ensure you have a few tools on hand to assist in the inspection:
- A camera or smartphone for taking photos.
- A notepad or tablet for jotting down observations.
- A tape measure for checking dimensions.
- A torch for inspecting hard-to-see areas.
- Ensure you have a few tools on hand to assist in the inspection:
- Work Systematically
- Start at Section 1 and work through each item in sequence (note: there is a mistake on the intro page that we will fix in the next version). For example, begin with site management items like checking sediment control and move through to roof finish, gutters, and flashings.
- Focus on one section at a time to avoid missing critical details.
- Document Your Findings
- For each checklist item:
- Mark it as OK if no further action is needed.
- Use an arrow (→) to indicate items you couldn’t assess at the time (e.g., due to weather conditions).
- Mark an X for items that require follow-up or repairs.
- Take clear photos of any issues you identify. Reference these photos against checklist items for easy follow-up.
- For each checklist item:
- Engage with Your Contractor
- Share your findings with your builder or roofing installer. Use the checklist as a reference to discuss any concerns and ensure they are addressed promptly. Clear documentation and photos makes it easier to hold contractors accountable.
Tips for a Successful Inspection
- Schedule Inspections Strategically Perform inspections at critical stages of the roof installation, such as after the frame is complete, when the roof sheeting is installed, and before finishing elements like flashings and gutters are added.
- Don’t Rush the Process A thorough inspection takes time but is well worth the effort. Set aside dedicated time for each section to ensure no detail is overlooked.
- Stay Safe If inspecting the roof requires climbing ladders or accessing elevated areas, prioritise safety. Consider using a professional roof inspector if the task seems risky.
Example in Action
Imagine the gutter has just gone up and you want to make sure it was installed correctly. Our checklist guides you to check for adequate gradient, proper placement of downpipes, and the presence of overflow mechanisms. By knowing what to inspect, you might notice that the gutter isn’t sloped correctly, which could cause water pooling and long-term damage.
Documenting this issue and bringing it to your contractor’s attention ensures the problem is fixed before it leads to costly repairs.
Key Inspection Areas
The Metal Roof + Flashing Inspection Checklist is designed to guide you through inspecting all critical aspects of your roof installation. Below, we’ll delve into the main sections and highlight what to look for, ensuring your inspection is thorough and effective.
3.1 Site Management
Before the roof installation begins, it’s crucial to ensure the site is properly prepared and managed.
- Erosion and Sediment Control: Check that sediment fences are intact and effective in preventing soil run-off. Poor sediment control can lead to environmental fines and damage to neighbouring properties.
- Cleanliness and Safety: Inspect the site for organised material storage and clear pathways. Disorganised sites can increase the risk of accidents and damage to roofing materials.
- Utility Access: Verify that water meters, stormwater grates, and other utilities are undamaged and accessible. Take photos to document their condition.
3.2 Roof Finish
Once the roof sheets are installed, assess their quality and adherence to the design.
- Surface Quality: Look for drag marks, scratches, or dents on the metal sheets. These imperfections can lead to corrosion or leaks over time.
- Roof Slope and Turn-Ups: Ensure the roof slope meets the required minimum (e.g., 1:30 or 2°) to allow proper water drainage. Turn-ups at the sheet ends should be present to prevent water ingress during heavy rains.
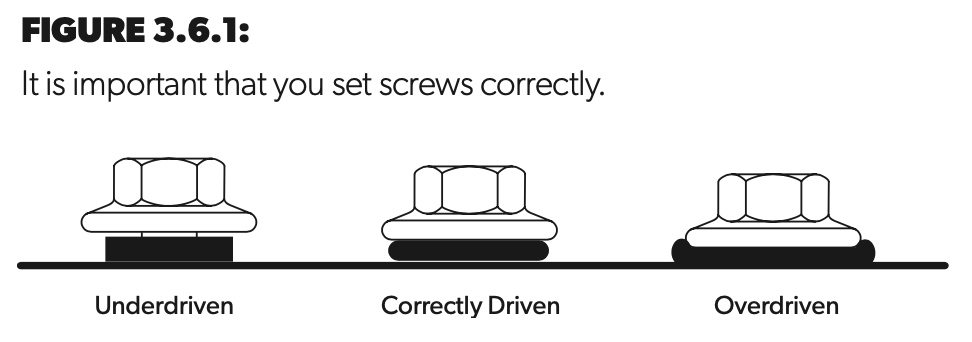
- Fastener Placement: Check that screws and fasteners are evenly spaced and securely tightened, with no overtightening that could damage the sheeting.
3.3 Gutters and Box Gutter Design
Gutters and box gutters are critical for effective water management. Proper installation prevents pooling, overflow, and long-term water damage.
- Gradient and Overflow Mechanisms: Verify that gutters are installed with the correct gradient (e.g., 1:500 or steeper) and include overflow mechanisms such as slotted gutters or standoff brackets.
- Sealing and Fastening: Inspect gutter joints to ensure they are fully sealed with silicone and securely fastened with rivets.
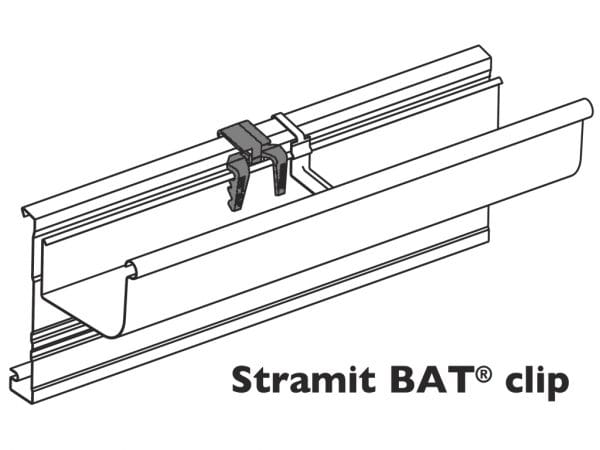
- Alignment: Stand at either end of the gutter to check for straightness. Uneven gutters may indicate improper clip installation.
3.4 Flashings and Sealing
Flashings are vital for sealing the roof and preventing water penetration. There are several types to inspect:
- Apron Flashings: These protect the areas where a roof meets a vertical wall. Ensure they are properly installed with sufficient overlap.
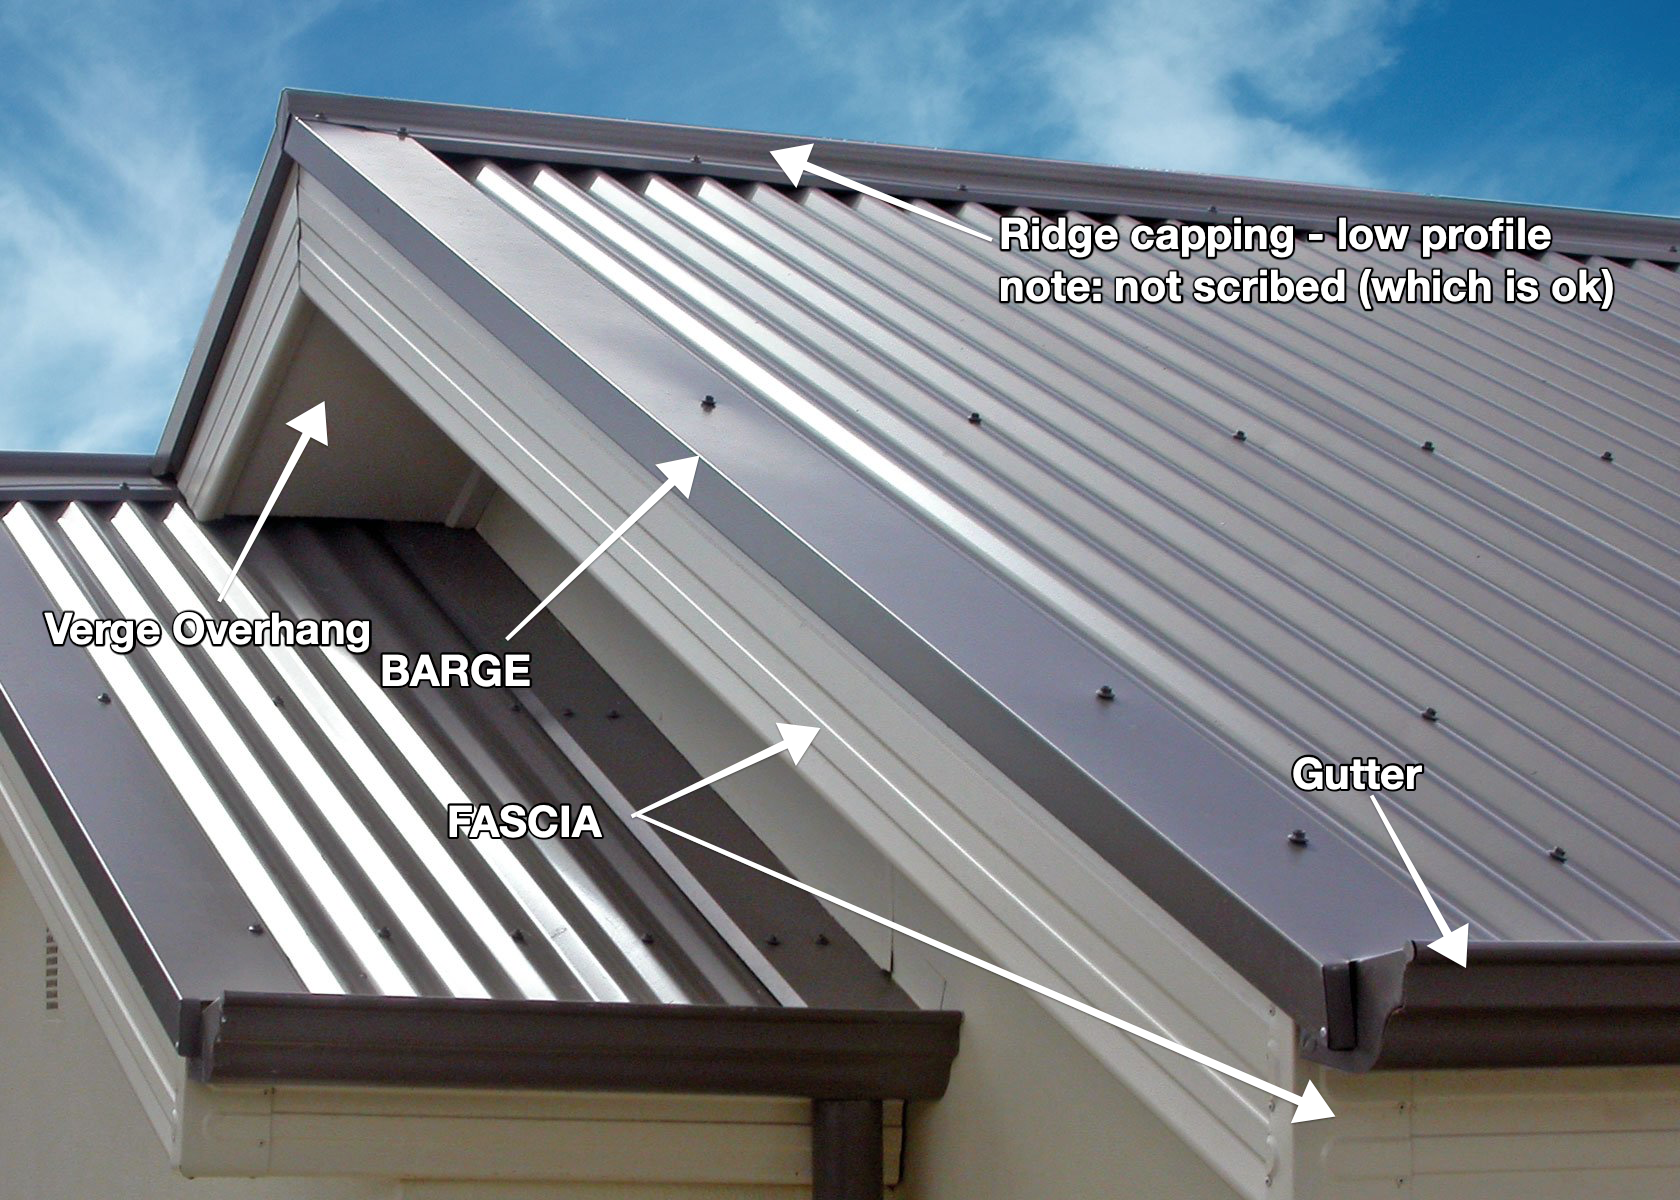
- Barge and Pressure Flashings: Check that these are securely fixed and made from materials compatible with the roof sheeting.
- Sealant Application: Inspect the application of neutral-cure silicone sealant to ensure all gaps are sealed without excess or missed areas.
The Embed Below
This includes some useful details on stepped flashings with reglet construction. However, the example shown is one of the poorest construction details I’ve come across. An alternative to a reglet is a K-flashing.
While both have their uses, I prefer the reglet because it doesn’t rely entirely on the sealant at the "head" of the K-flashing to maintain the system's integrity. Over time, K-flashing sealant tends to shrink, allowing water to seep behind it, which inevitably leads to significant water penetration issues. With a properly constructed reglet, this risk is eliminated, as there’s no pathway for water to penetrate when installed correctly.
3.5 Downpipes
Proper downpipe installation ensures efficient water drainage away from your home.
- Positioning: Confirm that downpipes are installed per the design, particularly near valley gutters or areas with high water flow.
- Size and Compatibility: Measure the downpipe diameter to ensure it matches the building’s requirements and rainfall intensity.
- Temporary Downpipes: For sites under construction, verify that temporary downpipes are fitted securely to protect against weather damage.
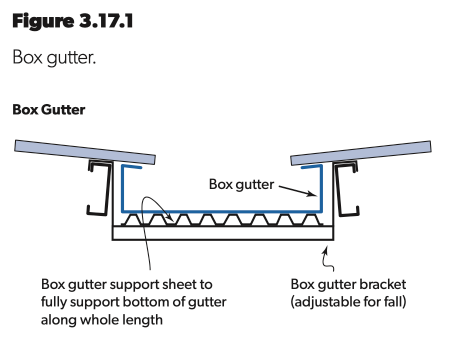
3.6 Box Gutter Support Systems
Box gutters need robust support to manage water flow and structural loads.
- Support Spacing: Ensure brackets or supports are placed at the correct intervals (e.g., no more than 750mm apart).
- Material Compatibility: Check that all support materials are corrosion-resistant and compatible with the gutter’s material.
The Embed Below
This is a highly informative presentation on box gutters and steel framing. It offers a clear overview of what box gutters are, their purpose, and when they are necessary, as well as guidance on how to size and construct them.
Compliance with Standards and Best Practices
Australia has specific codes and standards for roofing and related components. Familiarity with these standards helps you identify potential non-compliance and communicate effectively with contractors. Some key standards include:
- AS 1562.1 – Design and Installation of Sheet Roof and Wall Cladding: Outlines requirements for materials, fastening, and structural integrity.
- AS 3566.1 – Self-Drilling Screws for Roofing and Cladding: Specifies the durability and compatibility of fasteners.
- Plumbing Code of Australia (PCA): Governs the installation of box gutters, ensuring they meet hydraulic capacity and overflow requirements.
- SA HB39:2021 – Installation Code for Metal Roofing and Cladding: Provides comprehensive guidance on best practices for installing metal roofing and cladding systems, including specifications for roof sheeting, flashings, and waterproofing details.
- The NCC Part 7 details roof and wall cladding compliance
Areas of Focus for Compliance
- Roof Fasteners and Screws
- Ensure fasteners meet the AS 3566.1 standard, particularly in terms of corrosion resistance and material compatibility - Minimum Class 4 and Class 5 when close to ocean (exposure category dictates).
- Fasteners should be correctly tightened, with sealing washers securely in place to prevent water ingress *see the detail 3.6.1 in roof finish 3.2 above.
- Refer to SA HB39:2021 for guidelines on fastener spacing and types for specific roofing profiles.
- Gutters and Downpipes
- Verify that gutters are installed with a gradient of at least 1:500 to avoid water pooling.
- Downpipes should be positioned to handle expected rainfall intensities and spaced appropriately to distribute water flow.
- Use SA HB39:2021 for detailed recommendations on gutter sizing and overflow mechanisms.
- Flashings and Sealants
- Flashings should overlap sufficiently (e.g., 50mm for apron flashings) and be secured with fasteners at the correct intervals.
- Sealants must be neutral-cure and applied in a continuous bead to ensure durability.
- SA HB39:2021 offers specific instructions for different flashing types and their integration with roof sheets.
- Thermal Expansion and Movement
- For metal roofs, include provisions for thermal expansion to prevent buckling or leaks over time. This may involve traditional expansion joints or other strategies as outlined in the standards.
- SA HB39:2021 provides detailed methods for addressing thermal expansion in both roofing and cladding systems.
Common Non-Compliance Issues
Non-compliance can lead to serious issues that compromise the integrity of your roof. Here are a few common examples and how to spot them:
- Inadequate Gradient in Gutters: This can cause water pooling and overflow. Use a tape measure or level to check the slope during your inspection.
- Incorrect Fasteners: Using fasteners incompatible with the roofing material can lead to corrosion and eventual failure. Confirm the type and coating of screws used.
- Improper Sealant Application: Gaps in sealant can lead to water leaks. Inspect all sealed areas and reapply where necessary.
Common Challenges and How to Overcome Them
Inspecting and managing the quality of a roof installation can present various challenges, particularly for homeowners unfamiliar with general building practices. Our checklist helps address these hurdles, but being prepared for common issues can further improve the inspection process.
1. Limited Accessibility
- Challenge: Reaching certain areas of the roof, such as box gutters or high ridges, can be difficult and sometimes dangerous without the proper equipment.
- Solution: Use a ladder stabiliser and ensure you have adequate safety gear, such as a harness if required. For areas that remain inaccessible, consider hiring a professional inspector or using a drone to capture detailed photos.
2. Lack of Construction Knowledge
- Challenge: Technical terms, such as "turn-ups," "capillary action," or "thermal expansion," may be confusing to homeowners.
- Solution: The checklist includes plain-English explanations for each term. Additionally, this blog post serves as a guide to demystify these concepts, empowering you to conduct inspections with confidence.
Just enter in a term or phrase and get a clear explanation with context. This is powered by our blog and our glossary.
Its currently released in a limited free preview so you can try it out.

The Constructor TermiNator AI Free capped use for a limited time - try it for up to 20 searches - Ill be back
3. Uncooperative Contractors
- Challenge: Some builders and contractors may dismiss concerns or fail to address issues promptly.
- Solution: Document all findings with photos and detailed notes. Share the checklist results with the contractor in writing, and keep a record of all communications. If issues persist, consider engaging a third-party building inspector or seeking advice from a local building authority.
4. Identifying Standards Compliance
- Challenge: Homeowners may struggle to determine if the roof installation complies with Australian standards such as AS 3566.1 or SA HB39:2021.
- Solution: Cross-reference the checklist items with the standards discussed in the previous section. Use resources like online guides or consult a professional to clarify compliance questions.
5. Time Constraints
- Challenge: Homeowners managing construction projects often juggle multiple responsibilities, leaving little time for detailed inspections.
- Solution: Break the inspection into manageable sections and tackle one area at a time. Completing smaller portions of the checklist regularly ensures a comprehensive review without feeling overwhelmed.
8. Resolving Identified Issues
- Challenge: Addressing problems such as misaligned gutters or improperly sealed flashings can be complex and time-consuming.
- Solution: Work closely with your contractor to resolve these issues. Use the checklist as a reference during discussions to ensure each item is properly addressed. Set clear timelines and expectations for repairs.
Practical Example
Let’s say you notice that the gutter gradient is too shallow during your inspection. You flag this issue with a photo and detailed notes. By documenting the problem and sharing it with your contractor, you can ensure the gradient is corrected before it causes pooling or overflow. This proactive approach saves you time and money in the long run.
Communication with Builders
Effective communication with your builder helps to ensure that any issues identified during your roof inspection are addressed promptly and correctly. The C8 Metal Roof + Flashing Inspection Checklist provides a structured framework to help you convey concerns clearly, keeping the project on track and maintaining the quality of your new home.
1. Documenting and Sharing Findings
- Use the checklist to organise your observations, marking items that require follow-up with an “X” and including detailed notes. For example:
- “Box gutter gradient appears insufficient. Water pooling observed near the midpoint.”
- Attach photos to illustrate the issues clearly. A picture of a poorly sealed flashing or a dented roof sheet provides undeniable evidence that can’t be easily dismissed.
- Compile your findings into a concise report or email to ensure your contractor understands the key concerns.
2. Setting Clear Expectations
- Communicate your expectations for addressing the issues, such as:
- What needs to be repaired or adjusted.
- How you expect the work to align with Australian standards (e.g., AS 1562.1 or SA HB39:2021).
- A reasonable time frame for completion.
- Example: “I’d like the gutter gradient corrected to comply with the Plumbing Code of Australia within the next two weeks. Please confirm your plan to address this.”
3. Establishing Accountability
- Contractors may occasionally dispute your observations. Use the checklist and its alignment with Australian standards as a neutral reference point to substantiate your concerns.
If necessary, involve a third-party inspector to validate your findings and provide an independent assessment.
4. Maintaining Professionalism
- Even if frustrations arise, keeping the tone of your communications respectful and professional is key to resolving issues amicably. Focus on facts and solutions rather than emotions or blame.
- Example: “I’ve noticed that some screws used in the roof installation don’t meet the requirements of AS 3566.1. Could you please review and confirm the steps you’ll take to address this?”
5. Tracking Progress
- Use the checklist to monitor progress on the corrections. After repairs are made, re-inspect the affected areas and update the checklist to reflect the changes.
- This ensures that you have a complete and accurate record of the project’s quality management.
6. When to Escalate
- If the contractor fails to address your concerns despite repeated communications:
- Consider consulting a building inspector or seeking advice from a local authority, such as the Fair Trading department in your state or territory.
- Read your contract first on the requirements for and process to withhold payment (notification and timing) and ensure you comply with these provisions. Seek legal advice if in doubt. Then, withhold paying the current progress claim
- In extreme cases, legal action may be required, though this is typically a last resort.
Example in Action
You notice that the flashing around a skylight has been installed with gaps, risking water ingress. You document the issue in the checklist, attach photos, and send an email to your contractor. The contractor responds with a timeline for repairs and follows through. Once the repair is complete, you recheck the area, confirm the issue has been resolved, and update your checklist.
The Benefits of Proactive Communication
Proactively communicating your findings helps:
- Prevent misunderstandings and disputes.
- Build a collaborative relationship with your contractor.
- Ensure that your roof installation meets quality and compliance standards.
The checklist serves as a powerful tool in these conversations, offering clarity and structure to what might otherwise feel like an overwhelming process.


Conclusion
Building a new home is one of the most significant investments you’ll make, and ensuring every aspect of your roof installation meets high standards is key to protecting that investment, and ensuring prolonged performance. The C8 Metal Roof + Flashing Inspection Checklist helps you to take control of the quality management process for this stage, even if you have no prior construction experience.
By using the checklist, you’re not only identifying potential issues but also proactively managing them before they escalate into costly repairs or delays. Whether it’s ensuring gutters are properly graded, flashings are securely sealed, or fasteners meet Australian standards, each step contributes to a roof that’s built to last longer.
Remember, your roof is more than just a structure—it’s your main defence against the elements, a cornerstone of your home’s energy efficiency, and a important component of its overall value. By following the systematic approach outlined in our checklist, you’ll gain confidence in the construction process and ensure your roof is installed to the highest standard.
Take the first step toward peace of mind today. Download the checklist, get familiar with its sections, and start inspecting your roof with clarity and purpose. Your future self—and your home—will thank you for it.
FAQs
- What is the Metal Roof + Flashing Inspection Checklist?
It’s a tool designed to help homeowners inspect their roof installations for quality, compliance, and adherence to Australian standards. The checklist covers key areas like roof finish, gutters, and flashings to ensure a thorough inspection process. - Who should use this checklist?
The checklist is ideal for Australian homeowners, prospective homeowners, and anyone managing residential construction projects. It’s particularly useful for those working with project builders or unfamiliar with roofing quality management. - Do I need special tools to perform the inspection?
No specialised tools are required. A smartphone for taking photos, a tape measure for checking dimensions, and a torch for inspecting hard-to-see areas are sufficient. - How do I know if my roof complies with Australian standards?
The checklist aligns with standards such as AS 1562.1, AS 3566.1, and SA HB39:2021. Cross-reference your observations with these standards to verify compliance. For further clarification, consider consulting a professional inspector. - What should I do if I find an issue during the inspection?
Document the issue with photos and notes, mark it on the checklist, and share your findings with your contractor. If necessary, involve a third-party inspector or local building authority for resolution. - Why is gutter gradient so important?
A proper gradient ensures efficient water flow, preventing pooling that can lead to corrosion, leaks, and structural damage. The recommended minimum gradient is 1:500. - Can I inspect my roof in any weather?
No. It’s best to inspect during stable weather conditions to ensure safety and visibility. Rain or wind can obscure details and make inspections dangerous. - What are the most common roofing issues to look out for?
Common issues include improperly sealed flashings, misaligned gutters, insufficient fastener spacing, and poor roof slope. These can lead to leaks, water damage, and reduced roof lifespan. - How often should roof inspections be conducted?
During construction, inspections should align with key milestones like framing, roof sheeting installation, and flashings. Post-construction, annual inspections are recommended to maintain quality. - How can this checklist help with contractor disputes?
The checklist provides a structured way to document and communicate issues, making it easier to resolve disputes. Photos and notes serve as evidence to support your concerns.
Further Reading


