

Take The Quiz On This Post
Read the post, then take the quiz—test your knowledge and see what you’ve learned!
Introduction
Air conditioning is required for comfort, especially with the country’s extreme temperatures. A reliable and efficient air conditioning system can make all the difference in maintaining a pleasant living environment.
However, many home owners face issues after installation—such as inefficiency, high energy bills, or even frequent breakdowns—
because their systems were not installed correctly.
Common complaints from home owners about air conditioning installations include:
- Inadequate cooling or heating: Systems failing to perform at the expected capacity.
- Excessive noise: Poorly placed units or improperly installed ductwork causing disturbances.
- High energy bills: Systems running inefficiently due to improper installation or non-compliance with standards.
- Water leaks or condensation issues: Often a result of incorrect piping or lack of proper drainage planning.
Why Proper Installation Matters
The effectiveness of your air conditioning system relies heavily on correct installation. A well-installed system not only ensures maximum efficiency but also reduces energy consumption, prolongs the life of the unit, and prevents expensive repairs down the road.
Proper installation affects everything from the airflow and refrigerant levels to duct sealing and system calibration. Without following Australian Standards and best practices, even the best units can fail to perform as expected.
Australian Standards in Air Conditioning Installation
The key standard that governs air conditioning installation in Australia is AS 4254.1-2012. This standard sets out the requirements for ductwork in air-handling systems and is essential for ensuring that your system operates efficiently. AS 4254.1 covers everything from duct sizing and insulation to sealing and hanger supports.
Non-compliance with this standard can lead to issues such as air leakage, poor airflow, and energy inefficiency.
In this post, we will take a look into the common issues with air conditioning installation, outline the correct methods of installation, and provide a general checklist for quality control.

Understanding Air Conditioning Installation Basics
Stages of Installation: Rough-In and Fit-Off
Rough-In Stage: The rough-in stage generally occurs after your fascia gutter and roof is installed and other services like plumbing and electrical are roughed in. The AC rough in involves laying out the infrastructure required to support your air conditioning system, such as ductwork, piping, and electrical wiring.
Key points during the rough-in stage:
- Ductwork layout: Properly sized and placed ducts are essential for efficient airflow. If ducts are too small or poorly placed, the system will struggle to maintain temperature and airflow, working harder than it needs to (using more electricity to do so).
- Refrigerant piping: Accurate piping sizing ensures the right amount of refrigerant flows between the indoor and outdoor units. Errors here can cause inefficient cooling or heating and increase energy costs.
- Electrical wiring: The right wiring and circuit sizing is necessary to power the system without overloading circuits or creating safety hazards.
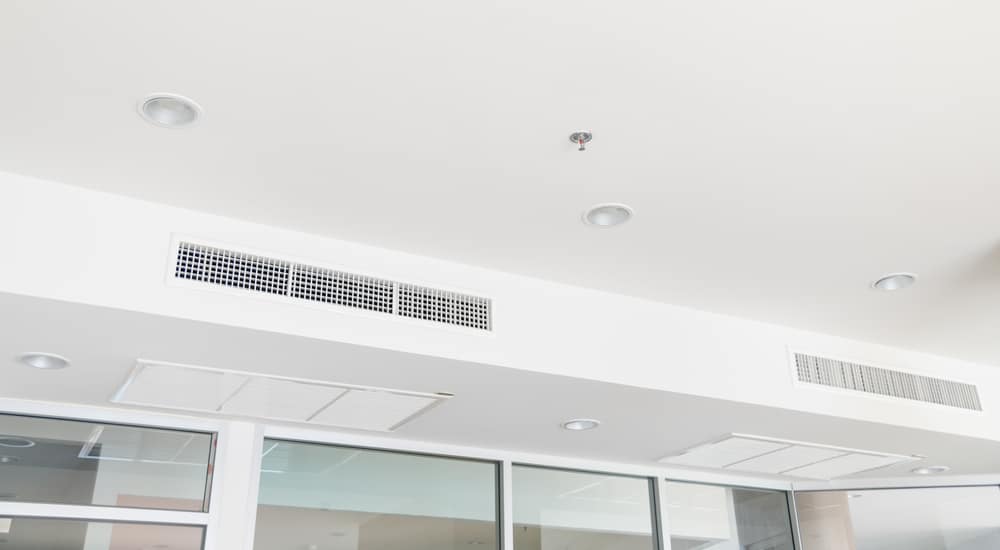
Fit-Off Stage: The fit-off stage occurs towards the end of the construction process, after paintwork and other trades have fit off their package. During this phase, installers complete the installation by installing the ceiling or wall diffusers connecting the ducts to the diffusers before mounting and connecting the outdoor unit to the roughed in pipework and electrical. The controller pads are connected up to the system then the system is calibrated and tested for performance.
Key points during the fit-off stage:
- Sealing ductwork: Proper sealing ensures there are no air leaks, which could compromise system efficiency and increase energy consumption.
- Calibrating the system: Ensuring the system is calibrated to the right temperature and pressure settings maximises performance.
- Drainage system installation: Correct installation of the drainage system (condensate line) prevents issues like water leaks and mould growth.
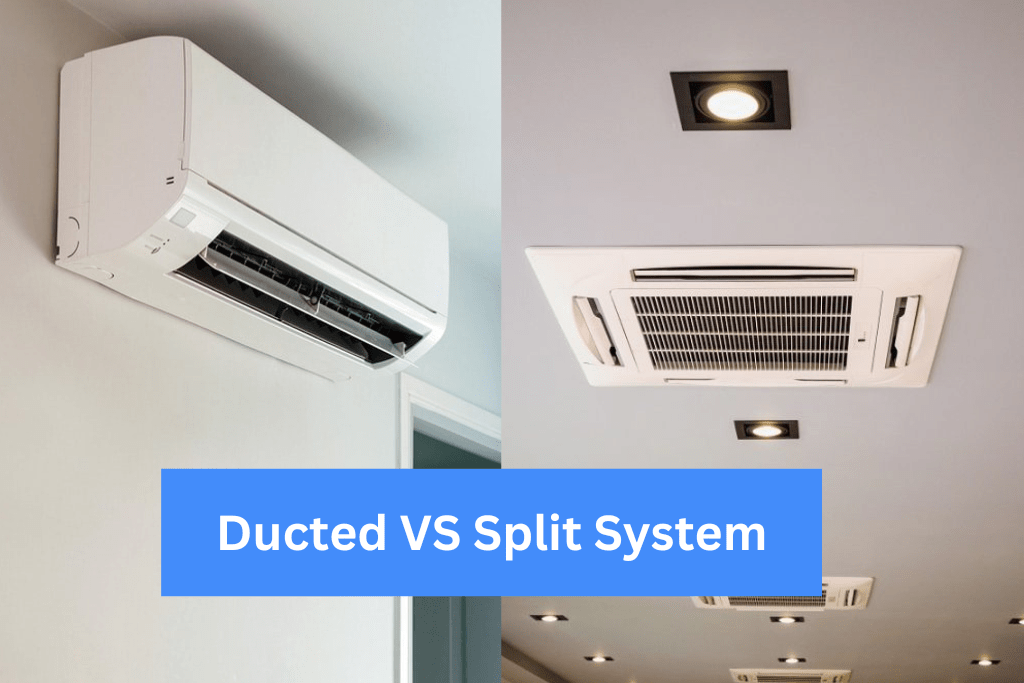
Types of Air Conditioning Systems: Ducted vs. Split Systems
Ducted Systems: Ducted systems distribute cool or warm air throughout a building via a network of insulated ducts. These systems are ideal for larger homes or spaces where temperature control in multiple rooms is necessary. Ducted systems are typically more expensive than split systems and often consumer more power and have greater power requirements due to their centralised nature.
Split Systems: Split systems are more compact, consisting of an indoor unit and an outdoor compressor. These systems are ideal for cooling or heating single rooms or small spaces. Split systems are often more energy efficient than ducted systems because units are only turned on as needed. This means if instead of switching off zones in a fully ducted system, you only physically turn on the split systems in the areas of the house you need conditioned. In my opinion, splits are the way to go for energy efficiency and cost effectiveness.
The Role of Ductwork: Why Flexible Duct Compliance is a must
AS 4254.1-2012 sets the standard for flexible duct installation, outlining the necessary requirements to ensure that ducts are properly sealed, insulated, and supported.
Key elements of ductwork installation include:
- Sizing: Incorrectly sized ducts can restrict airflow, causing the system to work harder and increasing energy costs. AS 4254.1 provides guidelines on how to size ducts correctly to ensure optimal performance.
- The general duct sizing guidelines provided by AS 4254.1-2012 ensure that ducts are appropriately sized to maintain proper airflow, avoid system inefficiencies, and minimise pressure loss.
- Duct runs should not exceed 6 meters for any one duct diameter. This ensures that airflow is not excessively restricted over long distances, which could reduce efficiency.
- For buildings in Classes 1 to 3 and Class 10 (as defined by the National Construction Code), flexible ducts should use no more than two lengths of up to 6 meters each between air terminal devices.
- Over sizing the flexible duct by one diameter larger than the specified size may be recommended in certain situations to minimise pressure loss and ensure optimal airflow.
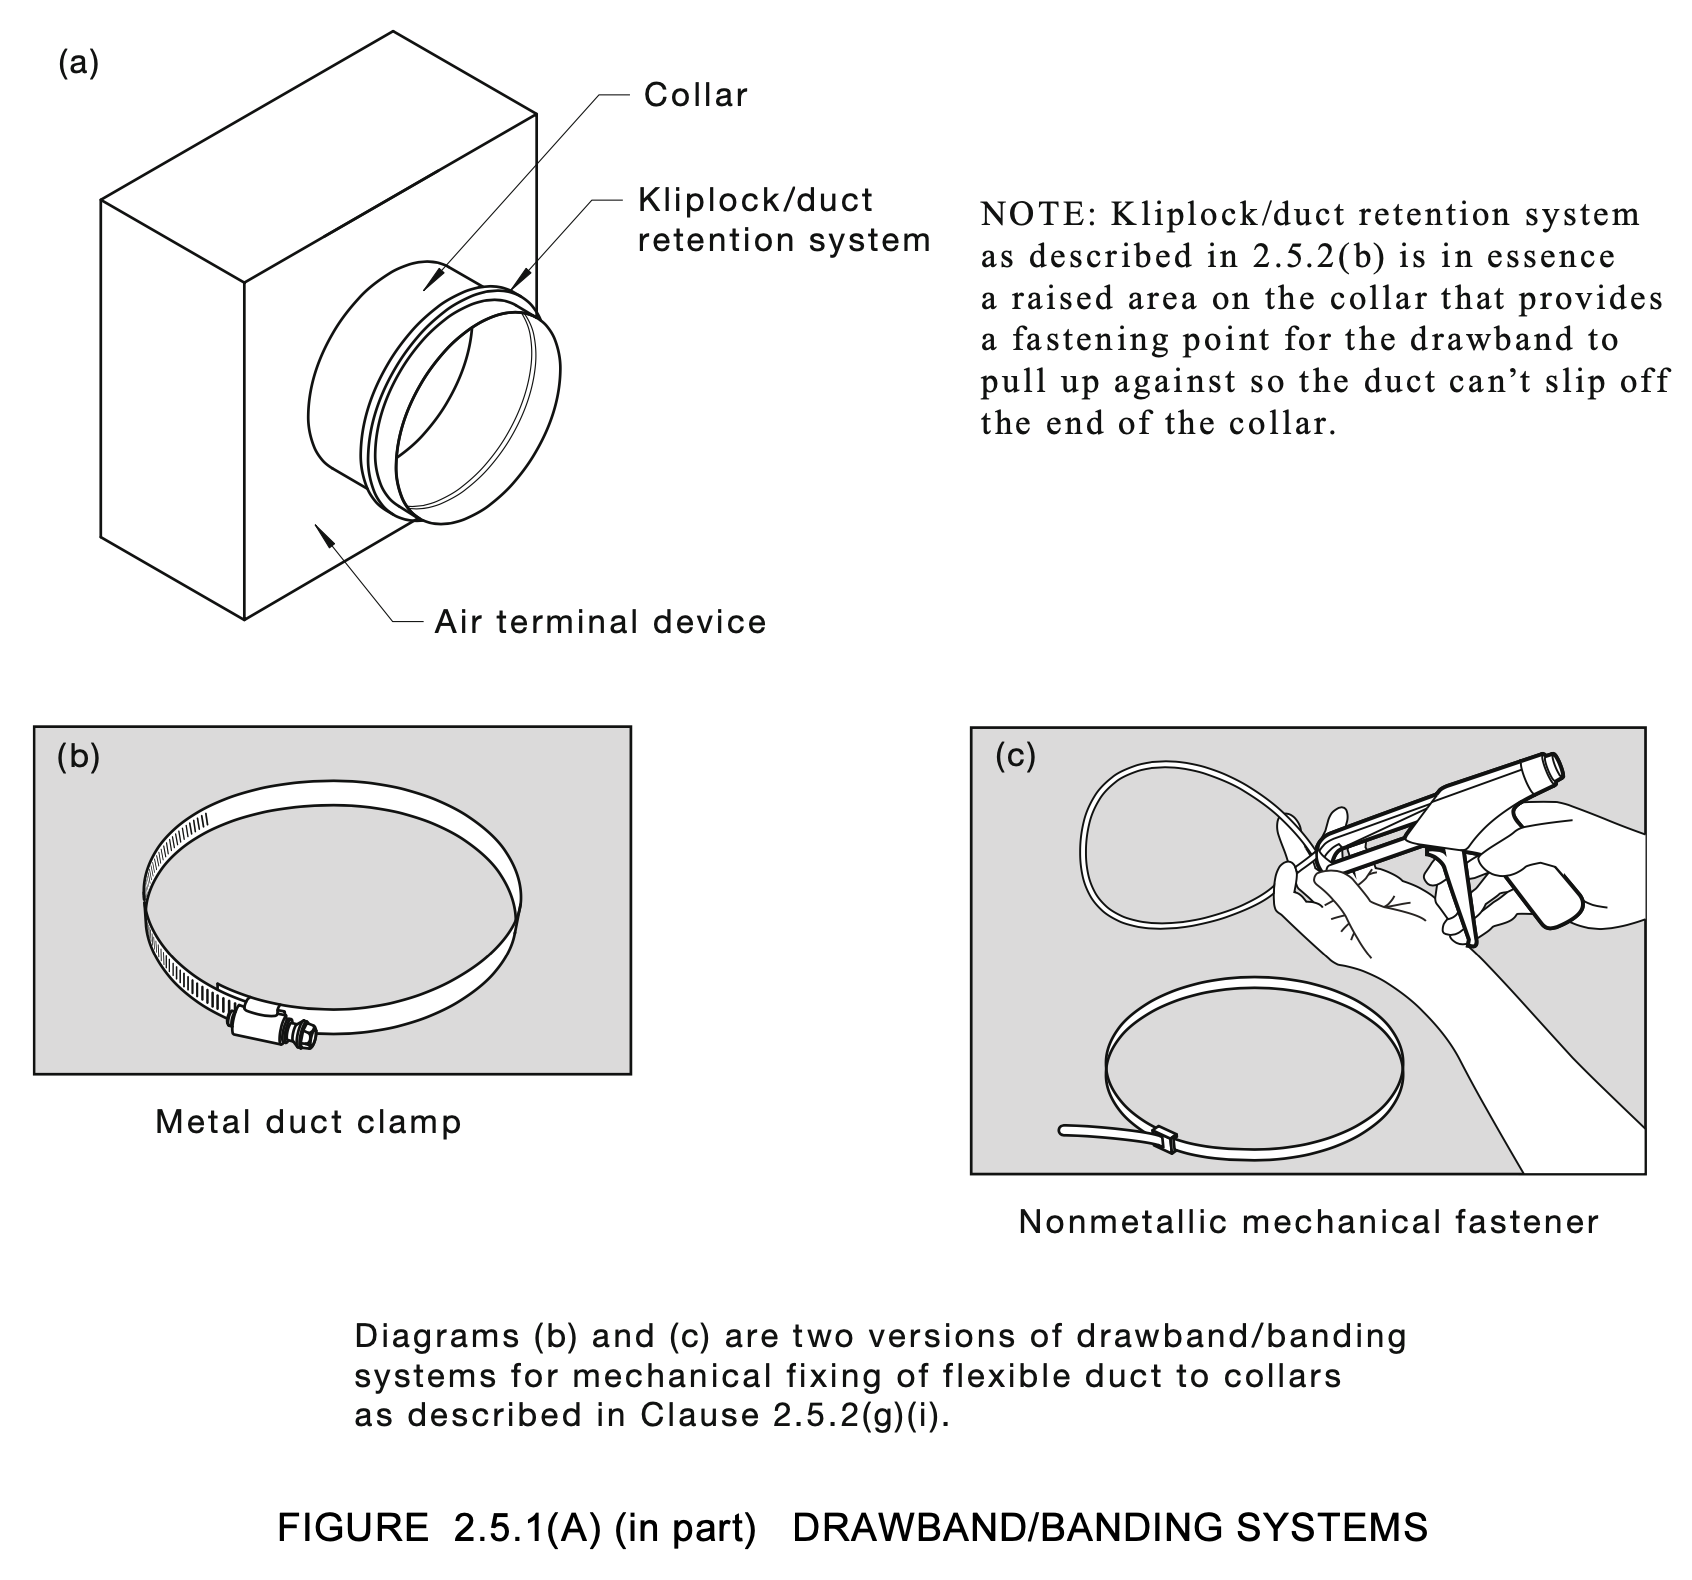
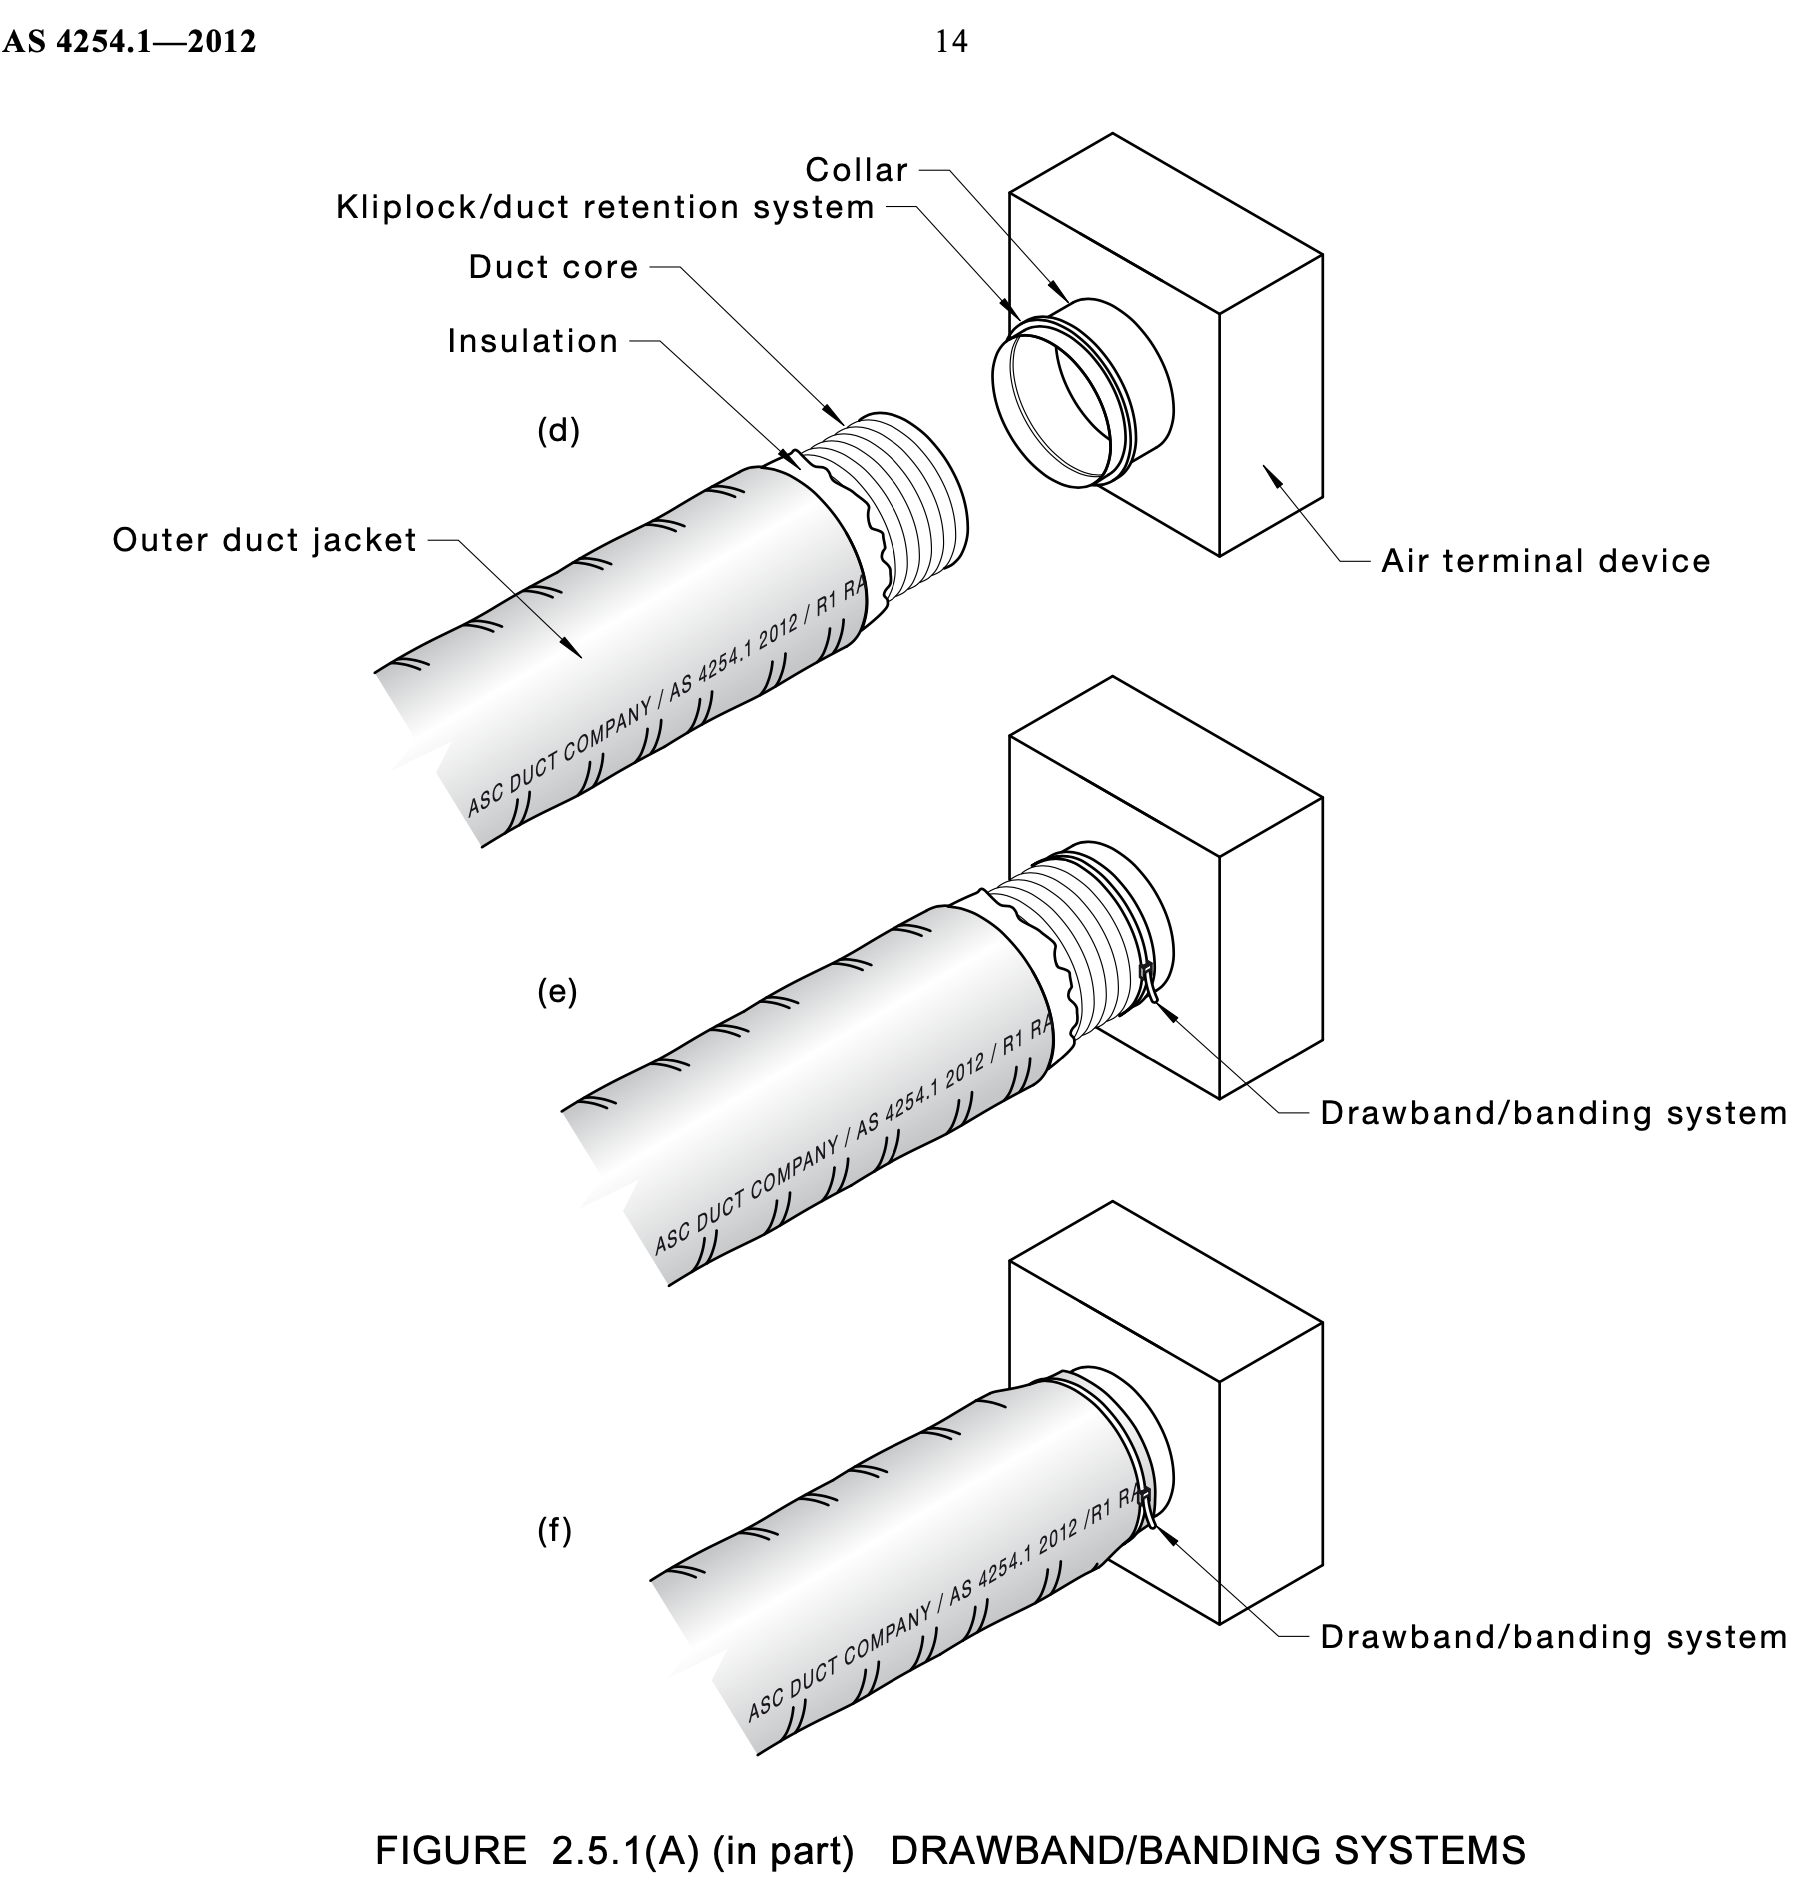
- Sealing: Ducts must be properly sealed using adhesive tapes or drawband systems to prevent air leaks.
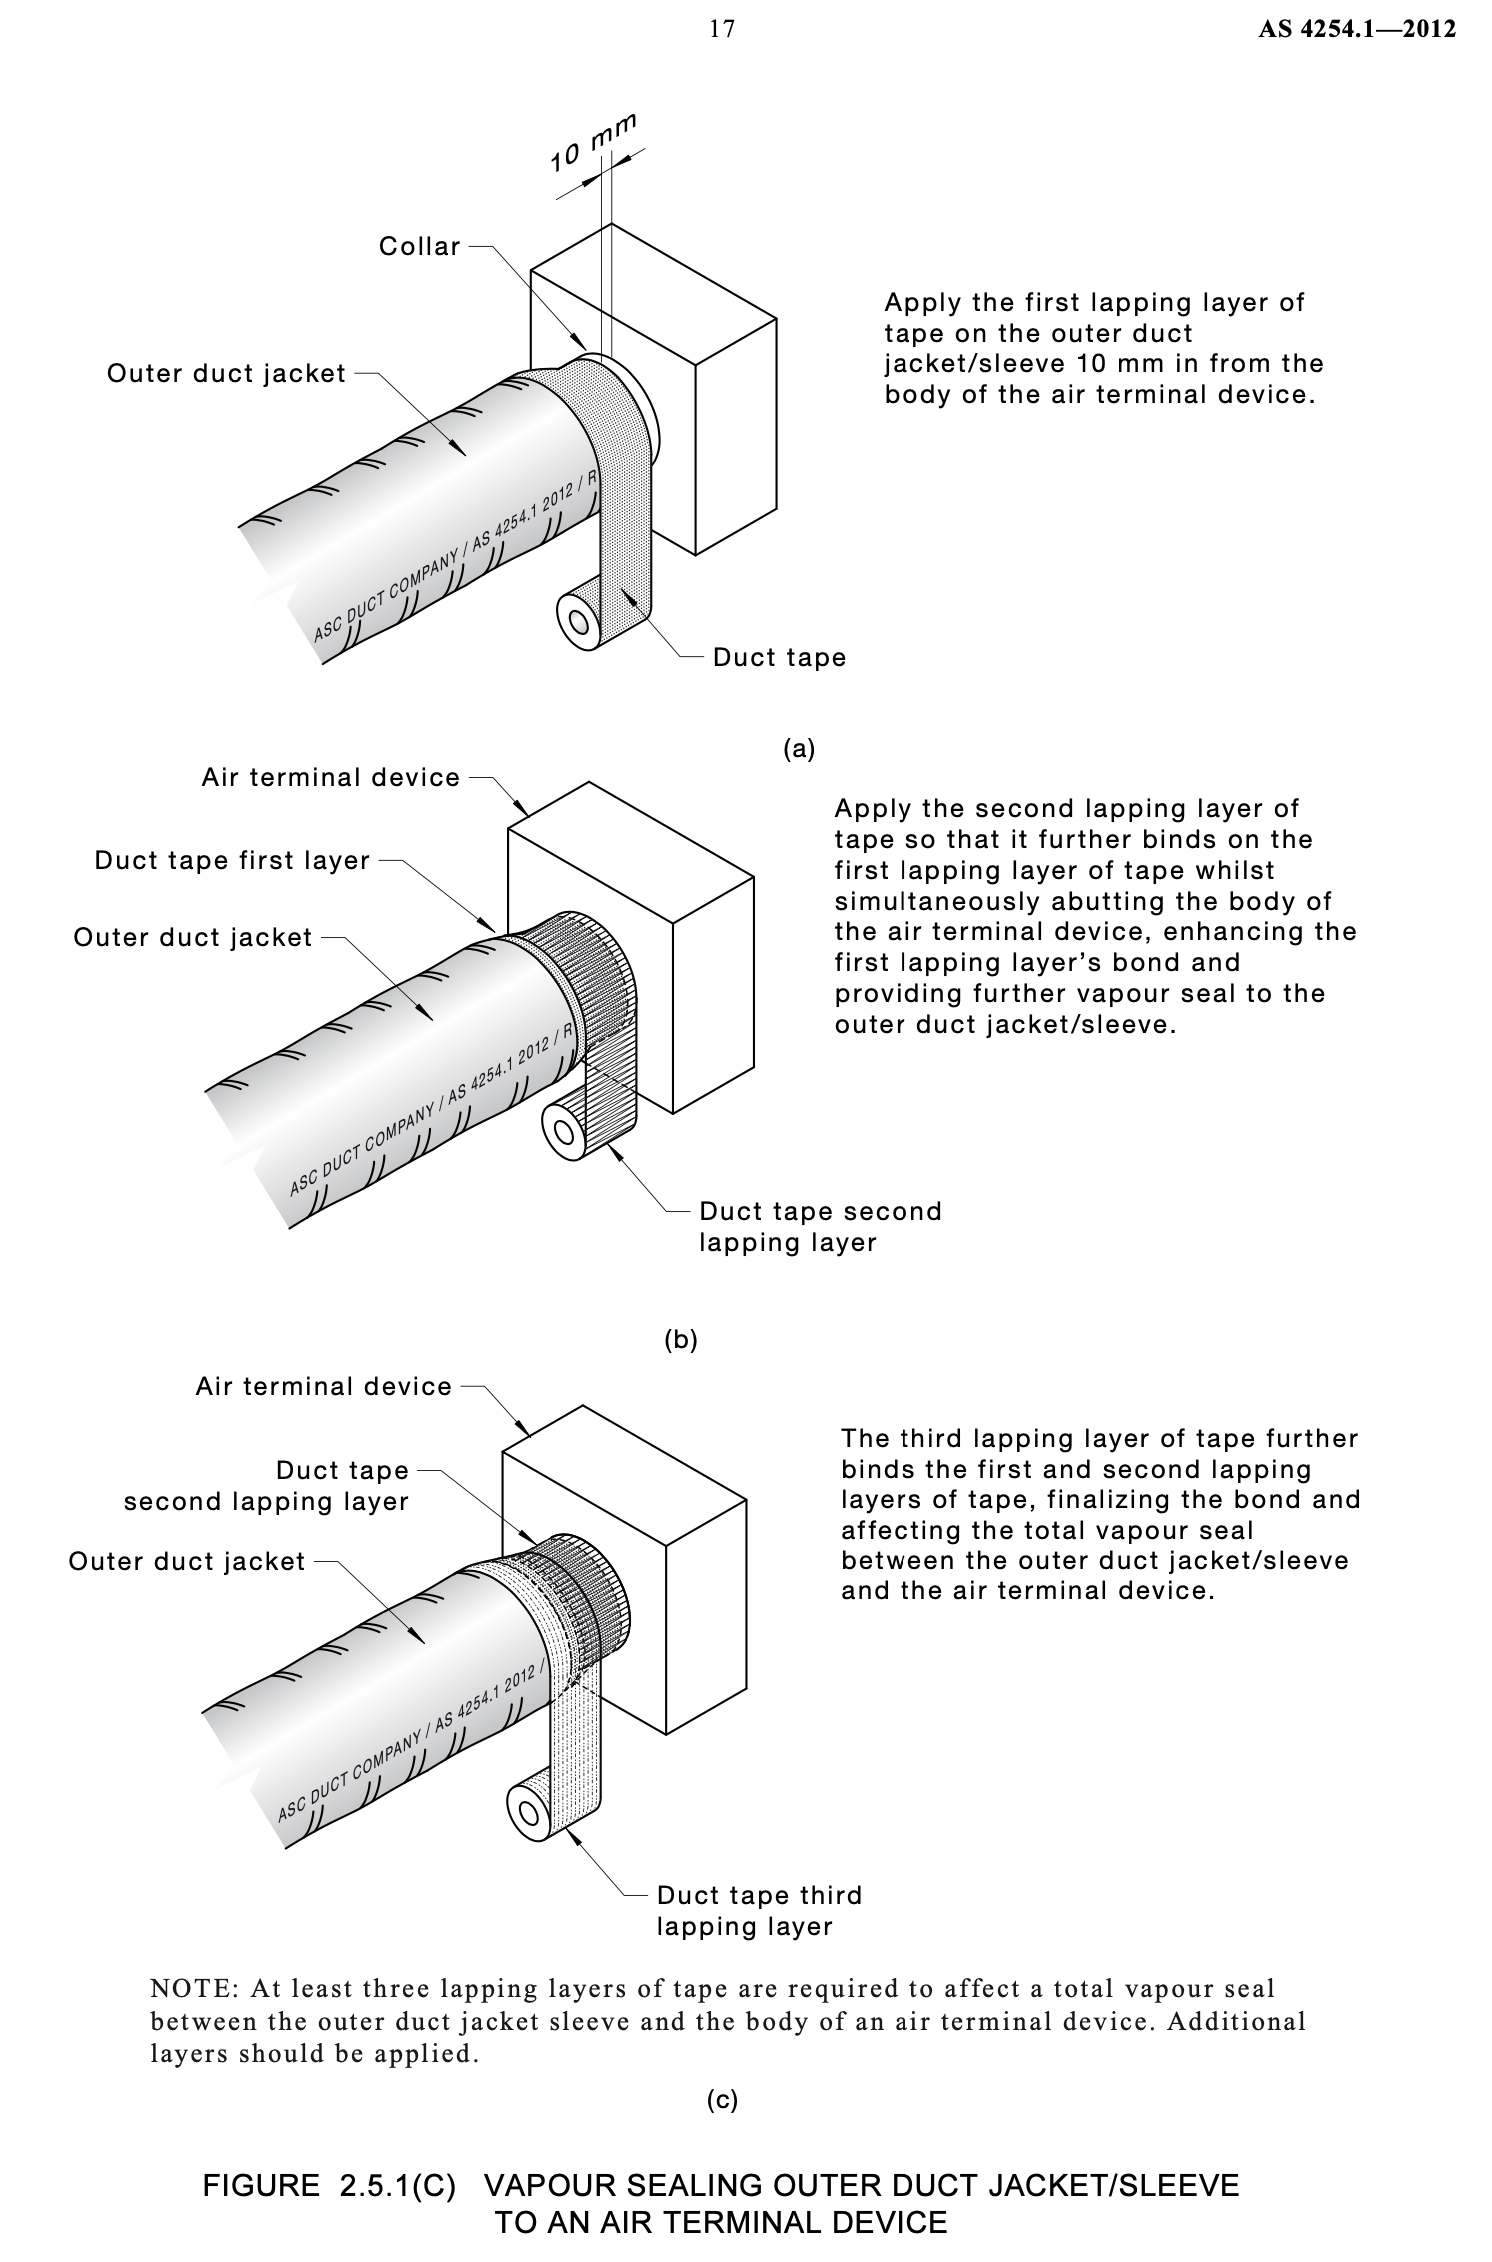
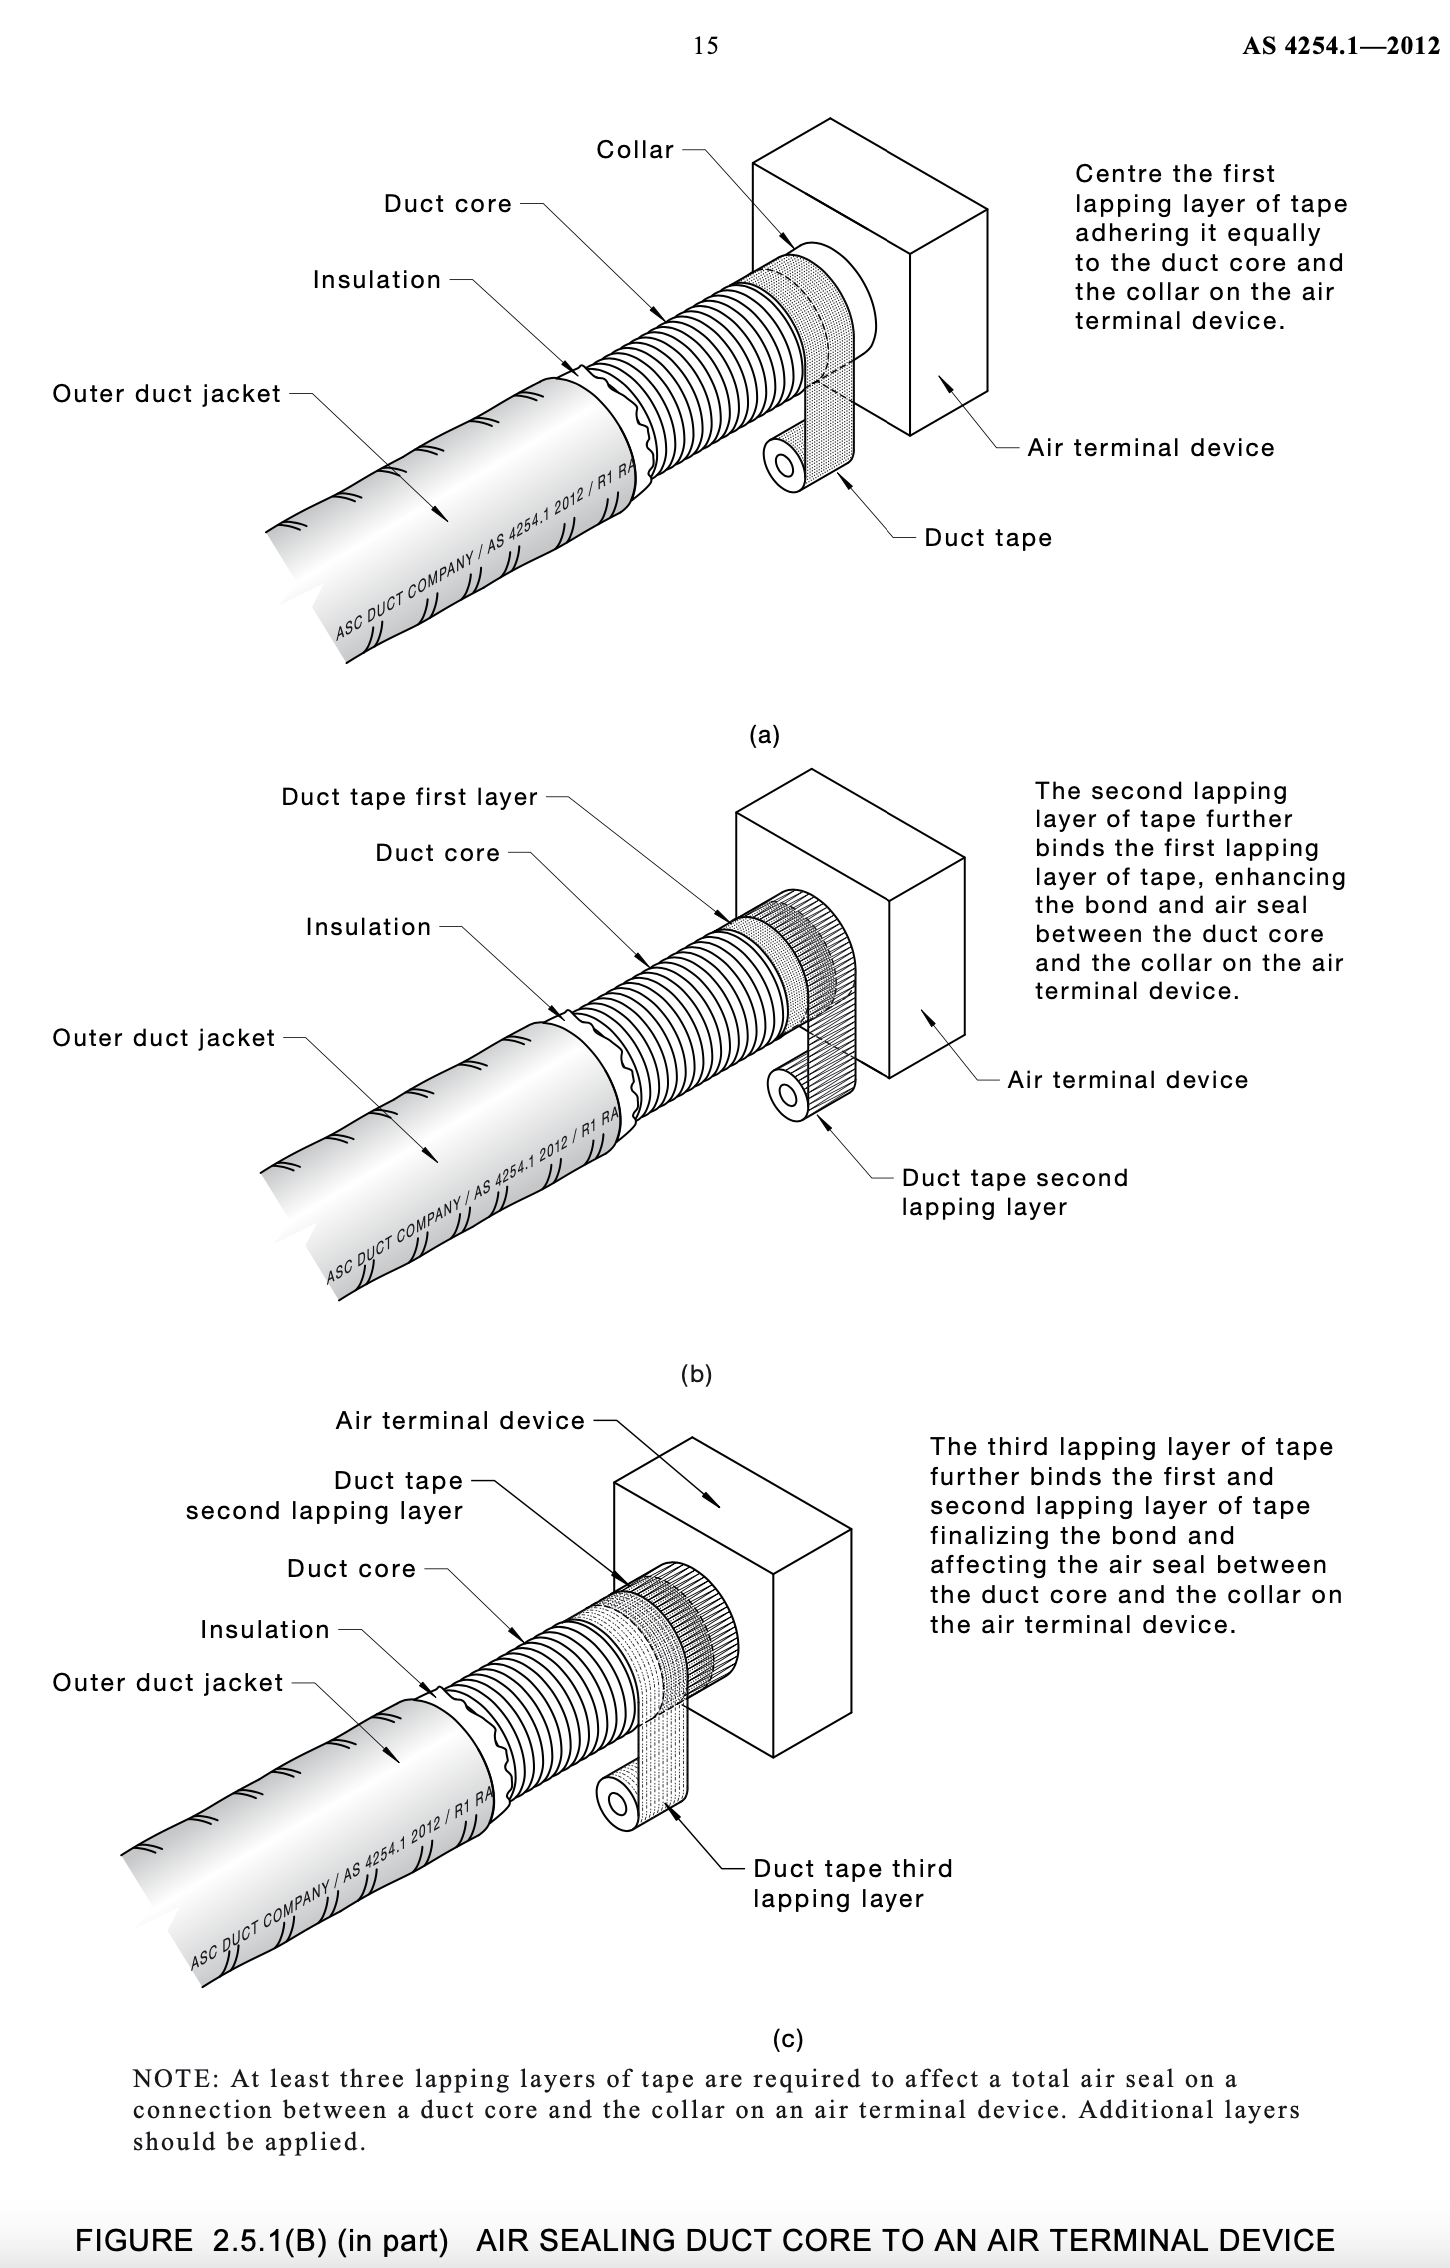
- Insulation Peeling: According to AS 4254.1-2012, when preparing flexible duct for connection to collars, air terminal devices, or joiners, the outer jacket and insulation must be folded back to expose at least 100 mm of the flexible duct core. This ensures that the duct core can be properly sealed and fastened without the insulation interfering with the connection
- When sealing flexible duct with duct tape, it is required that: The duct tape must be applied with a minimum of three overlapping, tensioned, crease-free wraps.
- Each layer of duct tape should overlap the previous layer by 40% to 60% of the tape width to ensure a secure air seal.
- Any air leakage can drastically reduce the system’s efficiency and lead to uneven cooling or heating across the house.
- Insulation: Proper insulation of ducts helps maintain the desired temperature as air travels through the system. The standard outlines the R-value (thermal resistance) required for different climate zones across Australia.
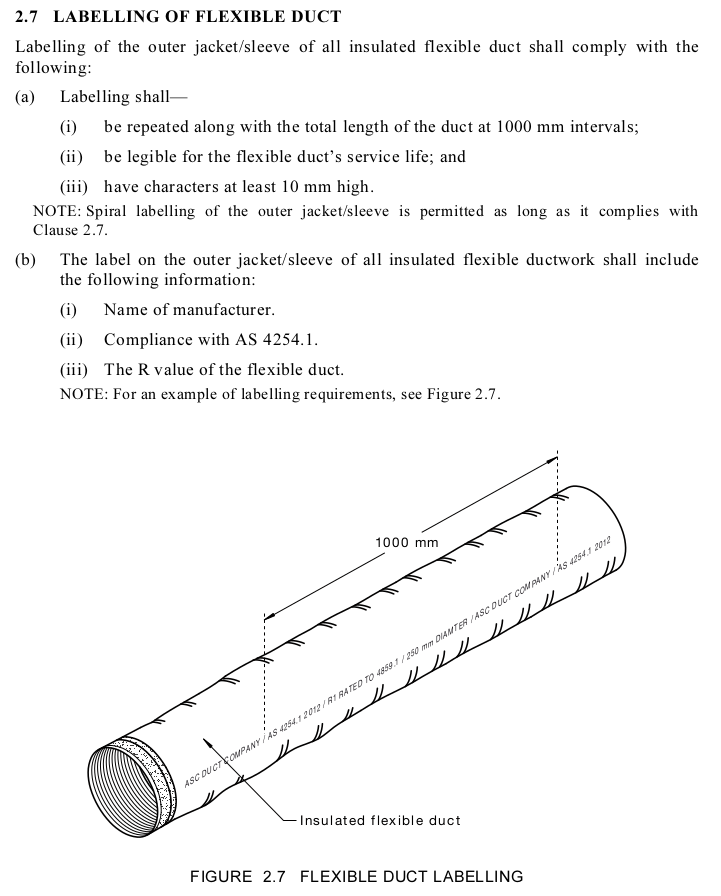
Labelling Requirements for Flexible Ducts
One important requirement. as outlined in AS 4254.1-2012 is the proper labelling of flexible ducts. This ensures traceability, compliance with thermal efficiency standards, and easy identification for future maintenance. According to the standard:
- Labelling must be repeated along the length of the duct every 1000 mm.
- The label must include the following information:
- The name of the manufacturer.
- Compliance with AS 4254.1-2012.
- The R-value of the insulation, which indicates the duct's thermal resistance.
- The labelling must be legible for the entire service life of the duct and use characters at least 10 mm high
Common Air Conditioning Installation Mistakes
Even the best air conditioning systems can perform poorly if they are not installed correctly. Many home owners experience subpar operation due to avoidable installation errors. Here, we’ll outline some of the most common mistakes made during air conditioning installation, how they affect system performance, and what to watch out for as a home owner.
1. Poor Placement of Outdoor Units
The placement of the outdoor unit is essential to the overall performance of the system. A poorly positioned outdoor unit can cause airflow blockages, noise disturbances, increase maintenance and reduced efficiency.
Key issues with improper placement include:
- Blocked airflow: If the unit is placed too close to walls, fences, or other objects, it won’t have enough space for proper ventilation. This leads to poor cooling performance and higher energy consumption.
- Excessive noise: Units placed near bedrooms or living spaces can produce disruptive noise, particularly if vibrations from the compressor aren't dampened. Noise barriers or proper placement away from sensitive areas can mitigate this problem.
- Increased wear and tear: Improper placement can expose the unit to harsh environmental elements such as direct sunlight, dust, and debris, which can lead to faster deterioration.
2. Incorrect Duct Sizing and Sealing
Proper duct sizing and sealing are essential to maintaining airflow and energy efficiency. Poor ductwork is one of the most common causes of inefficient air conditioning systems, leading to uneven temperature distribution and higher energy bills.
Common issues related to ductwork include:
- Incorrectly sized ducts: Ducts that are too small or too large will result in reduced airflow, placing additional strain on the system. According to AS 4254.1-2012, duct sizing must be calculated to suit the specific load requirements of the building.
- Air leaks: Sealing ducts is critical to prevent air from escaping, which can account for significant energy loss. AS 4254.1 outlines proper sealing methods using approved tapes and drawband systems. Even small gaps in the ductwork can cause a dramatic drop in system efficiency.
- Poor insulation: If ducts are not insulated properly, the cooled or heated air can lose its temperature before reaching its destination, making the system work harder. Section 2.6 of AS 4254.1 provides detailed insulation requirements to prevent heat loss or gain through ducts.
Check out this Technical Paper on new construction and the design implications of the envelope line and ceiling space, which discusses the impact of duct sizing on the buidability of the HVAC system.
3. Failure to Insulate Ducts Properly
Proper duct insulation is often overlooked, but it is essential for maintaining temperature control and energy efficiency. Ducts that are not insulated according to AS 4254.1-2012 requirements can allow heat to enter the ducting system during summer or escape in winter, rendering the air conditioning system far less effective.
Why this matters:
- Energy loss: Poorly insulated ducts allow heat transfer between the duct and the surrounding air, causing the system to overcompensate and use more energy.
- Temperature inconsistency: Rooms further away from the air conditioner will receive less effective cooling or heating if the ducts aren’t insulated, resulting in uneven temperatures throughout the house.
4. Improper Air and Vapour Sealing
Another common mistake is improper air and vapour sealing during installation. According to Section 2.2.4 of AS 4254.1, proper sealing with adhesive tapes and mastic is required to prevent leaks. If not done correctly, you can experience:
- Condensation issues: Moisture can form on ducts that are not properly vapour-sealed, leading to water damage or even mould growth in walls and ceilings.
- Decreased system performance: Unsealed ducts allow air to escape, reducing the effectiveness of the entire system. This leads to higher energy consumption and costs.
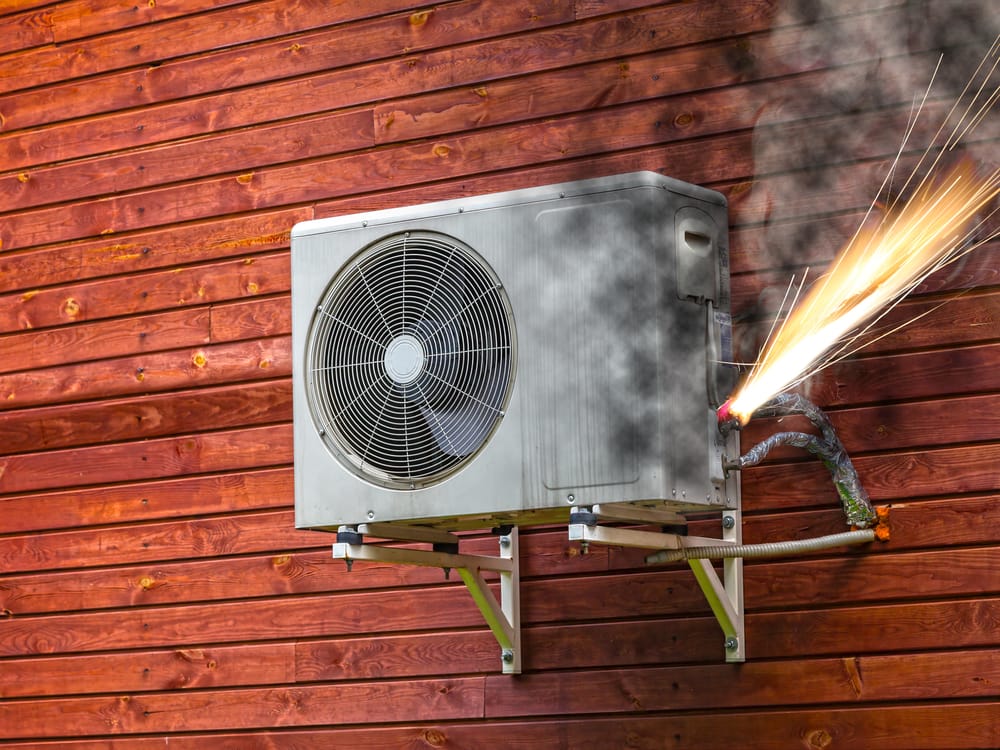
5. Electrical Wiring Mistakes
Air conditioning systems require complex electrical wiring to function safely and efficiently. If the electrical system is not installed according to the manufacturer’s specifications or AS/NZS 3000, it can result in safety hazards or equipment failure.
Common electrical mistakes include:
- Insufficient breaker sizing: If the system’s electrical load is greater than the breaker’s capacity, it can result in frequent tripping or, worse, a fire hazard.
- Improper grounding: The air conditioning system must be properly grounded to avoid electrical hazards. The Daikin Installation Manual emphasises the need for professional electricians to handle wiring for safety and compliance with local codes
Check out the VBA Technical solution below that consolidates the standards and industry best practices into a handy document:
What to Look for at the Rough-In Stage
The rough-in stage is one of the most important phases of air conditioning installation (and on this point, really for all trades). It's always better to spend time checking things and asking questions before access is reduced and compounding repairs are required to make good should alterations need to be made after internal linings area installed.
1. Proper Installation of Ductwork and Piping in Compliance with AS 4254.1-2012
One of the most important elements at the rough-in stage is ensuring that all ductwork and piping are installed in compliance with AS 4254.1-2012. This Australian standard outlines the requirements for ductwork in air-handling systems, focusing on aspects such as sizing, sealing, insulation, and support.
What to check:
- Duct size and layout: Check that the ductwork is properly sized to accommodate the system's load requirements.
- Refrigerant piping installation: The refrigerant lines must be correctly positioned and insulated to avoid temperature loss. Pay attention to the connections between the indoor and outdoor units, as improperly installed refrigerant lines can lead to leaks and cooling inefficiency.
- Compliance with AS 4254.1: This includes ensuring that ductwork is supported correctly, with hangers spaced appropriately as per section 2.5.3 of the standard. Improper support can lead to sagging ducts, air leaks, and pressure loss, all of which reduce the efficiency of the system.
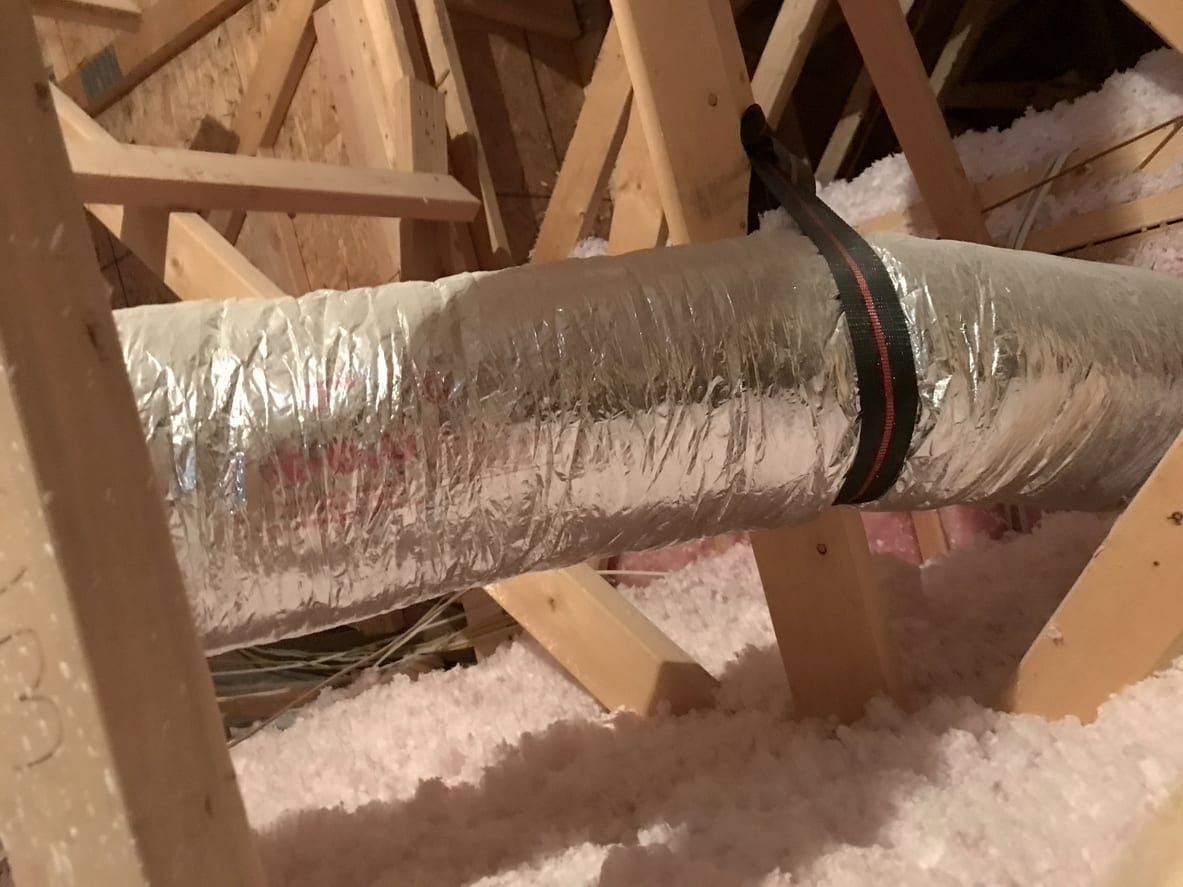
2. Considerations for Flexible Duct Systems: Hangers, Support, and Load Distribution (AS 4254.1)
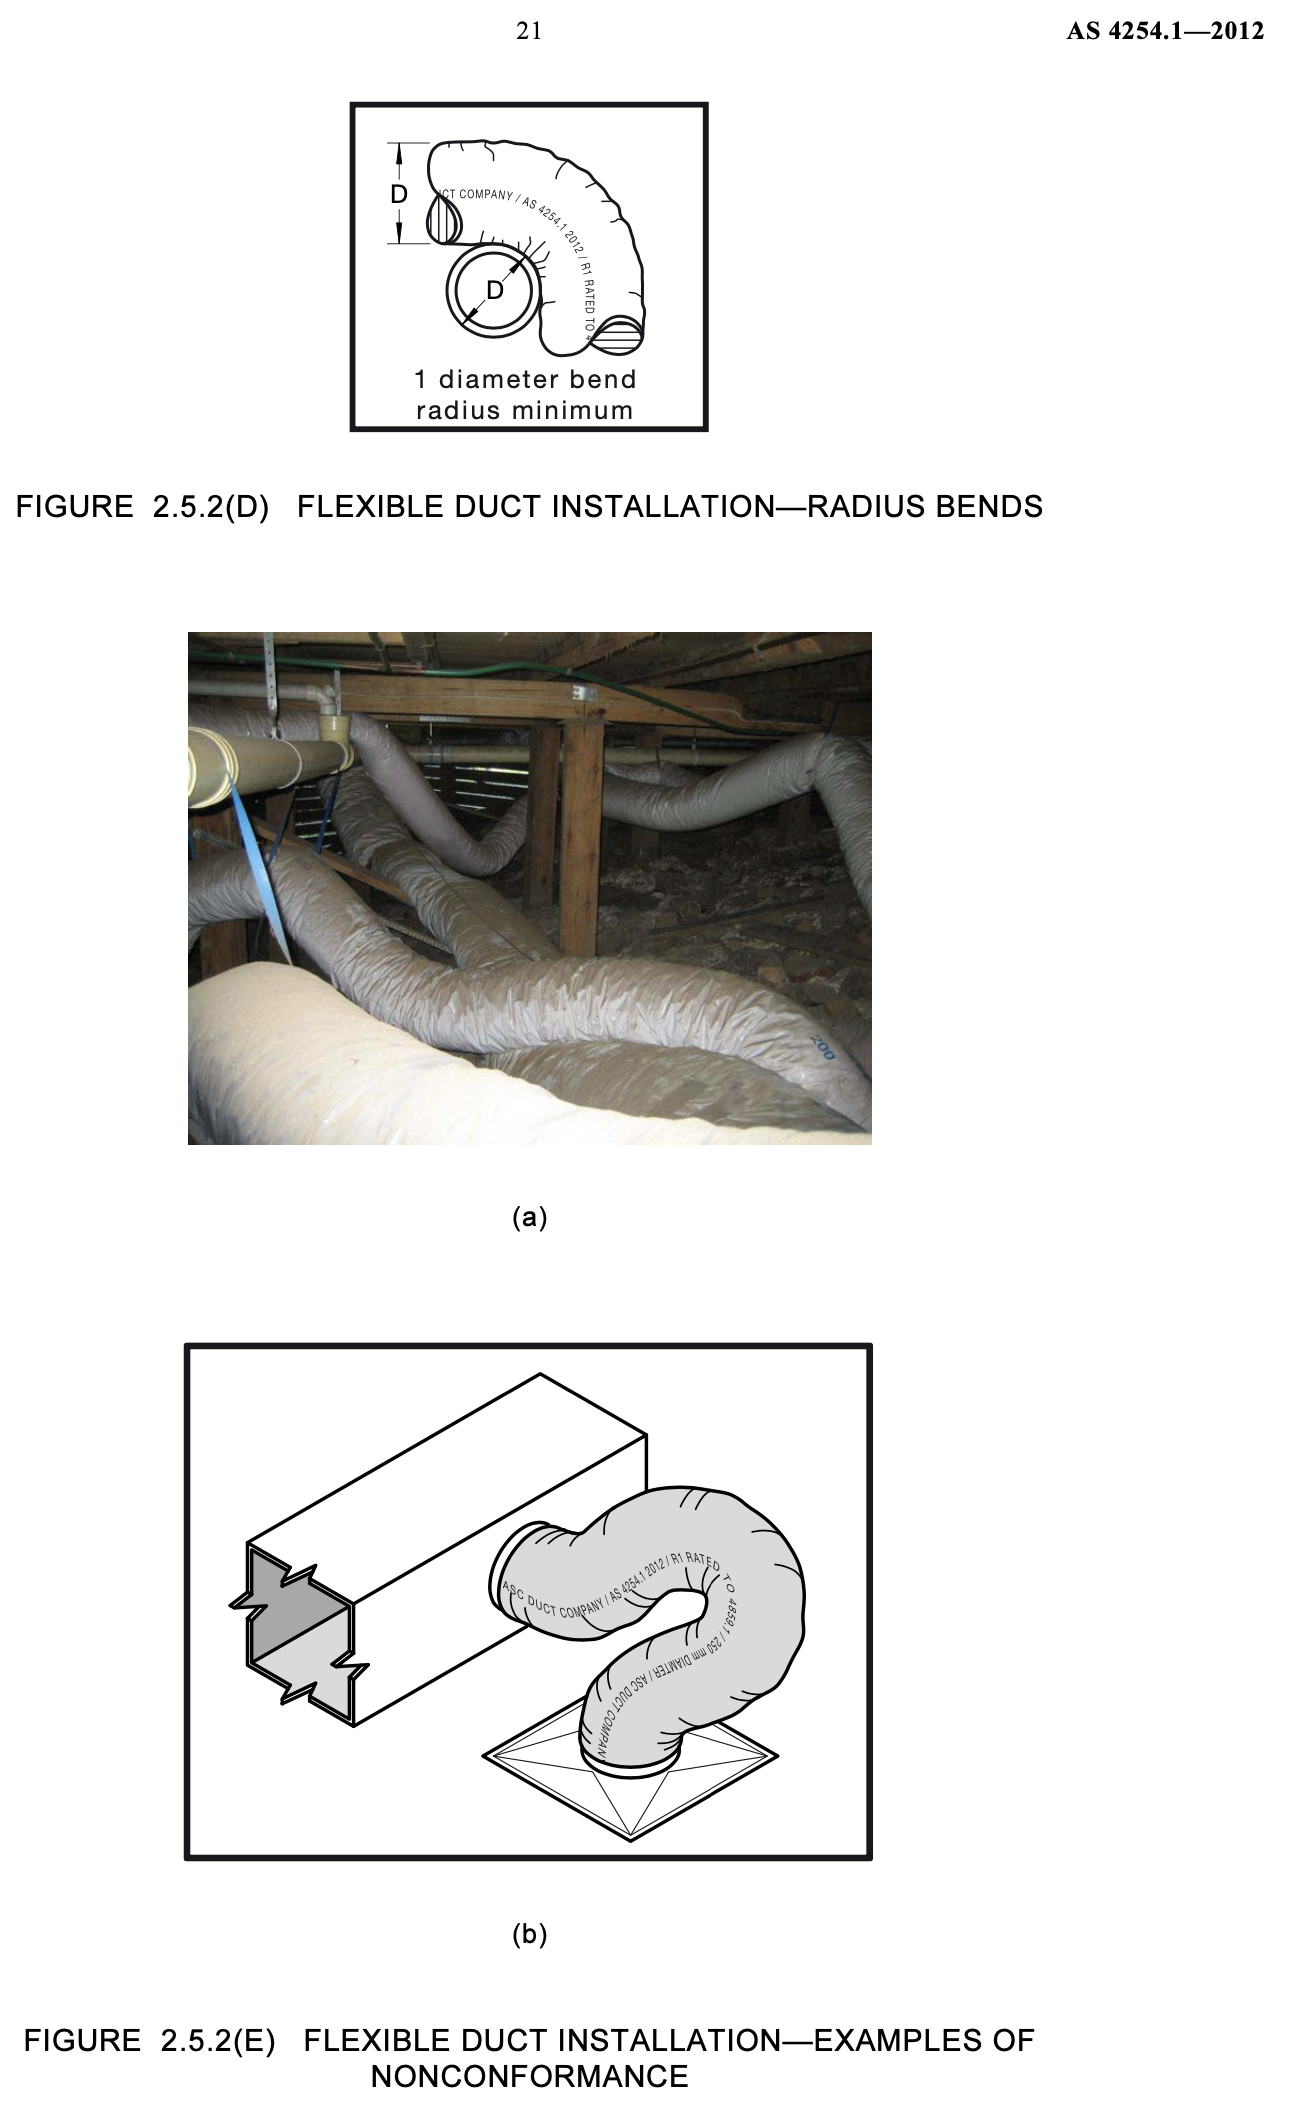
Flexible ducts are particularly prone to sagging or kinking, which can severely restrict airflow.
Key points to ensure:
How well hung is your duct?
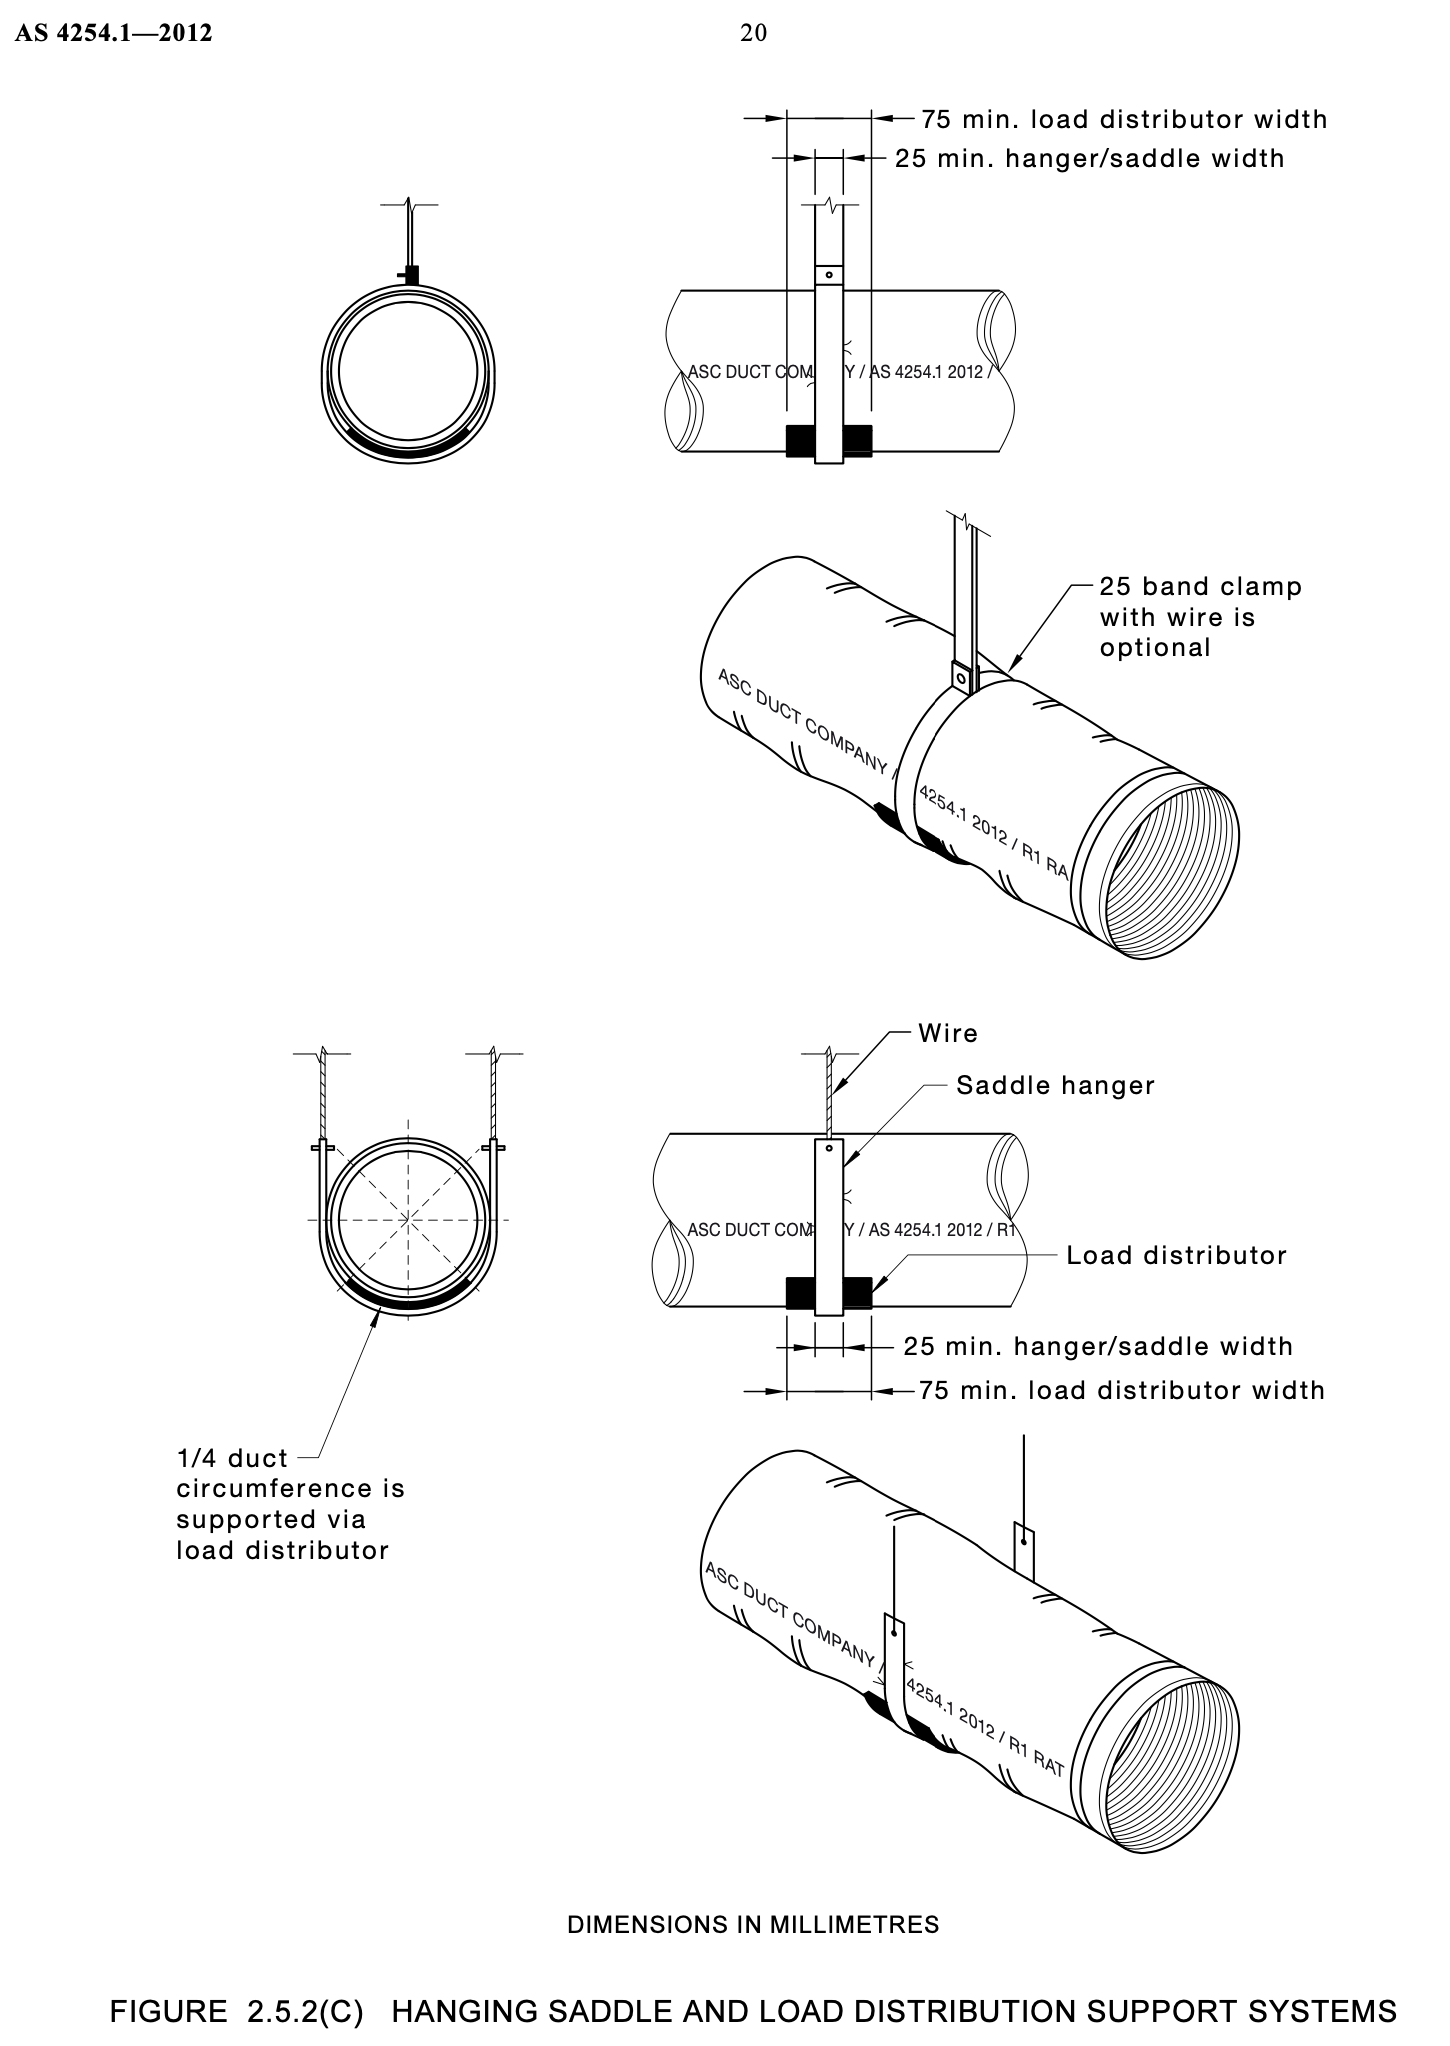
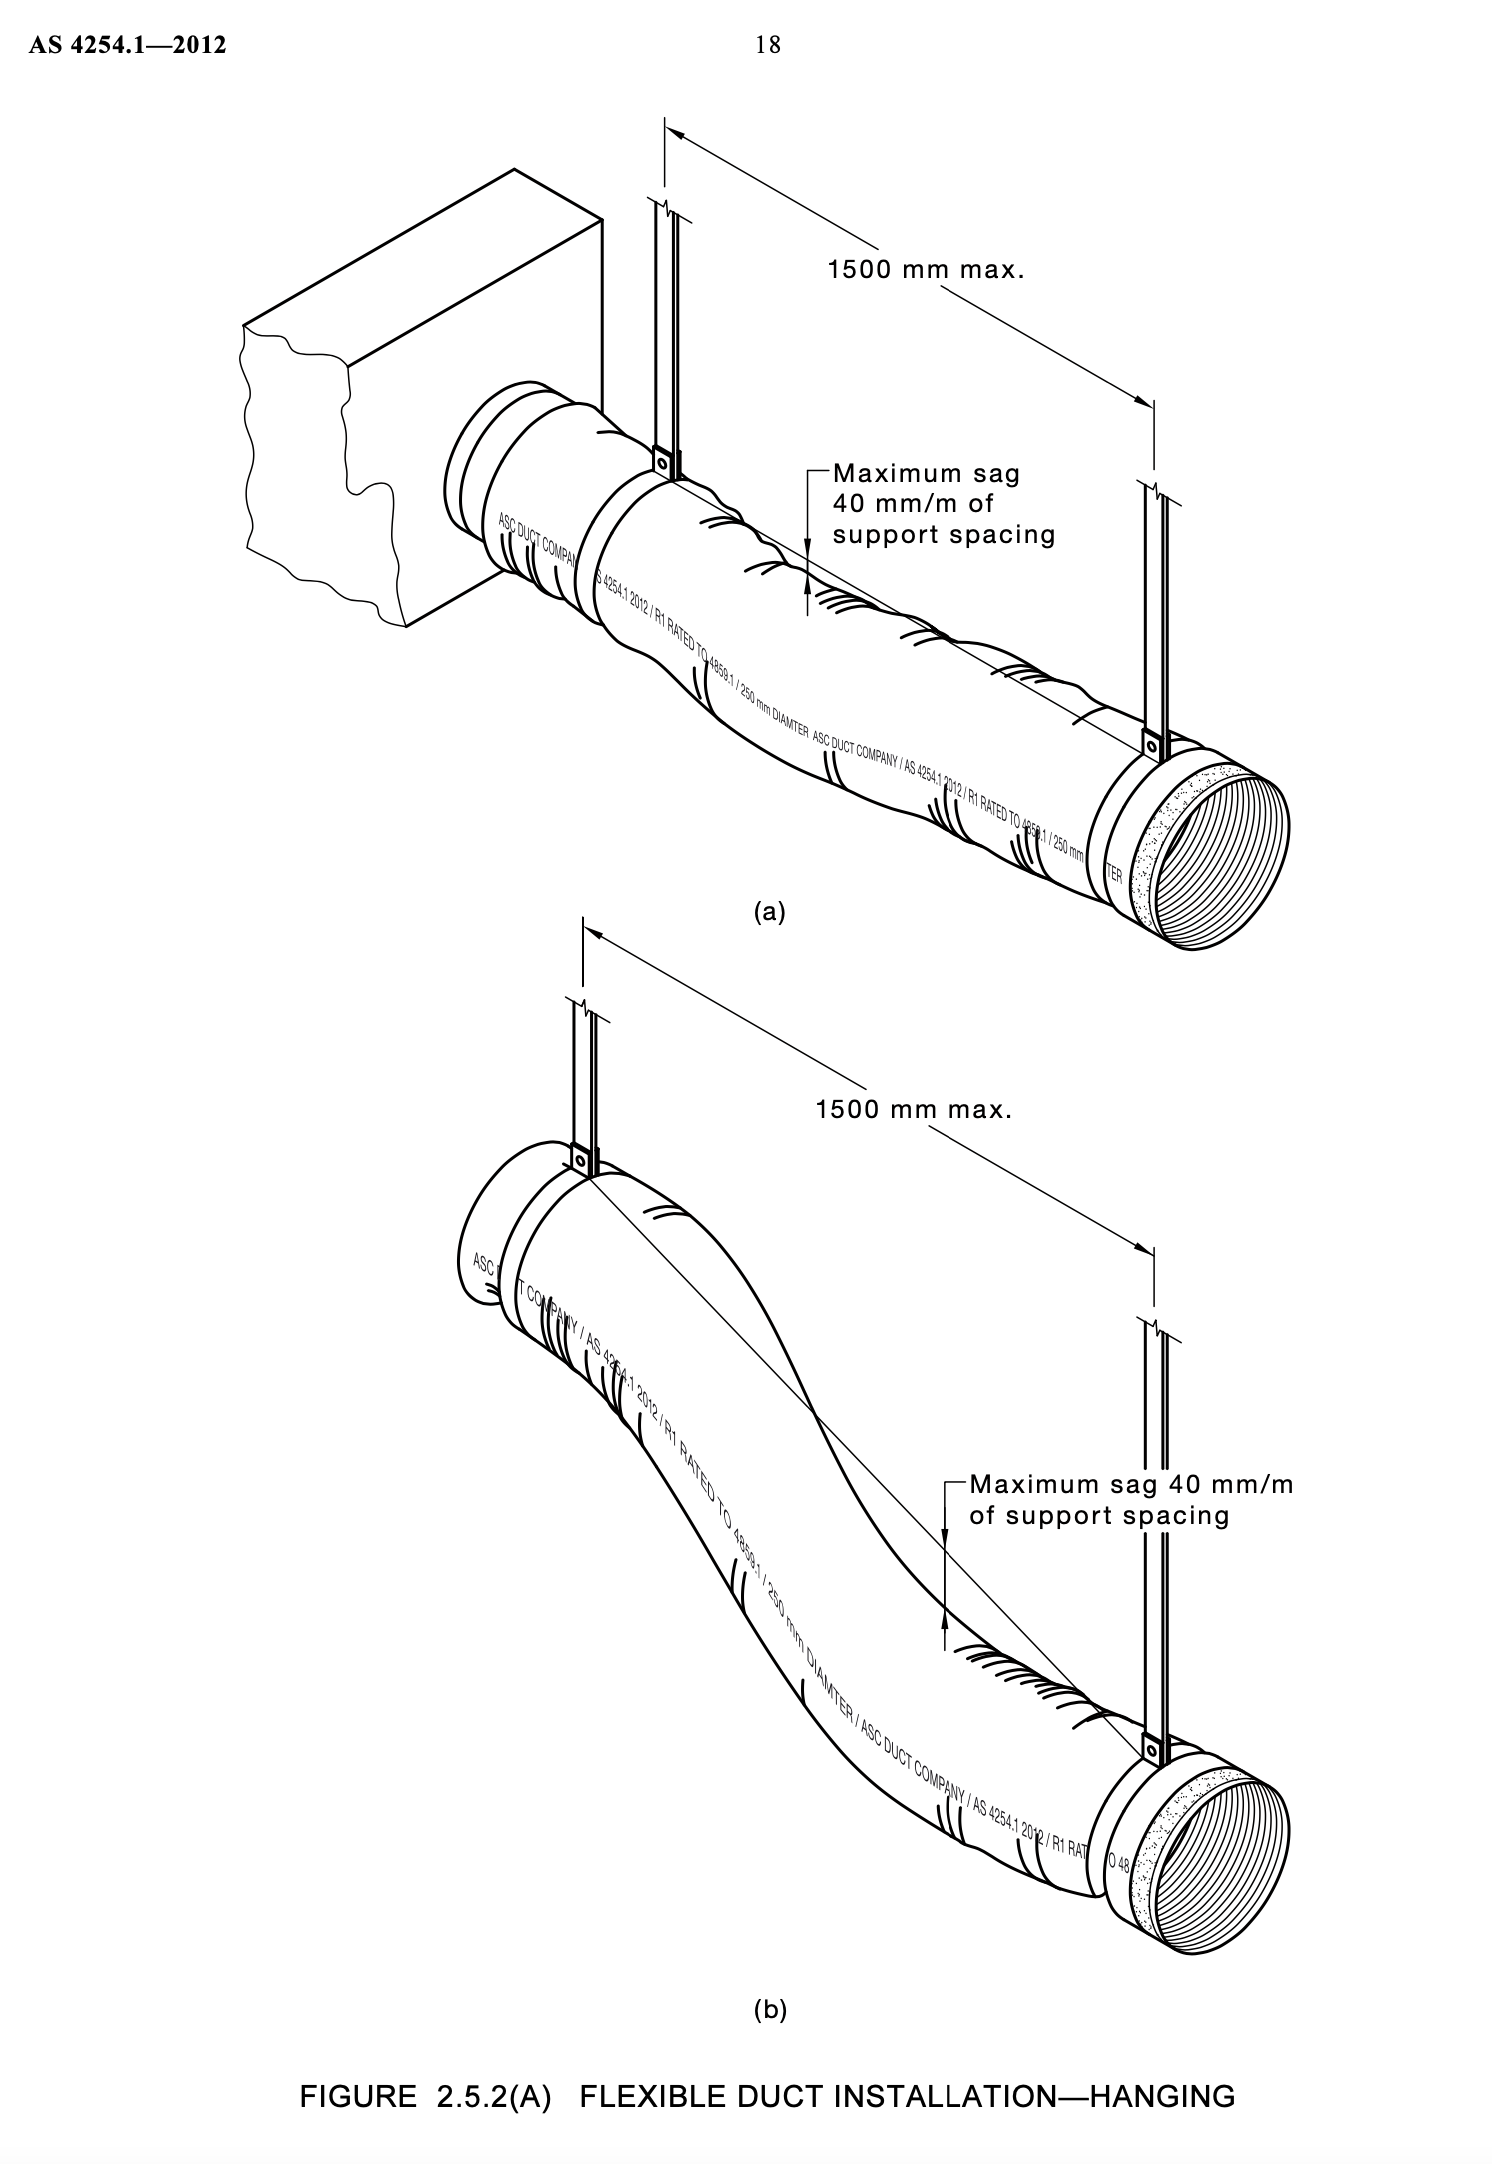
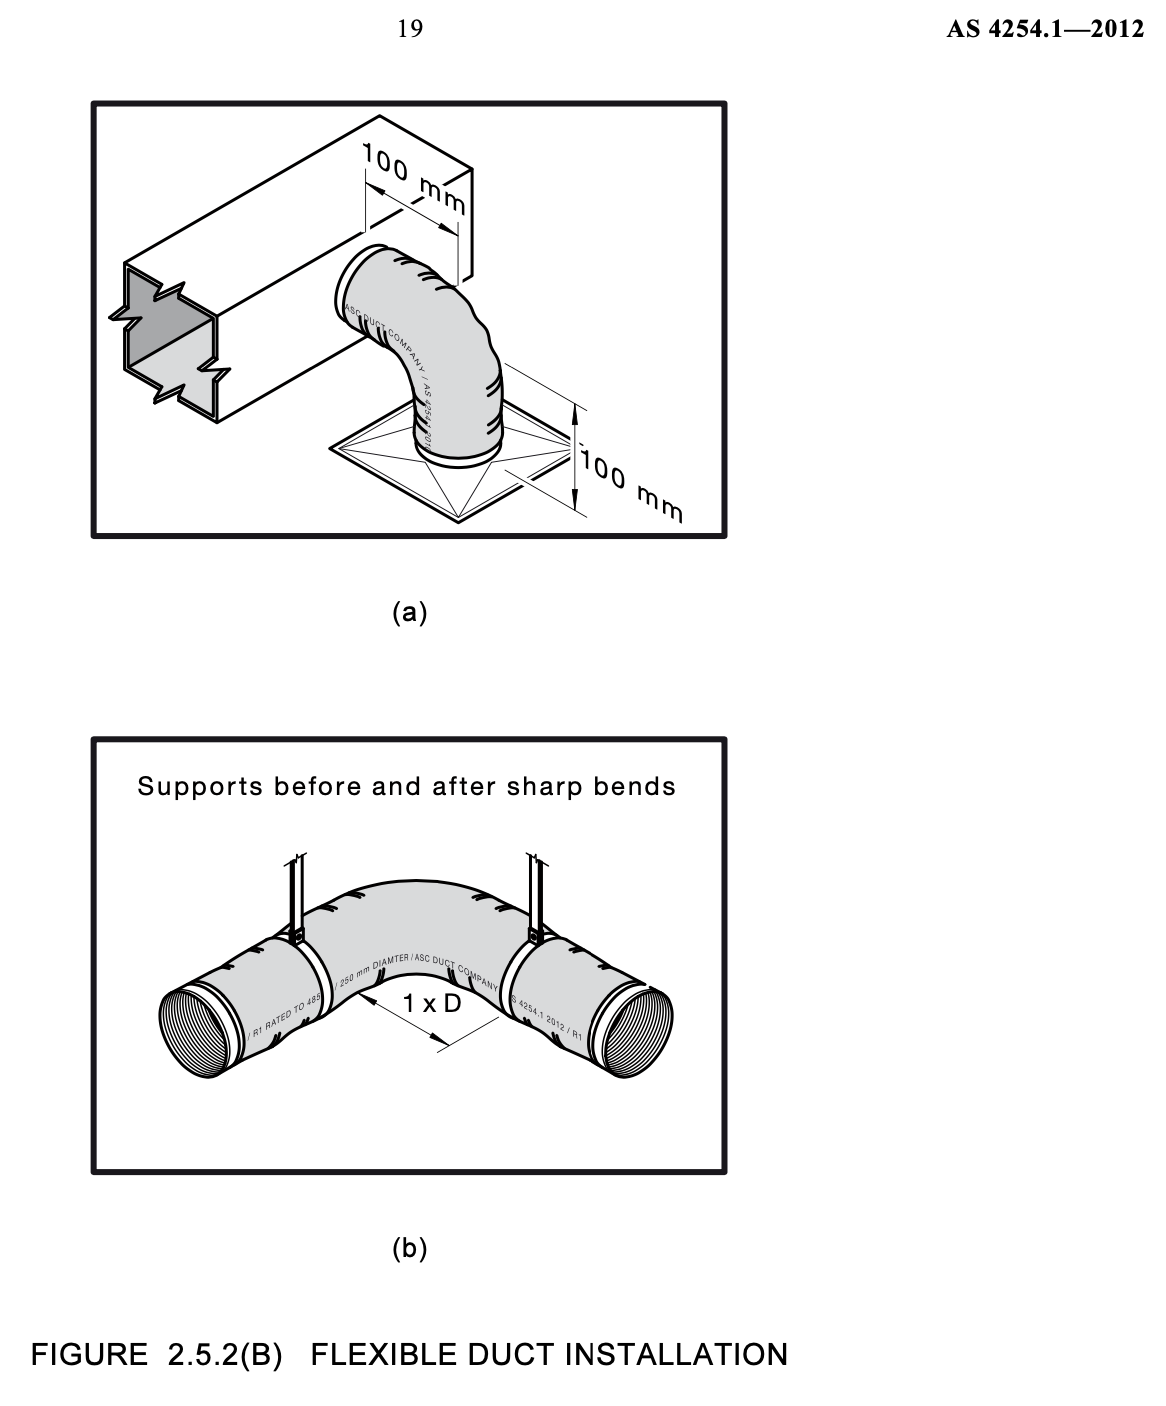
- Hanger supports: The ductwork should be supported at intervals recommended by the standard to prevent sagging. Section 2.5.3 of AS 4254.1 outlines the correct placement of hangers to ensure proper load distribution and to prevent air pressure drops.
- Air terminal devices and branch take-offs connected to flexible duct shall be
supported independently of the flexible duct - The maximum permissible sag between supports shall be 40 mm/m
- According to AS 4254.1-2012, ductwork must be adequately supported to prevent sagging, maintain proper airflow, and ensure the longevity of the system. Simply laying flexible ducts over trusses without hanger supports is not considered adequate support under the standard, even if the trusses are spaced at 600mm centres. The standard specifically requires that flexible duct must be supported at intervals no greater than 1.5 meters, and that the supports must ensure that the duct remains at its full internal diameter, free from kinks or flattening.
- Air terminal devices and branch take-offs connected to flexible duct shall be
- Load distribution: Ducts must be evenly supported to avoid stress points that could lead to air leaks or duct collapse. This is especially important for long duct runs.
3. Inspecting for Correct Duct Placement to Avoid Pressure Loss and Airflow Restrictions
Correct placement of ductwork is required for maintaining even airflow and avoiding pressure losses that can affect system performance. Misaligned or improperly installed ducts can lead to:
- Restricted airflow: Kinks or bends in the ducts can drastically reduce airflow, leading to uneven cooling or heating in different parts of the home.
- Pressure loss: If ducts are too long or not correctly placed, the system will have to work harder to push air through, increasing energy consumption and wear on the equipment.
4. Proper Insulation and Sealing of Ducts Using Adhesive Tapes and Draw band Systems (AS 4254.1-2012)
During the rough-in stage, all ductwork must be insulated and sealed properly to prevent air leaks and maintain temperature control. According to AS 4254.1-2012, ducts should be sealed using approved methods such as adhesive tapes or a draw band system to ensure airtight connections.
Important things to check:
- Sealing with approved tapes: Tapes used for sealing must comply with Section 2.2.4 of AS 4254.1 to ensure long-lasting and effective seals. Leaky ducts can cause up to 20% energy loss.
- Insulation of ducts: Insulation is required for preventing heat gain or loss as air travels through the system. Proper insulation according to the standard ensures that the system doesn’t have to work harder to compensate for lost energy.
5. Ensuring the Outdoor Unit is Placed in an Optimal Location and Compliant with Standards
At the rough-in stage, the location of the outdoor unit must also be finalised. The placement of the outdoor unit affects the system's performance and efficiency. According to the Daikin Installation Manual, the outdoor unit should be placed in a location with adequate ventilation and away from obstructions.
Key considerations:
- Adequate airflow: Ensure that the outdoor unit is placed in an area that allows for sufficient airflow around the unit. Blockages or poor placement can lead to overheating and reduced efficiency.
- Protection from elements: The unit should be placed in a location that is protected from extreme weather conditions and direct sunlight, which can wear down components over time.
- Noise considerations: To avoid disturbing residents and neighbours, consider the noise levels of the unit and position it in a location where noise is less likely to be a problem.
Key Considerations at the Fit-Off Stage
The fit-off stage is when your air conditioning system comes to life. It’s the phase where the infrastructure laid during the rough-in is connected and tested, and final adjustments are made to ensure optimal performance. Any errors during this stage can affect the efficiency, reliability, and longevity of your system. Below are the key aspects to monitor during the fit-off stage to ensure your system functions as expected.
1. Ensuring Air and Vapour Sealing is Done Correctly (Section 2.2.4 of AS 4254.1-2012)
One of the most critical aspects of the fit-off stage is ensuring that all ducts are properly sealed to prevent air and vapour leakage. According to Section 2.2.4 of AS 4254.1, using approved sealing materials like adhesive tapes and mastics is essential for achieving a durable, airtight seal.
Key points to monitor:
- Air sealing: Ensure all duct connections are sealed with approved tapes and clamps to prevent air leakage, which could reduce system efficiency and lead to uneven cooling or heating.
- Vapour sealing: Proper vapour sealing prevents condensation inside the ductwork, which can lead to mould growth, water damage, and reduced system lifespan.
2. Verifying the System’s Calibration and Performance Testing
Once the system is physically connected, it needs to be calibrated to ensure it operates at peak efficiency. This involves adjusting the system’s airflow, refrigerant levels, and thermostat settings.
Important steps include:
- Airflow calibration: The airflow needs to be adjusted to ensure each room receives the appropriate amount of cooled or heated air. Inadequate airflow can result in uneven temperatures, reduced comfort, and increased energy consumption.
- Refrigerant levels: The refrigerant lines must be charged to the correct pressure levels as per the manufacturer’s guidelines. Improper refrigerant levels can lead to inefficient cooling or heating, compressor damage, and higher energy usage.
- System performance testing: After calibration, the system should be tested under full operational conditions. This includes running the system for a designated period to ensure it meets the required performance standards.
You really know your life is rocking when you've read this (the Daikin Installation Manual).
It does have some quite important information, especially around the placement of outdoor units (distances) and locations. Its actually worth a read. Your welcome 😸
3. Testing for Duct Leakage and Verifying Air-Tightness (AS 4254.1-2012, Section 2.2.7)
Testing for duct leakage is required at the fit-off stage to ensure that all ducts are properly sealed. According to Section 2.2.7 of AS 4254.1-2012, ductwork should be pressure-tested to verify that it is airtight. This prevents energy loss, keeps operating costs down, and ensures consistent temperatures throughout the home.
Key steps:
- Pressure testing: The installer should conduct a pressure test to check for any leaks in the duct system. This ensures that no air is escaping, and that the system is delivering maximum efficiency.
- Visual inspection: After pressure testing, a visual inspection should be performed to check for any gaps, tears, or incomplete seals that might have been missed during the rough-in stage.
4. Drainage System Installation
An often-overlooked aspect of air conditioning installation is the drainage system. Air conditioning systems produce condensate, which must be properly drained to prevent water damage. A well-installed drainage system will ensure that condensation doesn’t cause issues like water leaks, mould growth, or damage to your home’s foundation.
Key considerations:
- Proper drainage slope: Ensure that the drainage pipes are installed with the correct slope to allow water to flow freely away from the system.
- Condensate pump: In cases where gravity drainage isn’t possible, a condensate pump may be required to move water away from the system. Ensure that the pump is functioning properly and tested during the fit-off stage.
- Drainage outlets: Verify that the drainage outlets are positioned in a way that prevents water from pooling near the building or entering the living areas.
- It is important that the condensate line discharges into the storm water system with at least 50mm downturn into the downpipe. Condensate water contains a lot of copper saturated water which stains metal roofing. Read more on this point in the presentation below:
5. Electrical and Safety Testing
Before the system can be considered fully operational, the electrical wiring must be tested for safety and compliance with Australian standards (AS/NZS 3000). This ensures the system runs smoothly without overloading circuits or posing a fire hazard.
What to check:
- Breaker capacity: Ensure that the system is connected to a circuit breaker of appropriate capacity. Using the wrong breaker size can lead to frequent tripping or, in extreme cases, a fire.
- Grounding: Proper grounding is critical for system safety. The system must be grounded correctly to prevent electrical hazards.
- Safety tests: All electrical connections should be inspected, and tests such as earth continuity and insulation resistance should be performed to ensure the system is safe to operate.
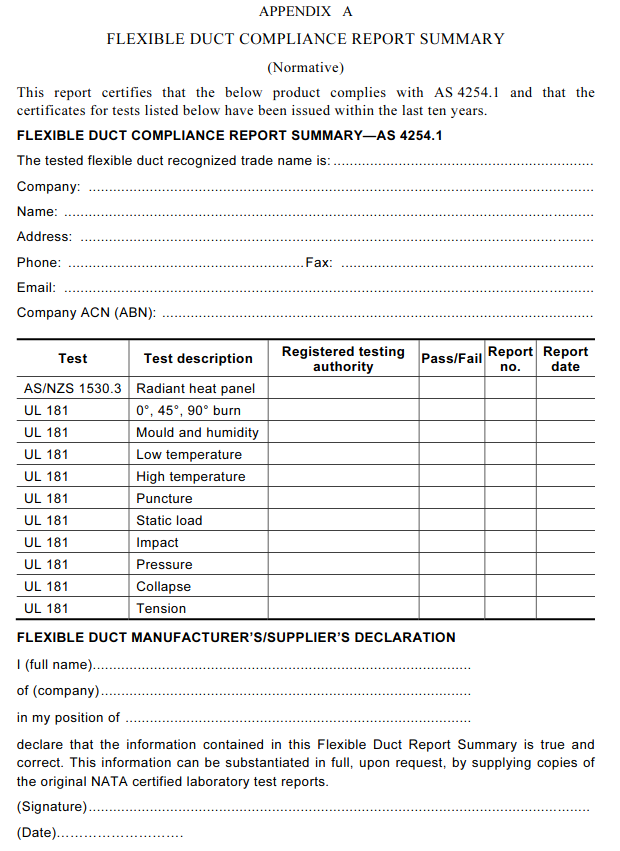
6. Receiving a flexible duct compliance report summary
Have you ever seen or heard of a flexible duct compliance report summary? Yeah, my people have never given me one of these!
This report, completed by the installer, certifies that the ductwork complies with AS 4254.1, including the testing standards specified in the regulation.
With the rise of substandard (imported) materials in the market, obtaining this report ensures that the materials used in your home meet Australian Standards—ultimately satisfying your insurer’s requirements and reducing the likelihood of disputes in the event of a claim. Here is what you are looking for:
Quality Management and Control: Your Air Conditioning Installation Checklist
Using a quality control checklist helps to ensure that the system functions as efficiently as possible. Below is a checklist that home owners and installers can use to manage and control the quality of the installation process.
1. Ductwork Quality and Compliance with AS 4254.1-2012
Ensuring that ductwork is compliant with AS 4254.1-2012 is essential to the performance and efficiency of your air conditioning system.
What to check:
- Duct sizing: Verify that the ducts have been sized correctly based on the system’s cooling or heating load.
- Sealing: Ensure all duct joints and connections are properly sealed using approved methods such as adhesive tapes and draw band systems, as outlined in Section 2.2.4 of AS 4254.1.
- Insulation: Check that all ductwork is properly insulated to prevent temperature loss as air moves through the system. The insulation should meet the R-value requirements outlined in the standard.
- Support and hangers: Confirm that the ductwork is supported by hangers and brackets at appropriate intervals (as per Section 2.5.3 of AS 4254.1) to avoid sagging and air leakage.
2. Refrigerant Line Installation and Pressure Testing
Refrigerant lines are the lifeblood of your air conditioning system, transporting refrigerant between the indoor and outdoor units.
Key points:
- Refrigerant line connections: Inspect all connections for leaks and ensure they are tightened to manufacturer specifications.
- Pressure testing: Conduct a pressure test to confirm that the system is sealed and there are no leaks in the refrigerant lines. This is required for both system efficiency and longevity.
3. Airflow and System Calibration
Airflow calibration is an often-overlooked part of the installation process, but it is needed for ensuring even distribution of cooled or heated air throughout the home. mould
Checklist for airflow calibration:
- Even airflow distribution: Measure the airflow at each vent to ensure that each room receives the appropriate amount of air. Adjust vents and dampers as needed to balance the system.
- Thermostat calibration: Ensure the thermostat is properly calibrated to reflect the actual room temperature and communicate effectively with the system.
4. Final Sealing and Vapour Control
Proper sealing of ducts and refrigerant lines is critical for preventing energy loss and ensuring that your system operates efficiently. Vapour control also prevents condensation build up, which can lead to water damage and mould growth.
Steps to verify:
- Air and vapour sealing: All ductwork connections and joints should be sealed according to AS 4254.1 standards, using approved sealing materials like tapes and mastics.
- Condensation management: Ensure that the system’s drainage setup is adequate to handle any condensate produced during operation, and that vapour seals are in place to prevent moisture build up in the ducts.
5. Electrical and Safety Compliance
Ensuring that the electrical components of your air conditioning system meet safety and regulatory standards is critical for both the system’s functionality and the safety of your home.
What to check:
- Breaker size: Verify that the circuit breaker is appropriately sized to handle the system’s electrical load. An undersized breaker can lead to frequent tripping or even pose a fire hazard.
- Grounding: Ensure that the system is properly grounded in accordance with AS/NZS 3000 to prevent electrical hazards.
- Final safety checks: Before the system is powered on, confirm that all wiring, connections, and safety mechanisms (such as circuit breakers and fuses) are in place and functioning correctly.
6. Third-Party Inspection and Sign-Off
For peace of mind, it’s a good idea to have a third-party inspector or licensed professional review the installation to ensure everything has been done to code and meets Australian standards.
Why it matters:
- Compliance verification: A third-party inspector can verify that the installation complies with AS 4254.1-2012 and other relevant standards.
- Final sign-off: Having a professional sign off on the installation gives you added confidence that the system will function efficiently and last longer without major issues.
Dealing with Defects: What to Do When Things Go Wrong
Even with the best planning and installation practices, defects can occasionally occur in an air conditioning system. Whether the issue arises immediately after installation or develops over time, knowing how to handle defects efficiently is key to avoiding long-term damage, increased costs, and discomfort in your home.
Here’s a guide on what to do when things go wrong, from identifying common problems to understanding your rights as a home owner.
1. Steps to Address Defects
When you encounter a defect, it’s important to address it quickly to prevent further issues. Here’s a step-by-step guide on how to handle common air conditioning defects:
- Document the issue: Take notes and, if possible, photos of the defect (e.g., water leaks, unusual noise, temperature inconsistencies). This documentation will help when communicating with the installer or manufacturer.
- Contact your installer: Notify the installer as soon as you notice a problem. Most air conditioning systems come with warranties that cover defects in workmanship for a specified period. A professional should inspect the system to determine the root cause of the issue.
- Schedule an inspection: If the issue isn’t immediately resolved, request a professional inspection of the entire system, including ductwork, refrigerant lines, and electrical connections. This is particularly important for defects related to airflow, condensation, or noise.
- Demand a compliance check: Ensure the installer checks for compliance with AS 4254.1-2012 and the Manufacturers Installation Manual to verify that the defect isn’t due to non-compliant installation practices. Non-compliance could entitle you to repairs or compensation.
2. Understanding Your Rights Under Australian Consumer Law
In Australia, home owners have certain rights when it comes to defective products and services. If you’ve had a substandard air conditioning installation, you’re entitled to remedies under Australian consumer law.
Key rights include:
- Repairs, replacement, or refund: If the defect is substantial or cannot be easily fixed, you may be entitled to a repair, replacement, or refund of the air conditioning system. This applies to both the unit itself and the installation services.
- Warranty enforcement: Most air conditioning units and installations come with a warranty period. Ensure that the installer honours the terms of the warranty by providing free repairs for defects that arise within this period.
- Lodging a formal complaint: If your installer refuses to address the defect, you can lodge a formal complaint with consumer protection agencies or seek legal advice to recover the costs of repairs or replacement.
3. Ensuring Warranties Cover Both Unit and Installation Issues
When it comes to warranties, it's important to distinguish between the unit warranty and the workmanship warranty for the installation itself. Here's what to watch out for:
- Unit warranty: Most manufacturers, like Daikin, offer a warranty for the unit covering any defects in the product.
Be sure to register your unit after installation to activate this warranty.
- Installation warranty: Your installer should provide a separate warranty for the workmanship involved in installing the system. This warranty ensures that any issues arising from incorrect installation are fixed at no extra cost to you.
- Extended warranties: Some companies offer extended warranties for both the unit and installation. Consider opting for this if your home is in a high-wear environment, such as coastal areas prone to salt damage.
4. Negotiating Payment Withholding or Adjustments for Non-Compliant Installations
If your inspection reveals any defects or areas of non-compliance, you have the right to withhold payment or negotiate adjustments with the installer. Here’s how to handle this situation:
- Document the issues: Take notes and photos of any problems you find during the inspection. This documentation will be useful when discussing repairs or payment adjustments with the installer.
- Request corrections: Notify the installer of any defects and request that they fix the issues before you make the final payment. Be clear about what needs to be corrected and reference AS 4254.1-2012 or the Manufacturers Installation Manual if necessary.
- Withhold payment: If the installer refuses to address the issues, you may need to withhold part of the payment until the defects are fixed. In some cases, you can negotiate a reduced payment if the installer agrees to correct the defects later.
- If you withhold payment on an invoice that has been presented to you (a payment claim), and you are located in Queensland, you MUST ENSURE you abide by the times and notices needing to be sent to in accordance with the Building Construction Industry Fairness of Payment Act 2017
Here is a really handy overview of BIF Act and what to do and when:
and below is what a payment schedule looks like:
And, finally, if you happen to be the one sending invoices, like we do, and you are on the other side of this process, this is what an S99 looks like which is part of the escalation process to arbitration and default judgements being made:
- Seek third-party verification: If disputes arise, you may want to hire a third-party inspector to verify the issues and provide an unbiased assessment. This can be helpful in resolving disagreements and ensuring that the installation meets all required standards.
Ensuring Long-Term Efficiency and Maintenance
A well-installed air conditioning system will only perform optimally if it is properly maintained over time. Regular maintenance is required to ensure that the system remains energy-efficient, functions reliably, and lasts as long as possible.
Below are the key considerations for maintaining your air conditioning system and ensuring long-term efficiency.
1. Regular Maintenance Tips
Maintaining your air conditioning system involves several routine tasks that home owners should stay on top of, either by doing it themselves or hiring a professional.
Key maintenance tasks include:
- Cleaning filters: Air filters should be cleaned or replaced regularly to ensure optimal airflow. Dirty filters restrict airflow, reducing the system’s efficiency and increasing energy consumption. Depending on the system, filters should be checked every month or two during heavy usage periods.
- Inspecting ductwork for leaks: Over time, duct seals can degrade, allowing conditioned air to escape and reducing the system’s efficiency. Inspect ducts periodically for leaks and have them resealed if necessary. This is especially important if your ducts are located in unconditioned spaces like sub floors or crawl spaces.
- Checking refrigerant levels: Low refrigerant levels can indicate a leak and will reduce the system’s ability to cool or heat effectively. If you notice a decline in performance, have a professional check the refrigerant charge.
- Cleaning the outdoor unit: The outdoor condenser unit can accumulate dirt, leaves, and debris, which can restrict airflow and reduce efficiency. Make sure to clean the unit regularly and ensure that nothing obstructs its airflow. (this is a big issue with many home owners - piling things in front of the outdoor unit).
- Checking the condensate drain: Ensure that the drain line is clear of blockages. A clogged drain can cause water to back up into the system, leading to water damage or mould growth. Condensate pumps, if installed, should also be inspected regularly to ensure proper functioning.
2. How Often Should Professional Maintenance Be Performed?
While home owners can perform some basic maintenance tasks, more in-depth inspections should be done by a professional.
Professional maintenance should include:
- Annual or biannual inspections: A licensed technician should inspect your system at least once a year, ideally before the cooling or heating season begins. In regions with extreme temperatures, biannual checkups are recommended.
- Comprehensive checks: During a maintenance visit, the technician will inspect refrigerant levels, calibrate the thermostat, check for leaks, clean coils, and perform safety checks on electrical components.
- Ductwork inspection: A professional can perform a more thorough inspection of the ductwork to identify leaks or obstructions that may not be visible to the home owner.
3. Preventative Measures to Extend System Life
There are several preventative measures home owners can take to help extend the lifespan of their air conditioning system:
- Install a programmable thermostat: A programmable or smart thermostat allows you to optimise the system’s performance by setting temperature schedules that match your daily routine. This reduces unnecessary wear and tear by avoiding overuse during periods when cooling or heating isn’t needed.
- Ensure proper insulation: Well-insulated homes reduce the load on air conditioning systems by maintaining indoor temperatures for longer periods. If your home is not properly insulated, the system will have to work harder to maintain desired temperatures, which can lead to reduced efficiency and premature failure.
- Seal windows and doors: Ensuring that windows and doors are properly sealed reduces air leakage, making the system’s job easier and more efficient.
- Use ceiling fans: Ceiling fans can help distribute cool or warm air more evenly throughout the home, reducing the system’s workload and prolonging its life.
Conclusion
Installing an air conditioning system for your home is a significant commitment, but ensuring that it’s installed and maintained correctly is key to making the most of your investment.
A poorly installed system can lead to numerous issues, from inefficiency and high energy bills to frequent breakdowns and costly repairs.
By being proactive at every stage—from the rough-in to the fit-off, through regular maintenance—you can prevent common issues such as poor airflow, refrigerant leaks, and noise disturbances.
Conducting pre-payment inspections (ITPs), using checklists (quality control), and verifying compliance with industry standards can save you from the headaches and expenses of dealing with defects after installation.
Remember that your air conditioning system’s longevity and performance depend on more than just the quality of the unit. Proper installation, regular inspections, and adherence to maintenance schedules ensure that your system runs smoothly for years to come.
Further Reading
 Anthony Painter
 Anthony Painter
 Anthony Painter
 Anthony Painter
 Anthony Painter

FAQ Section
1. Why does ductwork need to be supported at specific intervals?
Ductwork must be supported at intervals of no greater than 1.5 meters as per AS 4254.1 to prevent sagging and maintain airflow. Proper support ensures that the duct remains at its full diameter, avoiding any kinks or flattening that could reduce system efficiency and increase energy costs.
2. Is it acceptable to lay flexible ductwork over trusses without additional hanger supports?
Not technically (per the standard). While laying ductwork over trusses spaced at 600mm centres may seem to offer sufficient support, it does not meet the requirements of AS 4254.1. The standard mandates that hanger supports be installed to ensure proper airflow and avoid sagging. Laying ductwork over trusses alone, even at 600mm centres, is considered under the standard to be insufficient support (but this doesn't make sense practically).
3. How many turns of duct tape are required to properly seal flexible ductwork?
AS 4254.1 specifies that duct tape should be applied with a minimum of three overlapping, tensioned, and crease-free wraps. Each wrap should overlap the previous layer by 40% to 60% of the tape’s width to ensure a proper seal.
4. Why is duct labelling important?
Labelling ensures that ducts are easily identifiable and that they comply with the standards outlined in AS 4254.1. Proper labelling, which must be repeated every 1000mm along the duct, helps ensure that the ducts meet insulation and performance specifications. Labels include important information such as the manufacturer’s name, compliance with AS 4254.1, and the insulation’s R-value.
5. Is it necessary to peel back insulation before joining ducts to collars or terminals?
Yes. AS 4254.1 requires that the insulation and outer jacket be peeled back to expose at least 100mm of the inner core before attaching ducts to collars, terminals, or joiners. This ensures a proper seal and secure attachment, preventing air leaks and maintaining system efficiency.
6. What should I check during the pre-payment inspection of my air conditioning installation?
During the pre-payment inspection, check the ductwork for proper sealing, insulation, and support according to AS 4254.1. Ensure that refrigerant lines are free of leaks, airflow is properly balanced, and the system performs efficiently without excessive noise. Additionally, confirm that electrical connections comply with AS/NZS 3000.
7. How can I tell if my air conditioning system is installed to Australian standards?
To confirm compliance, ensure that the installation adheres to AS 4254.1-2012 for ductwork and AS/NZS 3000 for electrical connections. You can also request an inspection by a third-party professional to verify that all aspects of the installation meet required standards.
8. What are the risks of improperly sized ducts?
Improperly sized ducts can restrict airflow, causing the system to work harder and increasing energy consumption. This may result in uneven cooling or heating, reduced comfort, and higher utility bills. AS 4254.1 provides guidelines on duct sizing to ensure optimal system performance.
9. Why is refrigerant level important in air conditioning systems?
Incorrect refrigerant levels can significantly affect the performance of your air conditioning system. Too little refrigerant will reduce cooling efficiency, while too much can damage the compressor. Ensuring the correct refrigerant charge according to manufacturer guidelines is crucial for optimal operation.
10. What should I do if my air conditioning installation does not meet standards?
If your installation does not comply with AS 4254.1 or other relevant standards, contact your installer and request corrective action. If the installer refuses to address the issues, you can escalate the situation by lodging a complaint with consumer protection agencies or an industry body or by seeking professional legal advice (last resort always!).


